This book is aimed at artists who already know the essentials of modeling and are considering modeling specialization. A big part of specialization involves seeking ways to streamline your workflow. Possibly you're a diploma student and want to level up your 3ds Max skills after a short course, or possibly you're self taught and want to measure the skills you've obtained. If you are starting from scratch, however, this chapter should help you get up to speed. It covers the essential starting points for those making their first launch into 3ds Max.
These are the areas covered in the chapter's topics:
Quick start: Jump into making models
Getting to know the User Interface
Default and custom UI schemes
Switching UI presets
Making changes to hotkeys
Customizing the Quad menu
Making changes to the view layout
Deciding on the best view navigation
Navigation with the ViewCube
Navigation with the Steering Wheel
Displaying your model for modeling
Setting scene units
Searching for content in the scene
Creating your own selection sets with Named Selections
Common changes to 3ds Max default preferences
Determining the hardware shading settings to use

Tip
In this book, we indicate menu, property, and tool keywords in bold. Keywords in the book can be explored via the Index of the 3ds Max menu Help | Autodesk 3ds Max Help
online. Offline documentation can be downloaded via an installer from the usa.autodesk.com under Home
|
Support
|
Support and Documentation
|
Autodesk 3ds Max
|
Documentation and Help | 3ds Max 2013 Documentation section under 3ds Max / 3ds Max Design 2013 Help Installer, which you should then set active in 3ds Max via the menu Customize | Preferences
| Help
| Local Computer/Network, or you can simply Download it via a button there.
This quick start guide is a set of steps to go from a blank viewport to having a simple model you can edit at the Sub-Object level (meaning you can access the component parts it is made of and change the object directly), and access the Editable Poly tools.
These steps establish a geometric object you can extend upon polygon by polygon:
In the menu bar at the top of the screen, go to the Create menu and choose Standard Primitives | Box.
Notice that the Create tab
 in the Command Panel on the right of the screen exposes the parameters for creating a new Box under Geometry | Standard
Primitives.
in the Command Panel on the right of the screen exposes the parameters for creating a new Box under Geometry | Standard
Primitives.In the Create tab parameters, you can also specify to set the Length, Width, and Height values, and also Segments to divide the box up in more detail. You can set these prior to creation, but it is easier to adjust them afterward.
Click in the view labeled Perspective. It gets an orange border to show it is active. Now click-and-drag in the Perspective view across the grid (G is the shortcut for toggling the grid visibility in any view). A planar shape will emerge, then when you drag up, you'll define its height as a box. We've created a box by specifying its length, height and depth. You can also, in the Creation Method section, click the radio button Cube. This will make a newly added box have sides of the same dimensions.
Having placed an arbitrary box in the scene via the Create tab in the Command Panel, we want to adjust or modify the parameters in the next tab
 . There, set the Length Segs, Width Segs, and Height Segs to 3 each for the existing box. The settings will be kept for any future boxes made, until you restart 3ds Max.
Press F4. This will display Edged Faces on top of the shaded viewport render of the box. While the box is selected, it will have a white, highlighted wireframe.
If you create a box you don't like, click on it to select it and delete it by hitting the Delete key, or use the Edit menu and choose Delete.
To continue editing, right-click on the object to expose the Quad menu and go to Convert To: | Convert to Editable Poly. Editable Poly is a good type for modeling.
Don't choose Editable Mesh, which is a
TriMeshobject format type mostly maintained for legacy and compatibility reasons (and sometimes to speed up display of objects). There are more editing tools available for an Editable Poly than there are for Editable Mesh, and they work faster. Editable Poly is a Winged Edge polygon data structure. For the technically inclined, there is an exhaustively detailed discussion of what this entails on the CGSociety forums (http://forums.cgsociety.org/showthread.php?t=146797), but the main thing is the tools we'll be using for this book's lessons are exclusively for Editable Poly models.Note that when you convert the primitive to Editable Poly, sometimes the quad menu extends available commands to the left side or right side, depending on where it is activated on the screen. This ensures a fit to the view. An example is shown in the following screenshot:

Right-click over the model and choose Quad menu | Sub-objects | Polygon in the Tools 1 section, or press 4. This sets you into SubObject mode, editing Polygons, which are the components of the object surface. Now click on one of the squares that make up the top of the box. It will be highlighted in red. These squares are sometimes called polygons, sometimes quads, and sometimes faces (though strictly speaking, a face has three sides and quads are inherently composed of a pair of triangles).
Hold Ctrl and click on one of the polygons on the side of the box. It is added to the current selection. In earlier versions of 3ds Max, pressing Ctrl on an already selected polygon would deselect it, but lately this has been changed; now, only pressing Alt will deselect.
Right-click and choose Quad menu | Extrude. When you hover the cursor over the selected polygons, the cursor changes to show you are in Extrude mode. Drag on the faces and they'll push out, generating new geometry. Right-click to exit Extrude mode.
Besides the white wireframe, there is a white bounding box surrounding the model. Bounds show the widest range of the model in each dimension. This also helps you spot the object that is selected. You can turn it off if you press the [+] icon at the top left of the viewport, choose Configure Viewports, then turn off the Selection Brackets tickbox in the Selection section of the Visual Style & Appearance tab.
Now select just the top extruded polygon by clicking on it. Press the icon
 to enter Move mode (or Transform mode). You can also right-click and choose Quad menu | Move. An XYZ gizmo or guide appears. If it doesn't, try pressing X, which toggles transform gizmos on and off. Highlight the blue Z arrow and then drag the polygon upward.
The following screenshot, on the left, shows the extrusion results, and the image on the right shows the transform results, with the XYZ gismo showing the blue Z axis highlighted, which constrains movement to Z.

It is a modest start, but you've made an object, converted it to Editable Poly for editing, and added to the model and transformed part of it. These processes are simple, but you'll have to repeat them many times, and these tools alone can help you get a lot done.
To finish up, right-click on the model and choose Quad | Top-Level from Tools 2. This turns off the Polygon editing mode and lets us adjust the entire model at the Object level rather than the SubObject level.
Press W to enter Move mode if you aren't already in it (yet another way to do it), and then hold Shift and move the object, which is one way to produce a clone or copy of the model. Try using the same tools and processes you've just proceeded through to adjust other parts of the model.
Save your first creation by pressing Ctrl + S and choosing a path and a filename (
YourName_FirstModel_01.max), which is a good convention because it informs us who made the model, what its subject is, and the iteration number for the piece. The extension.maxis used by all 3ds Max scenes. The default path for 3ds Max scenes isC:\Users\~\My Documents\3dsMax\scenes\.To export the model to a game engine like UDK (
.aseor.fbx), or a sculpting program like Sculptris (.obj) or Mudbox (.fbxor .obj), you can choose the appropriate format under File | Export | Export Selected. The default path for 3ds Max to export to isC:\Users\~\My Documents\3dsMax\export\.
First of all, it is useful to look at some of the conventions of the 3ds Max UI. While our goal at the moment is to get used to the patterns that windows, buttons, menus, and tabs follow in 3ds Max, some features of 3ds Max will surface along the way that we'll have to reserve discussing in depth until later.
For example, to edit objects, you can add Modifiers to them, and these can be added on top of each other as a stack. From modifier to modifier, the stack GUI arrangement is always the same. Here is what to look out for: any ![]() icon like the one next to Editable Poly in the following screenshot means you can expand it to view further parameters. Other editors in 3ds Max, such as the Curve Editor, share this convention. Shown on the Bend modifier in the following screenshot, an
icon like the one next to Editable Poly in the following screenshot means you can expand it to view further parameters. Other editors in 3ds Max, such as the Curve Editor, share this convention. Shown on the Bend modifier in the following screenshot, an ![]() icon will collapse an expanded section back again. The little lamp icon
icon will collapse an expanded section back again. The little lamp icon ![]() for each modifier lets you enable and disable a given modifier temporarily, without losing its settings. Right-click on the modifier label (for example, Bend) to get further options such as Delete, Rename,
Copy,
Cut, Paste
, and
Off in Viewport (which disables a modifier in the scene until render time).
for each modifier lets you enable and disable a given modifier temporarily, without losing its settings. Right-click on the modifier label (for example, Bend) to get further options such as Delete, Rename,
Copy,
Cut, Paste
, and
Off in Viewport (which disables a modifier in the scene until render time).

A menu item with a + icon, similar to the ones shown in the following screenshot, can also be expanded by clicking on its label. Once expanded, it can be closed by clicking on its label again. These menu items can be re-arranged by dragging them, as can modifiers in the Modifier stack. A blue line will highlight the position they will drop into.

The various sections of Command Panel, which can be extensive, can be scrolled using a hand cursor ![]() that appears when you drag on empty space in the Command Panel. You can also use the slider down the right side. This is also true of the Render dialog (F10). The slider is quite thin, but is easy to use once you know that it is there. On the Editable Poly option, if you expand all the sections, you can see this slider. On a modifier such as Bend, which has few parameters, it isn't included.
that appears when you drag on empty space in the Command Panel. You can also use the slider down the right side. This is also true of the Render dialog (F10). The slider is quite thin, but is easy to use once you know that it is there. On the Editable Poly option, if you expand all the sections, you can see this slider. On a modifier such as Bend, which has few parameters, it isn't included.
Any icon that shows a text field with a downward triangle icon ![]() means you can expand a rollout list, as is the case with Modifier List in the Command Panel. Likewise, any icon with a little black triangle in the corner can be held down to expand a fly-out revealing more options or tools that relate to it. An example is the Align tool:
means you can expand a rollout list, as is the case with Modifier List in the Command Panel. Likewise, any icon with a little black triangle in the corner can be held down to expand a fly-out revealing more options or tools that relate to it. An example is the Align tool: ![]() .
.
Any numeric field can either accept type or be adjusted using a spinner on the right ![]() . Most spinners can be right-clicked to drop their value to zero or its lowest possible value; for example, a Cylinder primitive's Sides parameter can only go down to
. Most spinners can be right-clicked to drop their value to zero or its lowest possible value; for example, a Cylinder primitive's Sides parameter can only go down to 3, or it would be a flat object.
Many text buttons and icons in 3ds Max, if you float the cursor over them for a short time, will display the name of the tool, and often a tool tip or instruction referring to the use of the tool. This is particularly true for the Ribbon tools, which often also display illustrations as they expand. An example of a tool tip is shown in the following screenshot:

The icon ![]() , which resembles a pin in the modifier stack, lets you keep a pinned object's modifier stack displayed even if you select a different object in the scene. The icon
, which resembles a pin in the modifier stack, lets you keep a pinned object's modifier stack displayed even if you select a different object in the scene. The icon ![]() , which resembles a pin in the Ribbon UI, lets you keep an expanded rollout menu from being reverted closed (while the current object is selected). This seems to work when you haven't minimized the Ribbon to one of its three minimized modes. In the following example, the Teapot primitive's modifier stack is pinned, so it shows even though the Sphere primitive is currently selected. Meanwhile, in the Ribbon UI, the extra tools of the Geometry (All) section have been expanded and pinned. This would remain so until some object other than the Sphere primitive was selected instead.
, which resembles a pin in the Ribbon UI, lets you keep an expanded rollout menu from being reverted closed (while the current object is selected). This seems to work when you haven't minimized the Ribbon to one of its three minimized modes. In the following example, the Teapot primitive's modifier stack is pinned, so it shows even though the Sphere primitive is currently selected. Meanwhile, in the Ribbon UI, the extra tools of the Geometry (All) section have been expanded and pinned. This would remain so until some object other than the Sphere primitive was selected instead.
The Ribbon UI can be collapsed to a minimal set of headings by clicking on the upward triangle shown at the top of the following screenshot (and the tiny downward arrow next to that indicates there are some options for this collapse command). There is a strange redundancy to this set of options, as the option Minimize to Tabs seems just fine. While the Ribbon is minimized, all you need to do to access the Ribbon tool is click on the tab titles, which then expand out.

Similarly, if you are using the Ribbon, then you can drag the labels of each section to re-arrange them, as shown in the following screenshot. The example shows the Graphite Modeling tools, where the Loops section is being dragged next to the Polygon Modeling section. Note that the Ribbon menus change automatically depending on what is selected and the editing mode you are currently in (such as the Polygon mode or the Vertex mode).

The next thing to get used to is accessing Settings of tools while editing. Any tool with a box icon ![]() next to it, or exposed under it in the case of the Ribbon UI, opens further settings for the tool. In the Quad menu, shown in the following screenshot, many of the editing tools show this.
next to it, or exposed under it in the case of the Ribbon UI, opens further settings for the tool. In the Quad menu, shown in the following screenshot, many of the editing tools show this.
Right-click in a view with an Editable Poly selected to expose the major editing tools (tools 2). Also, a sideways arrow in the Quad menu, as in the case of Convert To: | Convert to Editable Poly, reveals options for a command. In the preceding screenshot, the Extrude tool is shown in Polygon mode. There are multiple ways to access the tool itself and its settings: you can do so via the Ribbon or via the Quad menu. You can also access the same Extrude tool and other editing tools in the Command Panel in the section Editable Poly | Polygons | Edit Polygons.
Command Panel has a couple of interesting features: it can be floated, and in versions from 3ds Max 2012, it can be minimized, a lot like the menus in ZBrush, off to the side and out of the way unless needed. By default, Command Panel is docked on the right-hand side of the screen. You can widen it to show several columns by dragging on its edges. Views can also be enlarged in the same way. You can float Command Panel by dragging on its top edge or by right-clicking and choosing Float. There is also the option to Dock | Left. There is also the option to Minimize, which lets Command Panel slide out of view off to the side when not in use. A vertical strip labeled Command Panel, if you roll over it, pops it back out. When the Command Panel is floated, you can drag it to either side of the screen to re-dock it there, or you can double-click on its label.

The label also has a [ ![]() ] icon that lets you turn the Command Panel off. To reveal it again, go to the top row of icons—the main toolbar—right-click, and you can enable it from the list of menus there. If you happen to disable the main toolbar, you can get that back again if you go to the left side of the UI, just under the green 3ds Max logo
] icon that lets you turn the Command Panel off. To reveal it again, go to the top row of icons—the main toolbar—right-click, and you can enable it from the list of menus there. If you happen to disable the main toolbar, you can get that back again if you go to the left side of the UI, just under the green 3ds Max logo ![]() , and right-click to expose a menu that lets you enable it again. Above the main toolbar are the main menu entries: File
,
Edit
,
Tools
,
Group, and so on. These can be hidden by clicking the down arrow icon
, and right-click to expose a menu that lets you enable it again. Above the main toolbar are the main menu entries: File
,
Edit
,
Tools
,
Group, and so on. These can be hidden by clicking the down arrow icon ![]() and choosing Hide Menu Bar. To get it back, click there again and choose Show Menu Bar. The uppermost icons displayed are entries in the Quick Access Toolbar, which you can add your own entries to by right-clicking on a tool and choosing Add to Quick Access Toolbar. Here, I'm adding Swift Loop, a handy tool, to the Quick Access Toolbar from the Ribbon.
and choosing Hide Menu Bar. To get it back, click there again and choose Show Menu Bar. The uppermost icons displayed are entries in the Quick Access Toolbar, which you can add your own entries to by right-clicking on a tool and choosing Add to Quick Access Toolbar. Here, I'm adding Swift Loop, a handy tool, to the Quick Access Toolbar from the Ribbon.


Unfortunately, such additions are per session additions. Next time you load up 3ds Max, they won't be preserved. The Undo and Redo buttons are there, with icons
that let you access the available undo and redo history too. If you start to customize the Quick Access Toolbar, you will notice the option when you right-click to add a separator, which is a little dividing bar to space out menu items nicely. These are seen all throughout 3ds Max: in the modifier stack, in the various editor icon rows, and in the Quad menu.
In the current version, the UI is well-designed and visually appealing. The dark tones allow users to work without glare, and the icons are colored for easy spotting. There are still some legacy UI presets you can try out, including the 2009 interface that is used in many tutorials online. You can also save changes you make to the UI in an external file and set it as the default if you wish.
This quick demonstration shows two ways to change the presets for the user interface:
One way to switch UI presets is to expand the Customize menu and choose Load Custom UI Scheme, which pops up a browsing window to locate a
.uifile.Expand the History rollout at the top of this window to expose
C:\Program Files\Autodesk\3ds Max 2012\UI. This path includes several options you can try out.3Dsmax2009.uiis nearly the same as the 2012 default except the views are toned much lighter.
By default, Custom UI files, including small changes you make to the default UI, are saved in C:\Users\~\Appdata\Local\Autodesk\3dsMax\2012\64bit\enu\UI (supposing you are using the 64 bit version).
There is another way to access UI presets, which is by going to the
Customize
menu and choosing Custom UI and Defaults Switcher
, which has a slight advantage of including visual previews of each UI as you select it in the list. Here you can see a list of tool-based settings and a list of UI schemes (on the right). You may like to try the ModularToolbarsUI
, which exposes more than what the default UI does.
Tip
Downloading the example code
You can download the example code files for all Packt books you have purchased from your account at http://www.PacktPub.com. If you purchased this book elsewhere, you can visit http://www.PacktPub.com/support and register to have the files e-mailed directly to you.
Let's change the rather annoying Selection Lock Toggle. When turned on, this toggle prevents you from selecting anything else, which can be handy if you intend it to be on, but not so nice if you toggle it on by mistake. Since its hotkey is Space, you can imagine this to be easy to do. Setting it to Ctrl + Space, which is not assigned to a command, would be better, since it is less likely to be accidentally hit.
This is done as follows:
Go to the Customize menu and choose Customize User Interface. This window pops up with the Keyboard tab selected, so all we need to do is browse down the alphabetical list of Actions for Selection Lock Toggle, which also shows its icon (the padlock
 found under the time slider).
First, the hotkey Space will show next to Selection Lock Toggle. On the right, press Remove to remove it; then in the Hotkey field press Ctrl + Space, and click on Assign to commit it. Don't forget to press Save at the bottom of the window. You'll be prompted to save a
.kbdfile, which you can nameyourname.kbd. It will be saved with the UI next time you save the UI, and 3ds Max does this anyway when you end the session.Most commands in 3ds Max let you set a hotkey. You can view the assigned keys by browsing the Shortcut list. Or you can go to the Help menu and choose Keyboard Shortcut Map, which opens an interactive shockwave image that exposes main hotkeys as you roll over a diagram of a keyboard. Given the file type, your browser may not permit it to load, but you can find it here:
C:\Program Files\Autodesk\3ds Max 2012\hotkeymap.SWF. Note that this handy utility only shows default hotkeys.Not all the default hotkeys are as convenient as they could be.
The Scale command
 actually is a flyout with three options. On the keyboard Q stands for Select, W stands for Move, E stands for Rotate, and R stands for Smart Scale. Unfortunately, Smart Scale is not very smart, and often you'll only want to use the regular scale tool only to find you've actually cycled through to the Squash option. So, if we set R as Select and Scale, or just Scale, instead of Smart Scale, we avoid this oversight. You can always cycle through the three scale options using Ctrl + E, Scale Cycle.
There's a very handy shortcut called Transform tools. This tool can be found in the Edit menu, where it's called Transform Toolbox. It doesn't have a hotkey by default. This could be set to Ctrl + T, which is available. We'll discuss its functionality later on, and make frequent use of it as we model.
Another tool that is often used, which doesn't come with a hotkey, is the Manage Layers dialog
 , which is used for organizing scene content by layer and also for hiding and freezing content. Since I use this tool often, I've taken to setting it to Space, since it doesn't matter if I tap on it by mistake; it is easy to notice the dialog when it opens or closes.
Note
As well as using the Layer Manager, you may want to get the free script Outliner 2 (which imitates the Autodesk Maya Outliner) from http://script.threesixty.nl/outliner. The link downloads a
.mzpfile that you can simply drag from Windows Explorer into the 3ds Max viewport to install. Once installed, this uses the hotkey H, which overrides the Select By Name tool's hotkey, so you may want to set Select by Name to another hotkey (or use a different hotkey for the Outliner). Note that content hidden by the By Layer option in the Layer Manager can't be unhidden by the Outliner if you are in Hierarchy mode . At the bottom of the Outliner there is an icon
  that enables Layer mode, a substitute for the actual Layer Manager.
You may have noticed that when you right-click, a menu appears under the cursor with shortcuts to many tools distributed elsewhere in the 3ds Max UI. For instance, you can press the Select icon ![]() or press Q or you can right-click and choose Select from the Quad menu. This menu can be changed to suit your need, though part of its utility comes from memorizing its layout for speedy access, so making changes often may defeat the purpose. Still, there are a few tools that you'll regularly use that could benefit from being in the Quad menu.
or press Q or you can right-click and choose Select from the Quad menu. This menu can be changed to suit your need, though part of its utility comes from memorizing its layout for speedy access, so making changes often may defeat the purpose. Still, there are a few tools that you'll regularly use that could benefit from being in the Quad menu.
Note
Swift Loop is a tool used to add additional edge loops to an Editable Poly model. We'll discuss its use later too, but in brief, you can add a box to your scene, right-click on it, and choose Quad menu | Convert To: | Editable Poly. Then press 2 to enter Edge mode, then go to the Ribbon UI | Graphite Modeling Tools and expand the Edit panel to expose the Swift Loop icon ![]() . Clicking this enters a mode whereby clicking on an edge will add a perpendicular loop to the model. Using the Swift Loop tool is very handy, but accessing it from the Ribbon time and again is frustrating. It would be better to add it to the Quad menu, where it is always right under the cursor.
. Clicking this enters a mode whereby clicking on an edge will add a perpendicular loop to the model. Using the Swift Loop tool is very handy, but accessing it from the Ribbon time and again is frustrating. It would be better to add it to the Quad menu, where it is always right under the cursor.

The following demonstration shows how to add this commonly used modeling tool to the Quad menu:
Go to the Customize menu and choose Customize User Interface. Previously, we changed settings in the Keyboard tab; this time, skip over to the Toolbars tab to get the Quads tab.
There are four squares on the right side of the UI, with the transform section highlighted in yellow. Click on the lower-left square tools 2. Expand the entry [+] Context Edit Poly Tools 2 FLAT.
Highlight Swift Loop in the Actions list, then drag it over to the top entry of the [+] Context Edit Poly Tools 2 FLAT list, where it should be inserted above Create (Poly). Of course, you can drop it where you like, but this is a reasonable location, and it will show up as shown in the following screenshot when you right-click to access the Quad menu. At the bottom of the window, press Save and try it out.

A preference you may want to set while in the Quads tab of the Customize User Interface dialog is to turn off Show All Quads option, via its tickbox. What this does is it only displays the part of the quad box that you highlight with the mouse. It uses less screen space as only a quarter of the menu is seen at one time.
Should you want to remove or rename an entry in the Quad menu, right-click on it to access a menu showing those options.
Note that there are contextual Quad menus depending on what mode you are working in, and you can edit these by expanding the rollout that shows Default Viewport Quad. In particular, it is useful to customize the Unwrap UVW Quad to access mapping tools faster. See Chapter 7, The Mystery of the Unfolding Polygons: Mapping Models for Texturing, for coverage of mapping processes.
Also, you will notice there are hotkeys to filter the Quad menu. For example, the Modeling Quad (Ctrl + RMB) only shows modeling tools. The Snaps Quad (Shift + RMB) lets you set the current snap type. This is quicker than moving the cursor up to the Snap icon ![]() to right-click and access the Grid and Snap Settings menu. The hotkey for entering Snap mode is S and it uses whatever settings you most recently set. Snaps are used for precision modeling, and snapping functionality is discussed further in Chapter 5, The Language of Machines: Designing and Building Model Components.
to right-click and access the Grid and Snap Settings menu. The hotkey for entering Snap mode is S and it uses whatever settings you most recently set. Snaps are used for precision modeling, and snapping functionality is discussed further in Chapter 5, The Language of Machines: Designing and Building Model Components.
The most obvious way to change the viewports is to resize the default 4 x 4 panels by dragging their inner frame border. Each viewport has a [+] menu where the top entry is the Maximize Viewport or Restore Viewport command, Alt + W.
There are more controls for the view arrangement. If you press [+] in a view and choose Configure Viewports or right-click anywhere over the viewport control icons at the bottom right of 3ds Max or open the Views menu and choose Configure Viewports, you will get a pop-up window, Viewport Configuration, where the tab to open is called Layout, as shown in the following screenshot. Click this tab and notice the two rows of preset panel layouts. Click on any of them, and then click on the large panels that are labeled with the current setting. A list will appear with the available options you can set. This method is the only way to swap out a Track View option that has been set in a viewport, so keep it in mind if you do any animation.

3ds Max is over 20 years old. Some of its navigation tools go way back to the early days, and over time some replacement navigation tools have been added. If you are used to an old navigation method, then a new one sometimes doesn't appear to add any advantage, whereas to a new user (or a user familiar with other applications using the same method), it can seem obvious to use the newer tool. We're going to evaluate all the methods to navigate the views, and you can decide for yourself which you prefer. Remember that if you use more than one 3D application, then it is always a good practice to use the same method in both cases, especially for scene navigation. Unfortunately, few applications share common UI defaults. 3ds Max is customizable in terms of hotkeys and menu items, and its navigation tools do have keyboard entries you can change.
The quickest way to access Pan Mode in 3ds Max is to hold and drag the middle mouse button. You can also press the ![]() icon or you can press Ctrl + P to pan. You will notice that the Orthographic views pan is less jumpy than the Perspective view.
icon or you can press Ctrl + P to pan. You will notice that the Orthographic views pan is less jumpy than the Perspective view.
The quickest way to access Orbit mode is to hold Alt and drag the middle mouse button. All the main navigation modes make use of the middle mouse button.
Zoom = Middle Mouse Button (MMB) Scroll. Pan = MMB hold + drag. Orbit = MMB + Alt + drag.
There are, however, other ways to orbit. Ctrl + R is the hotkey for Orbit and the equivalent icon is ![]() , and it gives you a circular yellow manipulator that allows some axial control for the orbit.
, and it gives you a circular yellow manipulator that allows some axial control for the orbit.
There are three common viewport navigation methods (Zoom, Pan, and Orbit) and some additional ones such as Walk Through, Zoom Extents, and Zoom Extents Selected (which equates to a frame object tool), and Field-of-View (FOV), a camera control. Their functions will be discussed as we go through this chapter.
Open the .max file \Packt3dsmax\Chapter 1\Begin.max. You will see an assembly of un-textured models that form an industrial platform. We'll practice zooming around these, as having objects in the scene gives a more visceral feeling to the views than an empty scene does.
In the bottom-right corner of the UI there is a panel of viewport control buttons. In the following screenshot, these buttons are shown on the left for the Perspective view and are shown on the right for the Orthographic views (basically the same except for Region Zoom shown by default in Orthographic as FOV doesn't work in Orthographic views).

Zoom mode, if chosen here with the magnifying glass icon ![]() , permits a very smooth forward and backward motion of the virtual camera. The default hotkey for Zoom mode is Alt + Z. You can also zoom if you scroll the mouse wheel, but that is an incremental zoom. Next, we'll talk about how to adjust that increment, but it's handy to know that Ctrl + Alt + MMB drag (not scroll) allows you to zoom smoothly. This somewhat clunky key combo can be changed to suit in the Customize | Customize UI Interface dialog in the Mouse tab in the settings under Category | Navigation.
, permits a very smooth forward and backward motion of the virtual camera. The default hotkey for Zoom mode is Alt + Z. You can also zoom if you scroll the mouse wheel, but that is an incremental zoom. Next, we'll talk about how to adjust that increment, but it's handy to know that Ctrl + Alt + MMB drag (not scroll) allows you to zoom smoothly. This somewhat clunky key combo can be changed to suit in the Customize | Customize UI Interface dialog in the Mouse tab in the settings under Category | Navigation.
Go to the menu Customize and click on Customize UI Interface. This has several tabs at the top. Click on the one called Mouse. There is a panel under this tab called Mouse Control where you'll see two tickboxes for Zoom Above Mouse Point (Orthographic) and Zoom About Mouse Point (Perspective). The default zoom uses the center of the active view. The zoom options just mentioned use the cursor location in the view.
Checking these two options lets you zoom into objects under the cursor more easily, without having to pan. Below this is a numerical input field for Wheel Zoom Increment. The lowest number it accepts is 0.01. Enter 0.01 and click on OK.

This scene has been scaled so that this value works well. In larger scenes, you may find the increment doesn't work so well. The thing to do is try out values until you're happy.
You can also select everything in the scene (Ctrl + A) and uniformly scale everything up or down accordingly, so you get an incremental zoom value that works well.
Notice as you zoom now with the mouse wheel in the Orthographic views (top, front, and left) that zoom has a different feel than scrolling in the Perspective view, which seems faster. If you over-zoom or get lost, you can use the hotkey Shift + Z to undo view changes. To reframe a view, if you are lost, it helps to select an object or polygon and press Zoom Extents Selected, discussed next.
Zoom Extents Selected is a command that goes hand-in-hand with Orbit (Alt + MMB). When you are spinning around an object, it frames the selection in the current view. The default for the flyout with the icon ![]() is Zoom Extents, which frames the whole scene, but I find that Zoom Extents Selected is much more useful because it lets us locate items we've selected by name. Select By Name (H) is a command that lets you choose objects from a pop-up list. We mentioned that the hotkey for Orbit (besides using the ViewCube compass) is Alt + MMB. You can also use the legacy Orbit command via its icon
is Zoom Extents, which frames the whole scene, but I find that Zoom Extents Selected is much more useful because it lets us locate items we've selected by name. Select By Name (H) is a command that lets you choose objects from a pop-up list. We mentioned that the hotkey for Orbit (besides using the ViewCube compass) is Alt + MMB. You can also use the legacy Orbit command via its icon ![]() in the view controls panel.
in the view controls panel.
This pops up a controller you can use to adjust the view, shown in the following screenshot:

If you drag the crossed squares, the cursor changes to indicate that you'll be orbiting in one axis, either up and down or side to side. If you drag outside the circle, the cursor changes to indicate you'll tilt the view. If you drag within the circle, the cursor changes to indicate you'll make a free orbit in any axis based on the direction in which you move the mouse, much the same as with Alt + MMB.
The Orbit icon we mentioned, ![]() , actually has three settings. I find that almost always I use just one, but it isn't the default. If you click-and-hold the flyout icon, it reveals three options. Any icon in 3ds Max with a black triangle in the bottom-right corner has the same flyout options, a convention also seen in many other applications. The following screenshot shows the flyout buttons:
, actually has three settings. I find that almost always I use just one, but it isn't the default. If you click-and-hold the flyout icon, it reveals three options. Any icon in 3ds Max with a black triangle in the bottom-right corner has the same flyout options, a convention also seen in many other applications. The following screenshot shows the flyout buttons:

The uppermost option is Orbit Scene, the middle option is Orbit Selected, and the lowest option is Orbit SubObject. The last option works well when you are editing some small part of an object and want to orbit around that part, but it also works fine at any level of selection. Usually I set 3ds Max to use this and leave it that way.
The ViewCube is a tool introduced to many Autodesk products so they share a common basis for navigation. It is debatable how many people really use this tool, but for new users it is certainly a good way for learning how 3D space works. Power users will probably turn it off to save memory. Of course, it is possible many people love it.
There are four components in the ViewCube. The first is the Home button, which lets you store and return to a bookmarked view that you have set by right-clicking on the Home button ![]() .
.
The second component of the ViewCube is the cube itself. You can click on its faces, on its edges, and on its corners.
The third component is the Tumble tool that appears if you are viewing the face of the cube, which rolls the camera 90 degrees at a time when clicked.
The fourth component is the Axial Orbit tool shaped like a circular compass under the cube, which lets you spin the scene. It only allows one degree of freedom, unlike Orbit mode. If you like the ViewCube but don't like the compass under it, you can turn the Compass display off in its configuration.
The following steps walk you through the use of the ViewCube in order to familiarize yourself with its settings, so you can decide which to opt for.
If you have the ViewCube exposed, right-click on the Home button and choose Configure or else click [+] in the view and choose Configure Views and click on the ViewCube tab.
There is a checkbox labeled Show the ViewCube, which you can turn off if you don't like the ViewCube. If you do like it, but want to work a little more efficiently, click the radio button Only in Active View. You can only use the ViewCube in the view you are currently in, so it saves a little memory to not have four of them spinning around at once.

As shown in the preceding screenshot, you can diminish or increase the ViewCube size to taste. The left-hand side example is set to tiny, which is usable but problematic because the labels aren't visible, and the normal size is on the right. The large size is simply massive, and this is a case where small is probably better. No doubt the default size is too distracting to trouble with. You can also adjust how visible it is using Inactive Opacity in the same section.
In the viewport configuration options for the ViewCube, it is definitely a good idea to check the Snap to Closest View checkbox, to help keep the regular viewing angles lined up.
Clicking Fit-to-View on View Change means that whenever you change the camera using the ViewCube, you'll be zooming to the scene extents, which is probably not desirable unless you are editing only one model.
It definitely speeds up your work flow if you turn off Use Animated Transitions options when Switching Views. The transition is snappy, and you won't waste time waiting for the camera to animate through its turn.
Having the Keep Scene Upright checkbox checked is a good idea, just for stability in the view.
The Steering Wheel is an interesting but slightly twitchy tool introduced to 3ds Max in an attempt to provide game-like navigation, where you can fly or drive through the scene. New users, who will get used to this tool, will probably get a lot out of it, but users already familiar with the classic navigation methods already discussed will probably avoid it. Strangely, I like it when I remember to use it, but that is only in cases when I have to explain how viewport navigation can work. Still, there are a few features that are outstanding when using the Steering Wheel, in particular the Rewind and Walk tools.
The Steering Wheel shortcut is (supposedly) Shift + W, and I've noticed that Shift + W doesn't seem to turn anything on, which explains why I never really took up this tool. The reason is the hotkey is set in the context of the Steering Wheel group, not the main UI group.
The reliable way to activate the Steering Wheel is to go to the Views menu and choose Steering Wheels | Toggle Steering Wheel or choose one of the different modes it offers there. It is also possible to assign Toggle Steering Wheel as an entry in the Quads menu for speedy access. Look under Group | Steering Wheels in the Quad tab of the Customize User Interface menu to find it.
In the following example, we will open the Steering Wheel and explore the methods it offers for scene navigation.
Open the max file Packt3dsmax\Chapter 1\Begin.max. You will see an assembly of un-textured models that form an industrial platform. We'll use this scene to drive around using the Steering Wheel to compare how it feels in comparison to the regular navigation tools.
For a scene like this, which is surrounded on four sides by walls, the Steering Wheel actually responds very nicely. The slight lag in getting it started is the only drawback.
There are four types of steering wheels. The default is the Full Navigation Wheel . The others are streamlined derivations of it. The mini wheels are smaller, and there are also the Basic Wheels | View Object Wheels and Mini Tour Building Wheels options. All of these can be accessed from the down arrow icon on the lower corner of the Steering Wheel, shown in the following screenshot:

The Look command allows you to orbit around the camera's location, a lot like the 'look around' control in many 3D games. Try looking around the scene, and notice how it differs from the Orbit command, which turns around a pivot. After you have looked around, try using the Rewind command. This will present you with a filmstrip of prior views that you can slide along to choose among them.

The following screenshot shows the Look control highlighted. Each section of the wheel will be highlighted green, and then when you drag the cursor, the camera will act accordingly.

A tool tip appears underneath the Look Tool label, and a cursor replaces the wheel when it's being used.

When you are using the Steering Wheel's Orbit tool, a green pivot displays, and it is around this that the camera turns. This can be moved by pressing Orbit while holding Ctrl. Once you have moved the cursor where you want the pivot to be, as shown in the following screenshot, releasing it will allow you to orbit around the new pivot.

If you have set a Home bookmark from the right-click menu of the ViewCube's Home icon ![]() , you can choose the Go Home option from the Steering Wheel's menu too, shown in the following screenshot:
, you can choose the Go Home option from the Steering Wheel's menu too, shown in the following screenshot:

While the Rewind tool works very well, if you don't have the Steering Wheel active, you can use Shift + Z to undo viewport changes.
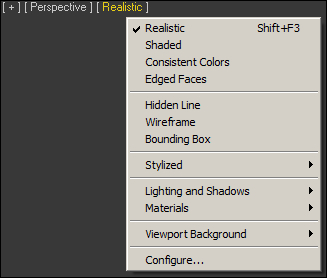
There are several viewport display modes that can be accessed by the label in each viewport, shown in the following screenshot:
If you open a scene such as Packt3dsmax\Chapter 1\Begin.max, you usually see four views and the orthographic views are shaded differently to the Perspective view. This can be changed. Press F3 in the Perspective view. The view changes to Wireframe. Press it again; the view changes back to Shaded mode. In Shaded mode, press F4 to turn on and off Edged Faces. The following screenshot shows clockwise: Hidden Line, Wireframe, Shaded, and Realistic.
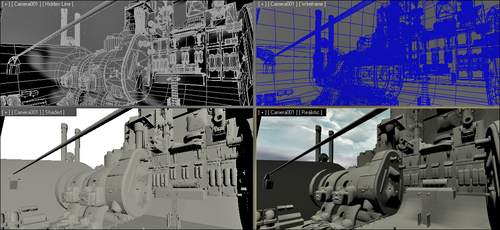
There are several intermediate ways to shade the view, including Hidden Line, which shows only the Wireframe directly facing the camera, culling the rest; and Flat Shaded, which removes any surface smoothing (so a Sphere's facets would all appear flat or faceted instead of round).
3ds Max 2012 introduced a Realistic shading mode that supersedes the Shaded shading mode in earlier versions. This is a technology update that allows faster shadow computation; therefore, faster view spinning, better texture resolution, and better lighting.
By default, views are lit using virtual, hidden lights you can't edit. Once you add your own lights (and in this scene there is a Daylight System), you can set the view to render those, which helps you design shadow casting and so on. To adjust this, go to the View menu and choose Viewport Configuration where the Visual Style & Appearance tab should be displayed (or you can swap to it). Look on the right-hand side to the Lighting and Shadows section. For the Illuminate with option, click on the Scene Lights radio button.
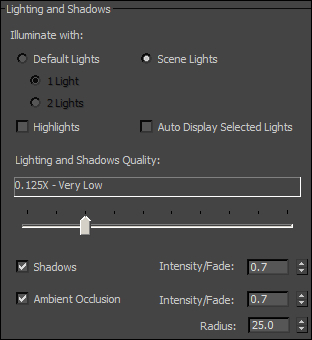
Here you have a few additional options. Turning off Highlights will prevent glare from glossy surfaces, so you can always see the edged faces on a surface. Sometimes it is nice to model with a glossy surface to help view the form changes, but often it means you'll not be able to tell what you are doing as the highlight eclipses the mesh wireframe. You can raise or lower the Lighting and Shadows Quality, where lower values calculate faster (often without an apparent drop in visual quality). You can also tick on Shadows and Ambient Occlusion checkboxes, and set their Intensity/Fade, which works well around 0.7 so that shadows are not black.
Neutral, consistent colors tend to be the easiest to look at when viewing un-textured models. By default, 3ds Max applies random colors to each new model. The shaded surface and wireframe share this color. Sometimes, the viewport lighting causes surface shine to obscure some of the mesh edges, as shown in the following screenshot on the left-hand side:
In this section, we'll change this so all models get the same wireframe color and have a neutral gray material, as shown on the right-hand side in the preceding screenshot:
Open the Material Editor (M). In 3ds Max 2012, you should see a version of the Material Editor called Slate. The legacy Compact Material Editor is still available, but for now Slate will do fine. Right-click in the Slate View1 canvas and choose Materials | Mental Ray | Autodesk Generic. This assumes you have iRay set as your renderer, which is also the installation default. If not, you can set a Standard Material instead.
The Autodesk Generic Material defaults to a dark gray color, which is possibly a bit heavy. To change this, double-click on the Material node and notice that on the right the Default Generic properties display. In the Generic section, under Color | Use Color, there is a color picker and you can adjust it to a mid-gray: Hue=
0, Sat=0, and Value=0.5. Click on OK.Now you can assign the Material Model to objects in the scene when you press Ctrl + A in the scene, then right-click on the Material node and choose Assign Material to Selection or press the icon
 in the editor icon row. Materials that are assigned to a selected object are displayed in the Material Editor with white corners around the sample preview, as shown in the following screenshot:
In 3ds Max 2013, dotted white edges appear around a node that is showing its parameters in the Parameter Editor panel on the right-hand of the Material Editor.
At the top of the Material properties panel, you can name this material
Modelin the text field. We'll discuss more about the Material Editor later in Chapter 3, The Base Model – A Solid Foundation in Polygon Modeling.Although this material is a neutral gray, it doesn't affect the wireframe displayed; it can if you access the Display tab of Command Panel and choose Display Color | Wireframe | Material Color. A better way to display the model, however, is to have the surface shaded with the Material color and the Wireframe set to the Object Color.

Click on the color picker to the right-hand of the object name, which is
Box001, and the following dialog will pop up:
Choose a dark color, such as the blue color, as shown in the preceding screenshot, in the Current Color slot. A light color may reflect scene light and make it difficult to tell what is going on, especially when you are zoomed in on a model.
Uncheck the checkbox for Assign Random Colors, so that each newly created object gets the same color.
You can still change colors, but do so in a logical way. Set your own classifying criteria, such as all animated objects are dark green and all static objects are blue. This is easiest to set after creation.
The way physical-based lighting performs when your scene renders is scene-scale dependent. Setting up scene units helps you to achieve real-world scale to your model. Sometimes, you may not want to work in real-world scale, especially if your objects have to match to the objects in another application when they are exported.
The following instructions show how to set custom scene units:
Open the
.maxfilePackt3dsmax\Chapter 1\Begin.max. Every scene is saved with its own units of measurement. If your default scene has a unit setting different from the scene you're loading, you'll be prompted to choose the one that you prefer to use.Go to the Customize menu and choose System Unit Setup, which pops up the following dialog box:

The Generic Units radio button is active by default, and the measurements for this are set via the System Unit Setup button at the top of the window, shown on the left-hand side. Click this to expose the pop up on the right.
In a scene with hundreds of models or model components, naming objects is probably the best way to keep content easy to access. There are a few ways to rename an object. One way is to type in the Modify Panel ![]() the name you want in this field:
the name you want in this field:

You can also rename objects by selecting them in the scene or highlighting them in the Layer Manager, and choosing Rename Objects from the Tools menu. Another way, if you are using the Outliner script we discussed earlier, is to double-click on the object label.

In the following steps, we will look for a single object amid hundreds using filters:
Open the
.maxfilePackt3dsmax\Chapter 1\Begin.max. This scene is made of hundreds of objects mostly calledObject001andPart001and so on.You could use the Select by Name tool, and you could use the Outliner to browse the scene. Another way is to use Tools | New Scene Explorer.
In the Scene Explorer window that pops up, you get a list of objects rather similar to the Outliner script's Hierarchy mode list. At the top, there is a menu called Select. Open this and choose Search from the bottom of the menu, as shown in the following screenshot. You can alternatively click on the icon Configure Advanced Filter
 from the vertical icons.
Another window will pop up called Advanced Search or Advanced Filter (depending on how you opened it), and this lets you filter the scene by numerous Property/Condition/Reference value combinations. For instance, expand the Property list and choose Hidden, and set the Condition to Is so that only hidden objects will be searched. Notice that the object Skydome is the only hidden object. It is highlighted in yellow. You can unhide it using Outliner or if you right-click in the scene and choose Unhide All from the Quad menu, then similarly freeze it.
In the Advanced Filter window, click on Remove. This clears the current filter.
In most scenes, you will have certain objects you select often. Quick access to these is very important. Also, some objects can be hard to directly select if they are surrounded by or covered by others.
By default, the H key is reserved for the Select by Name ![]() option, but if you take up the free script Outliner, you may have to change that. You can also use Named Selections, which lets you create a hot list of entries of your own. This rolls down from the main toolbar, as shown in the following screenshot, where it says Sky:
option, but if you take up the free script Outliner, you may have to change that. You can also use Named Selections, which lets you create a hot list of entries of your own. This rolls down from the main toolbar, as shown in the following screenshot, where it says Sky:

Open
Begin.max, and go to the expand icon for the Named Selection Set list and notice there is an entry Lines and an entry Sky. Click on Sky. This is a huge sky dome that provides a background for the scene. When you launch, it is hidden and frozen, but when you choose it, you'll see a prompt checking whether or not you want to reveal it. This prompt appears because its hidden state is set for its layer.
You can either choose Yes, and the object will be revealed, or No, and the object will be selected but remain hidden. Its entire layer will be affected.
Add to the list of Named Selections by choosing some objects in the scene and then typing an entry in the Create Selection Set text field where Sky is included. After typing, be sure to press Enter to commit the entry.
Now you'll want to edit entries in the Named Selections list. Click on the icon
 next to the text field, or go to the Edit menu and choose Manage Selections Sets, which pops up the same window.
Let's add an object in the scene to the existing set of Lines. Select Cylinder01 by using either Select by Name

in the Named Selection Sets window's icon row, then press the Add icon

.
The icons for managing objects include Remove
(which removes a list or objects from a list; it doesn't remove them from the scene), Select Objects in Set
(which works if you don't have them selected to start with), and Highlight Selected Objects
(which shows in the list the items currently selected in the scene if they belong to a given Named Selection Set). They are highlighted in blue.
Changes to preferences are quite subjective. There are many preferences in 3ds Max, but only a few that really make a big difference when starting to model. These include auto-save settings, the option to increment files when saving, levels of undo, whether to use large or small icons, whether to display certain warnings each time you take certain steps, and removing some small elements of clutter from the UI.

In the General tab, you can set the number of Scene Undo levels higher if you have a lot of RAM and think you might need more undo steps. Alternatively, you can reduce the number so your session has less overhead.
When you move objects you can set the transform gizmo to align with either the view grid, the local space of the object, or even another object. This is called the Reference Coordinate System. By default, when you swap from Move mode to Rotate mode to Scale mode, each has its own Reference Coordinate System. This can be annoying, since you have to track which system is active for which transform mode. The preference Ref. Coord. System | Constant checkbox keeps the system you set as current across all the transform types when you switch from one transform to another.
It is probably a good idea to turn off the Use Large Toolbar Buttons checkbox; it allows a little more screen space for the viewports, and also you can fit more icons in the toolbars.
The next few options are for reducing pop-up warnings that, if you know what you are doing, are somewhat distracting.
The first is the Display Topology-Dependence Warning checkbox. If it is checked, it will tell you whether a Modifier you're collapsing would depend on a SubObject selection (points, edges, and so on) from below in the Modifier stack, or when you change the SubObject selection while other Modifiers are using that selection.
The next is the Display Stack Collapse Warning checkbox, which occurs when you use the option to collapse modifiers, essentially merging their result.
Also, you have three choices for how to deal with unhiding content on layers that are hidden. The setting is called Propagate Unhide/Freeze Commands to Layers?. By default, you're asked if you want to unhide the layers and the object (Ask). You can set it so that the layers are always unhidden too (Propagate), or the layers are never unhidden too (Do not Propagate).
In the Files tab, if you are doing modeling work, it is handy to set Increment on Save checked, so that every time you press Ctrl + S to save, you won't write over the same file but add a new one like this: file001.max, file002.max. It requires some housekeeping occasionally but is a safe option, since if you save over your work or something else goes wrong (computers!), then you won't lose anything; alternatively, you may want to develop a habit to increment the number of file saves using Ctrl + A instead of Ctrl + S.
When you save a maxfile, it includes properties, the schematic view, and a thumbnail image for the browser. You may feel that this is unnecessary information, and those can be turned off individually.
If you are opening a very old maxfile from earlier versions, sometimes an obsolete file, a message will appear warning you to re-save. This can be turned off here by ticking off Display Obsolete File Message.
In the Viewports tab, there is nothing much to change. Set Display World Axis should be unchecked. This gets rid of the tiny, slightly obtrusive axis in the corner of each viewport. Of course, if you like it there, you can leave it on, but if you want to check which way the world X axis is, for instance, create a Box and enter Move mode with the View or World reference coordinate system active.
Finally, the number of auto-backup files and the duration that they are saved is set at the bottom of the Files tab, in the Auto Backup section. Backup files are kept in c:\users\~\documents\3ds max\autoback. Once you've written the amount of files that you've set as the number to save, they'll start saving over each other, starting with the oldest. Broadly speaking, if you set 10 backups at 10-minute intervals, that is enough to provide you with 100 minutes of continual work that you can look back on if you decide you need to go back in time.

The default views in 3ds Max 2012 and 2013 are driven by a newly introduced technology called Nitrous Accelerated Graphics Core , which is designed to allow larger sets of assets to be handled in real time with a better quality visual appearance.
You can revert your display settings to Direct3D alone, or to OpenGL, or even Software, but it depends on what hardware you are using, particularly your graphics card. If you are using a laptop with an integrated graphics card, you may be best off with Software or OpenGL rendering, but this will likely not be very fast or look as good. Nitrous views depend on access to the GPU (graphics card cores) to provide a responsive, high-quality viewport shading, and this is what gives you real-time ambient occlusion (soft shadows) and accurate shadow casting and reflective, transparent surfaces in the viewport even with unlimited lights.
You can read more about hardware concerns for 3ds Max in The Area—Discussions community—which you can access from the 3ds Max Help menu | 3ds Max on the web | The AREA. Also, you can obtain a report on 3ds Max's view of your GPU: Help | Diagnose Video Hardware.
By now you should be progressing with view navigation and have gained a feeling for just how much functionality is packed into the menus and dialogs of 3ds Max. You'll quickly find that what you're unfamiliar with at first, in the topics we've covered in this chapter, becomes intuitive with practice. By the end of the next chapter, no doubt you'll be flying around views, panels, tabs, and menus without thinking, ready for the next challenge.
We've covered a few niche methods of navigation as well as the main methods, and you'll be able to decide for yourself whether you want to use the middle mouse navigation method and hotkeys, or ViewCube and Steering Wheel. You may also want to experiment with new device-driven navigation, such as the Wi-Fi and touch-based CAD Control iPad app for 3ds Max by Maide Inc (and other Autodesk products), available on iTunes.
Besides navigation, we also considered ways to begin to customize the look of 3ds Max and make tools accessible based on your own preferences. It takes time to decide which tools are best to use and where to place them. Do you use the Quad menu, keyboard shortcuts, a toolbar, or mouse click to the default locations? Each user will develop a different preference. I've provided a complete UI preset that I like, which has most of the day-to-day modeling tools set in the Quad menu. At first it took a while for me to get used to this streamlined layout, since I was more used to the regular tool layout, but it didn't take long before I was enjoying a faster working speed. The UI preset can be found in Packt3dsMax\UI Settings\PacktUI.ui and can be loaded via the Customize menu | Load Custom UI. There is a version for 2012 and 2013. In later chapters, this UI will be referenced often, but the commands are also described in terms of their default layout in case you prefer to work with a "fresh install" style UI. One benefit of only using 3ds Max in its default state is that whenever you set it up, you're always going to be in a familiar place. However, the Packt3dsMax\UI Settings\PacktUI.ui can be set up with one command, and you can always revert back to the defaults the same way.
In the next chapter, we will look at general considerations for model handling, supposing you may want to work with an already built model. The main thrust will be toward ensuring you use 3ds Max's scene organization, visibility, and collaboration tools well. The next chapter's topics include importing of content, rendering basics, scene transforms, and setting object properties.