


Chapter 1: Building a Foundation beyond the Basics
Adobe Illustrator has been the industry leader in vector drawing software for decades and continues to be a very popular choice for graphics professionals. As you begin your journey into this book, it is very likely that you have been working with Illustrator for some time now but want to get more from the software and raise your skills to a higher level. It might also be the case that you haven't worked with Illustrator for very long and hope to hone your early skills.
Whatever the reason, creators of all levels can still benefit from a review of the ins and outs of the advanced features and options available within Adobe Illustrator. This chapter can quickly check your confidence level and raise it even higher as you prepare to delve deeper into mastering this software. Although this is not going to be a thorough list of all the foundational knowledge you would need in order to master Illustrator, it is intended to get you on stable footing as we move forward in this journey of harnessing its power.
After reading this chapter, you'll understand how to organize and save customized workspaces. You will also know how to utilize the Properties panel and Control panel to select attributes and become more efficient with the use of panels and shortcuts for often-used tools and tasks. You will be able to stay organized by using a grid, guides, and/or smart guides, and finally, keep up to date with the latest enhancements offered for Illustrator.
To accomplish this, the chapter will be divided into the following main topics:
- Creating a file.
- Workspaces and preferences.
- Tools and the Control panel.
- Additional panels and shortcuts.
- The grid and guides.
- What's new in Adobe Illustrator 26.3.1?
Creating a file
In this first chapter, we will be reviewing some of the foundational bedrock of Adobe Illustrator that has allowed it to maintain its reputation as a powerhouse vector-based arts software for so many years. Control and customization are two key components of Adobe Illustrator that make it flexible for any designer's needs.
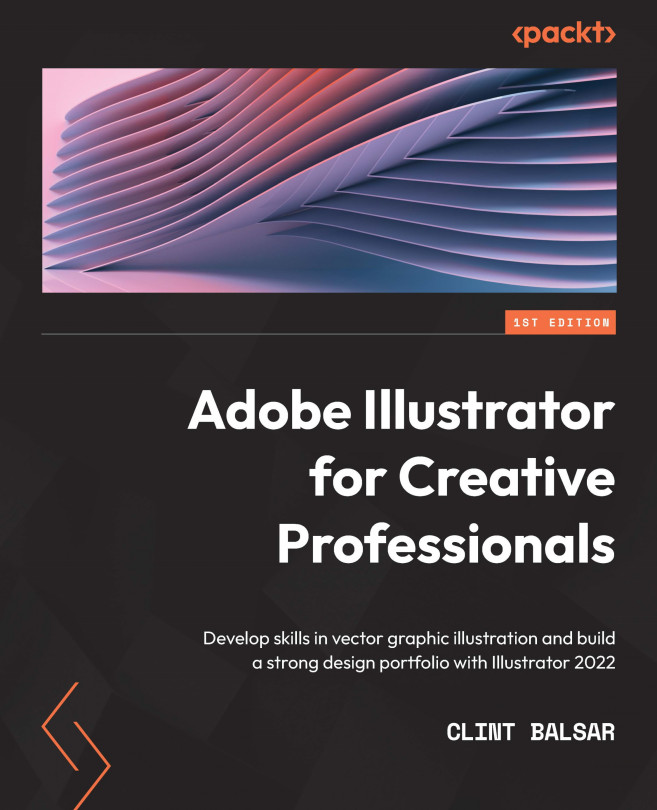
Once you have initiated Illustrator, you will be greeted with a welcome screen as follows:
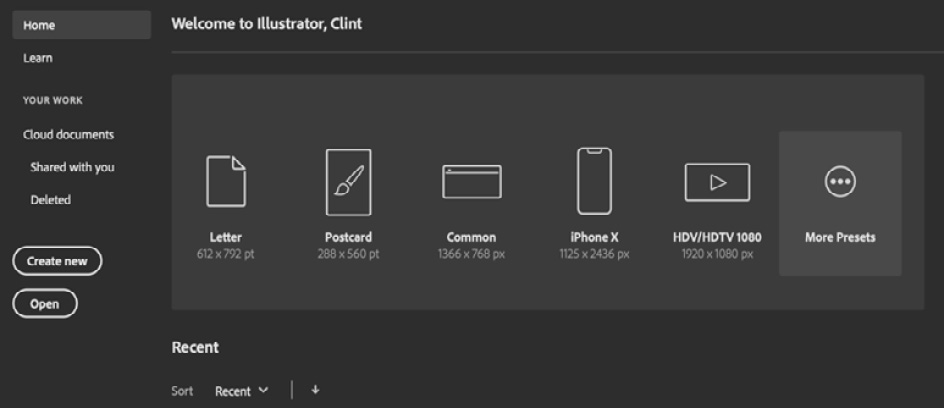
Figure 1.1 – Home screen options
This welcome screen will allow you to create new files, open previous ones (Recent is displayed prominently, while links are also available for Cloud documents and Shared with you), and even connect to Adobe's vast learning library. The latter offers both hands-on tutorials (in-app) and tutorials on the web. In addition to these options, you will also find a What's new button at the bottom left that Adobe updates with each new release of its software.
If you are starting a new file, the New Document dialog box allows you to choose from Presets based on your intended output (print or screen), Templates from Adobe Stock, or creating your own custom files, as follows:
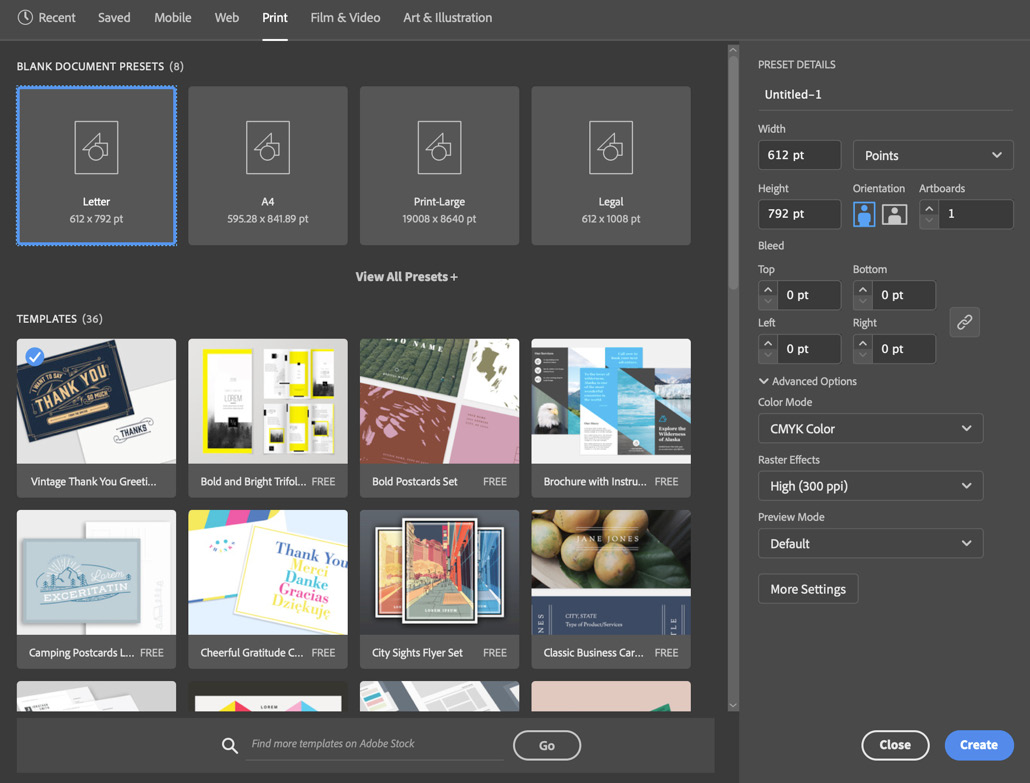
Figure 1.2 – The New Document dialog box
The presets are divided into the media categories of Mobile, Web, Print, Film & Video, and Art & Illustration. In addition, Illustrator also offers a category for Recent presets and Saved templates that you have acquired from Adobe Stock.
Workspaces and preferences
How you lay out your workspaces and develop that creative workflow will assist you in being more focused and efficient. Workspaces allow you to have the most common tools for the intended task while reducing unnecessary clutter.
Once you have greater control of your workflow management, you can then continue to make refined adjustments through the software's Preferences panel. This will give you the professional level of control that you will inevitably seek as you become more and more confident with the advanced options in Illustrator.
Workspaces
Illustrator currently offers the user nine different workspaces (plus Touch if your screen allows for it). These are merely a redistribution and/or visibility of the panels that would best be suited for the intended task. This allows the graphical user interface (GUI) to be reconfigured for the job you are performing or what feels most comfortable to you as the user. It also allows for the creation of custom spaces, if you would like to set up a unique environment that is best suited for you.
Workspaces can be selected in the Application bar located at the top right of the software's interface, as shown here:
Figure 1.3 – Workspace menu
As you can see in Figure 1.3, the Workspace menu has quite a few choices available. Essentials and Essentials Classic are great general-use layouts, but Illustrator also offers several workspaces for more specific tasks. Let's have a quick review of each one and what it offers:
- Automation: This offers up the panels you would like when doing repetitive work. The Actions panel allows for a series of prerecorded steps, while the Variables panel allows the use of data files (
.cvsor.xml) to replace the content with a document. - Essentials: This is the default view Illustrator opens with and simplifies the GUI to just three key panels: Properties, Layers, and Libraries.
- Essentials Classic: The previous default view that Illustrator used to open with and offers a good variety of the most common panels.
- Layout: This workspace is for those times when accuracy is crucial. The Transform and Align panels appear at the top right of the interface. It also allows access to multiple panels for object attributes, such as Fills, Strokes, and Gradients, as well as several panels for modifying the typography within the document.
- Painting: This offers the panels you would likely want for a painting project, including Brushes, Color, and Navigator.
- Printing and Proofing: If you are taking your document to the press, you may want to utilize this workspace. The key panel in this group is Separations Preview. It allows you to see your overprint preview by dividing your CMYK color space.
- Tracing: This allows you to image trace a raster image and adjust it for improved quality.
- Typography: Again, as the name would imply, you will find all the panels needed to make advanced adjustments to text.
- Web: This workspace has several familiar panels while adding the CSS Properties panel for those working with web content.
As well as these workspaces, customized workspaces can be saved and will appear at the top of the menu too.
Custom workspaces
To save a custom workspace, follow these steps:
- After creating a new document, open all the desired panels and place them where you would like them to be.
- Go up to the Switch Workspace button located at the top right of the Application bar and select New Workspace….
- Enter a custom name for your new workspace.
- You should now find this and any additional custom workspaces at the top of the list when returning to the Switch Workspace button or when using the Window > Workspace menu.
For those unfamiliar with arranging their own workspace, let's review the concept of the dock. Illustrator panels and panel groups can be collected in long vertical arrangements known as docks. To dock a panel, you will select it from the Windows menu at the top of the screen. Once it is open, it is considered a floating panel. To add it to an existing dock, you will need to grab it from the tab that includes the panel's name. This will be located at the top of the panel. You can then drag it over either a dock or a panel group to place it there.
Figure 1.4 shows what it would look like if you were about to add it to an existing panel group (left image), add it to an existing dock but outside a panel group (center image), and the result of adding it to an existing dock but outside a panel group (right image):
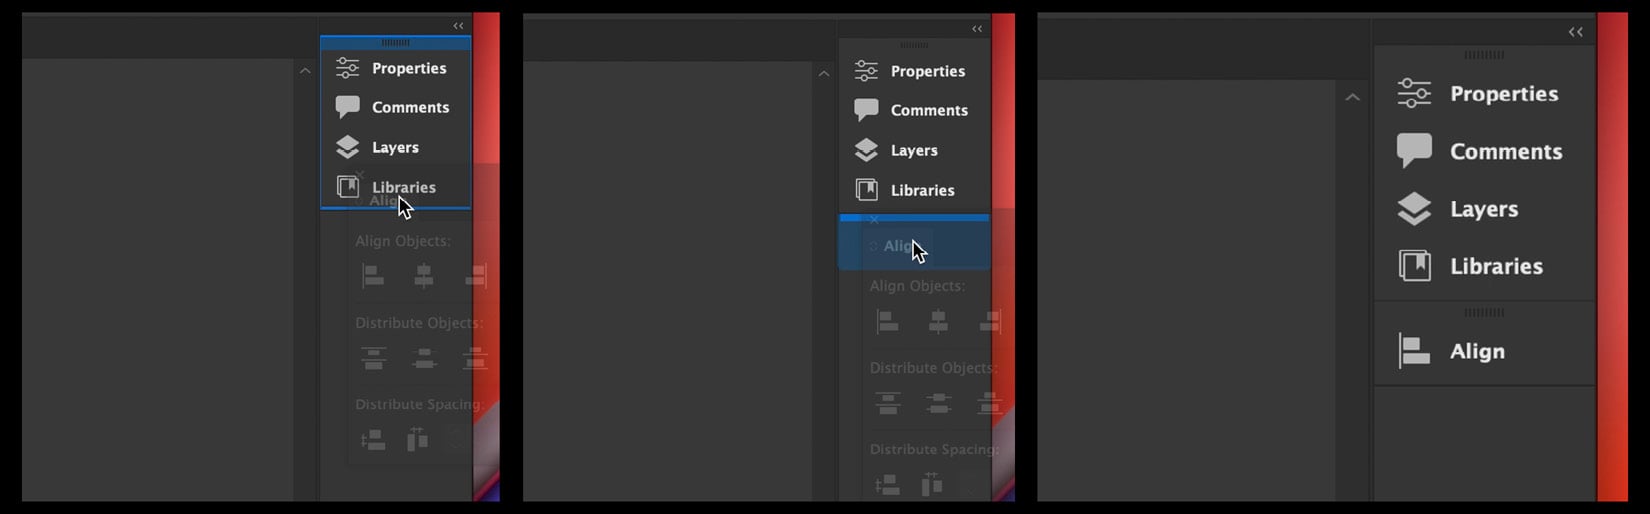
Figure 1.4 – Docking a panel
Custom workspaces are a great way to make Illustrator work for your intended purposes. I like to create custom workspaces for my multiple screen set-ups and third-party software. They are easy to create and remove, so don't be afraid to treat them as temporary aids to your workflow.
Custom preferences
Using the Ctrl/Command + K shortcut will bring up your preferences in several pieces of Adobe software (including Illustrator) and is an excellent place to start customizing Illustrator for your specific usage. From here, you can decide how many levels of Undo will get recorded, attach to a scratch disk, and set the time intervals between automatic recovery saves.
An excellent example of this is the Scale Strokes & Effects command located under the General section of this menu. I usually check this item so that the scaling of an object stays visually consistent at any size. I will be referring to this panel quite often through the course of this book, but for now, it is most important to know that it is available and allows for greater flexibility and customization for the user.
Contextual menus
An excellent option for quick access to commonly used tasks is the use of contextual menus. By definition, a contextual menu, or shortcut menu, gives you access to frequently-used commands related to the current context. It is generally brought up through a shortcut key or mouse button In Illustrator, after making a selection, you can right-click to see options for the selection:

Figure 1.5 – Contextual menu to an existing dock, but outside a panel group
In the case of the contextual menu shown in Figure 1.5, it highlights the options available to the path with the dashed white stroke. You will notice that it is the selected object due to the visibility of its blue bounding box. After summoning the contextual menu, you can use the Transform command to quickly make adjustments, such as adjusting the scale, and then either change the original selection or make a copy by using the Copy button.
Object attributes
At its simplest, every object can be assigned two attributes: Fill and Stroke. Of course, today, a variety of additional options can also be used to enhance any given object. In fact, an object can have multiple fills and strokes. You can adjust stroke width as well as apply variable stroke widths, brush definitions, and opacities.
Most of the adjustments to a path's attributes can be adjusted in the Control panel, located directly below the Application Bar (except in the default Essentials workspace). To assign more advanced attributes, such as adding multiple strokes to a path, you will need to make your way to the Appearance panel (which can be accessed through the Properties panel):
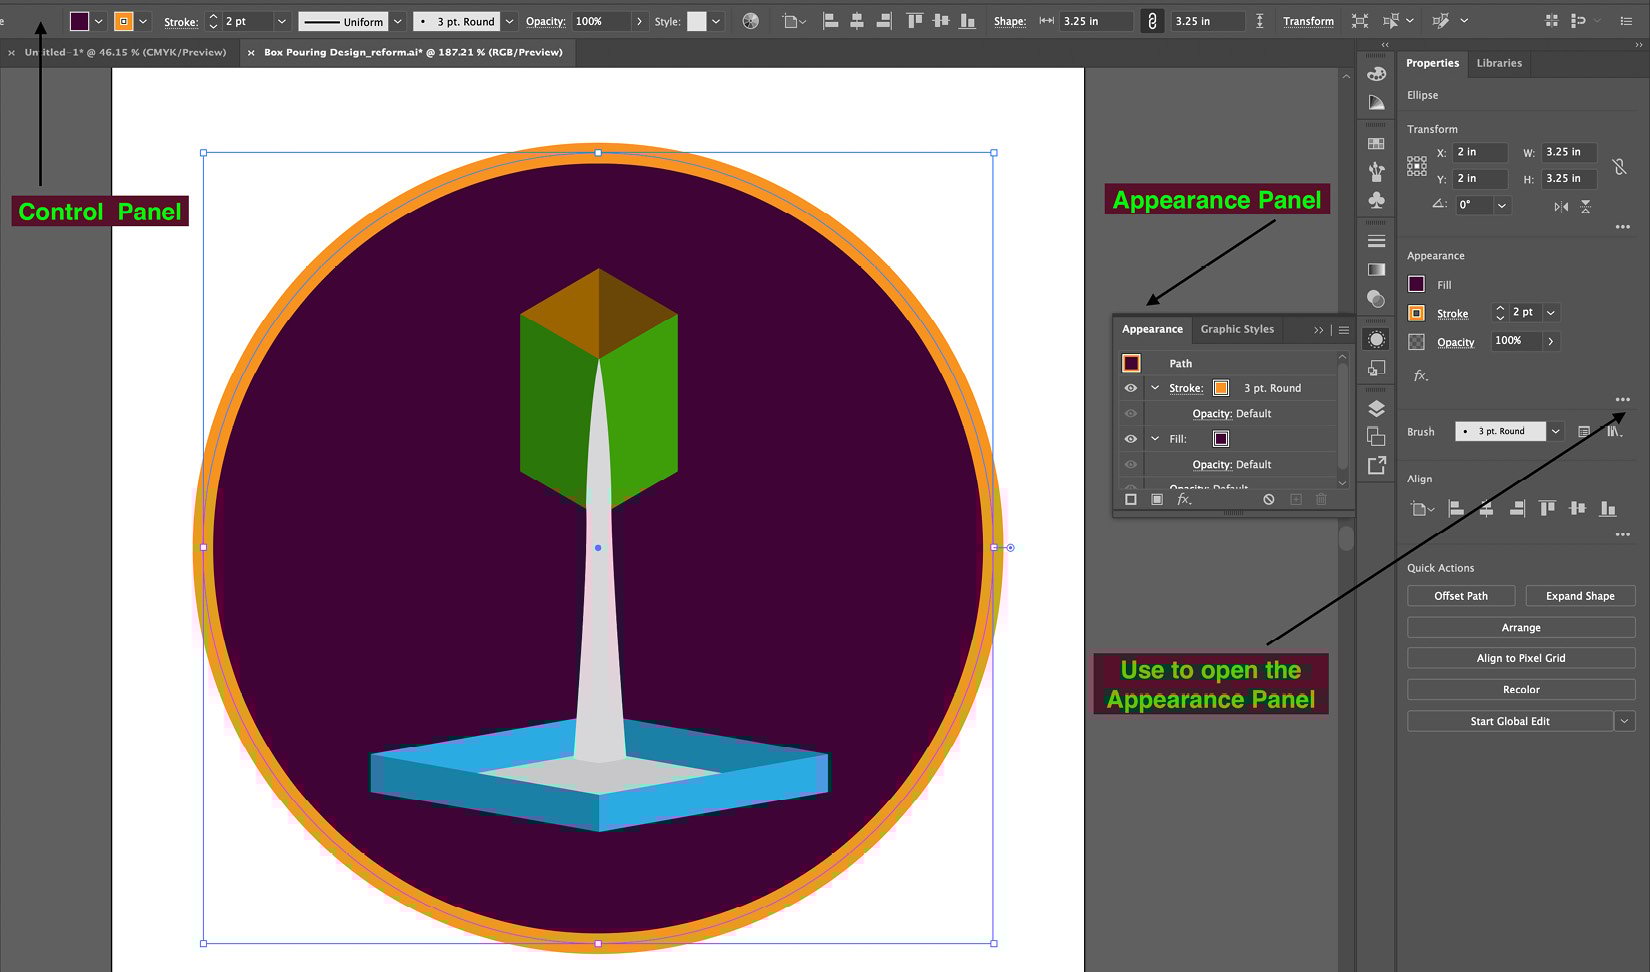
Figure 1.6 – The Control panel offers a lot more than just the Fill and Stroke attributes
As you may already be familiar with, the Fill attribute can be anything that can be a swatch in your swatches library. It can be a solid color, a gradient, or a pattern (None is also a choice). The same three choices of color, gradient, or pattern (plus None) are also available for the Stroke attribute.
Important Note
Setting up Adobe Illustrator is like finding the perfect recipe. You will continue to adjust it over time, and soon find that what was perfect for you at one time is no longer the right "flavor" and must be again adjusted for the specific situation at hand.
Understanding the multitude of ways to customize and utilize the GUI of Adobe Illustrator will help you solidify your success as you work to master your control of software. In extending the earlier analogy of the perfect recipe, consider that as chefs gain greater success, they inevitably also get more accustomed to their cooking tools and even customize them and their uses. Just as chefs hone their skills and the use of their tools over time, you too will find more benefits for the Workspaces and Preferences options over time and use them as your "secret sauce" in creating with Illustrator.
But of course, to successfully create in Illustrator, you must repeatedly use the main tools in Illustrator, while getting to know their specific capabilities (and limitations) over time.
Tools and the Control panel
I won't be going over all the available tools in this introductory chapter but will be reviewing some of those that are vital to successfully using Adobe Illustrator. In addition, I will share the Control panel for making choices and discuss the panel that Adobe has chosen as its replacement when in the Essentials workspace.
The Bezier curve
The development of Illustrator began from the earlier success of the PostScript language developed by the founders of Adobe: John Warnock and Chuck Geschke. The original was released in 1987 (which happens to be the same year I graduated from high school) for Apple Macintosh. The first official Windows offering occurred two years later with version 2.0 in 1989. Just like its predecessor, Illustrator was based on the PostScript language, which creates vector paths defined by mathematical formulas. The smooth curves were a welcome improvement in desktop publishing from prior pixel-based solutions.
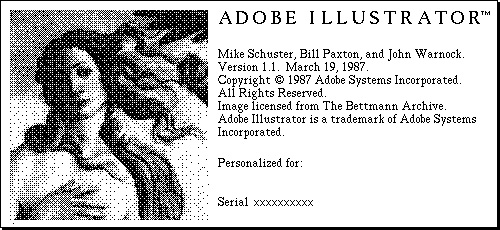
Figure 1.7 – Original Illustrator splash screen
So, the curve is fundamentally what makes Adobe Illustrator unique and essential. It is smooth at any resolution. In fact, it is generally stated that vector-based files are "resolution independent." It could be scaled to work just as well if it were for a business card or the side of a 10-story building.
The next couple of pages of tools are all based on the Bezier curve. If you are somewhat unfamiliar with all the tools and their shortcuts, you may use the following as a reference guide:
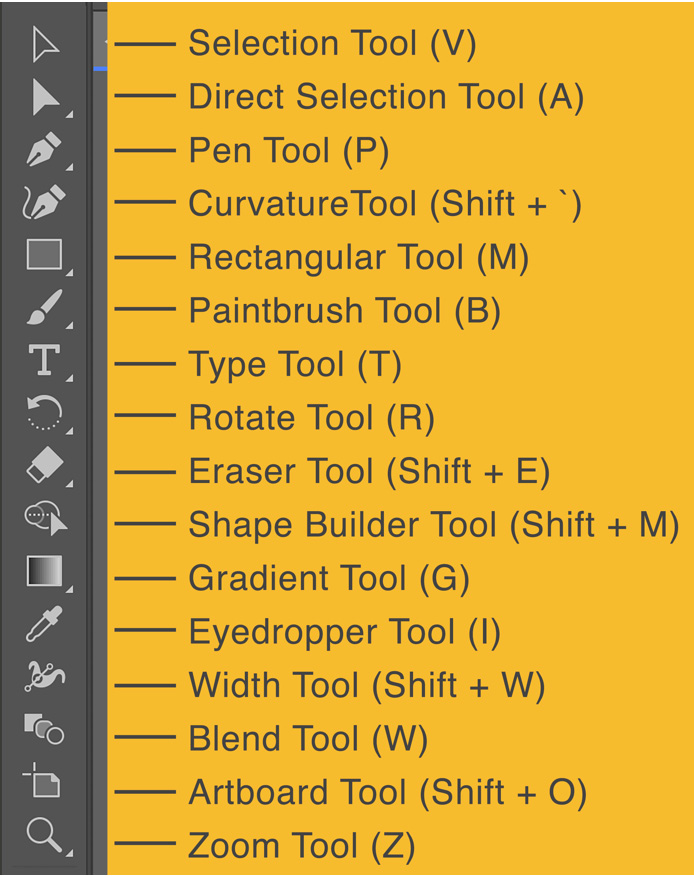
Figure 1.8 – Tools and their shortcuts in the Essentials workspace
Additional tools will be located under each of the tools that show a small triangle in the lower-right corner, and we will review all of them in later chapters.
Pen Tool
One of the most important tools to get skilled with in Adobe Illustrator is the Pen tool. It develops paths with either straight or curved segments between anchor points. It isn't always the most intuitive tool in the collection from Illustrator, but it is one of the most flexible.

Figure 1.9 – Path and anchors
Using the Direct Selection tool, you can edit any anchor or grouping of anchors. In addition to moving the anchor's position, you can also adjust its angle and size if it is a curvilinear segment of a path. Using the Anchor Point tool, you can also convert a corner anchor to a curve anchor and vice versa. To be more efficient when drawing with the Pen tool, several techniques can be used that will allow you to draw and edit simultaneously, and we will be going over these, and more, in the chapters to follow.
Type
Type has always been a strength of Adobe Illustrator since that is exactly how Adobe got started (think PostScript). For many years, Illustrator only had Adobe PostScript Type 1 fonts, but as the TrueType format (designed by Apple) gained in popularity, Adobe decided to allow support for both in version 7 and beyond.
This allowed content to be created for additional media, as Type 1 contains PostScript information for printing, while TrueType is a screen-appropriate font and not intended for print. Meanwhile, with the introduction of OpenType, which offers information for both print and screen, creators have found it to be the preferred method due to its flexibility.
Type tool is a collection of tools for text; besides the Type tool, there is also the Type on a Path tool and the Vertical Type tool.
Of course, you really can't mention the Type tool and not talk about the Character panel, which you can see here:
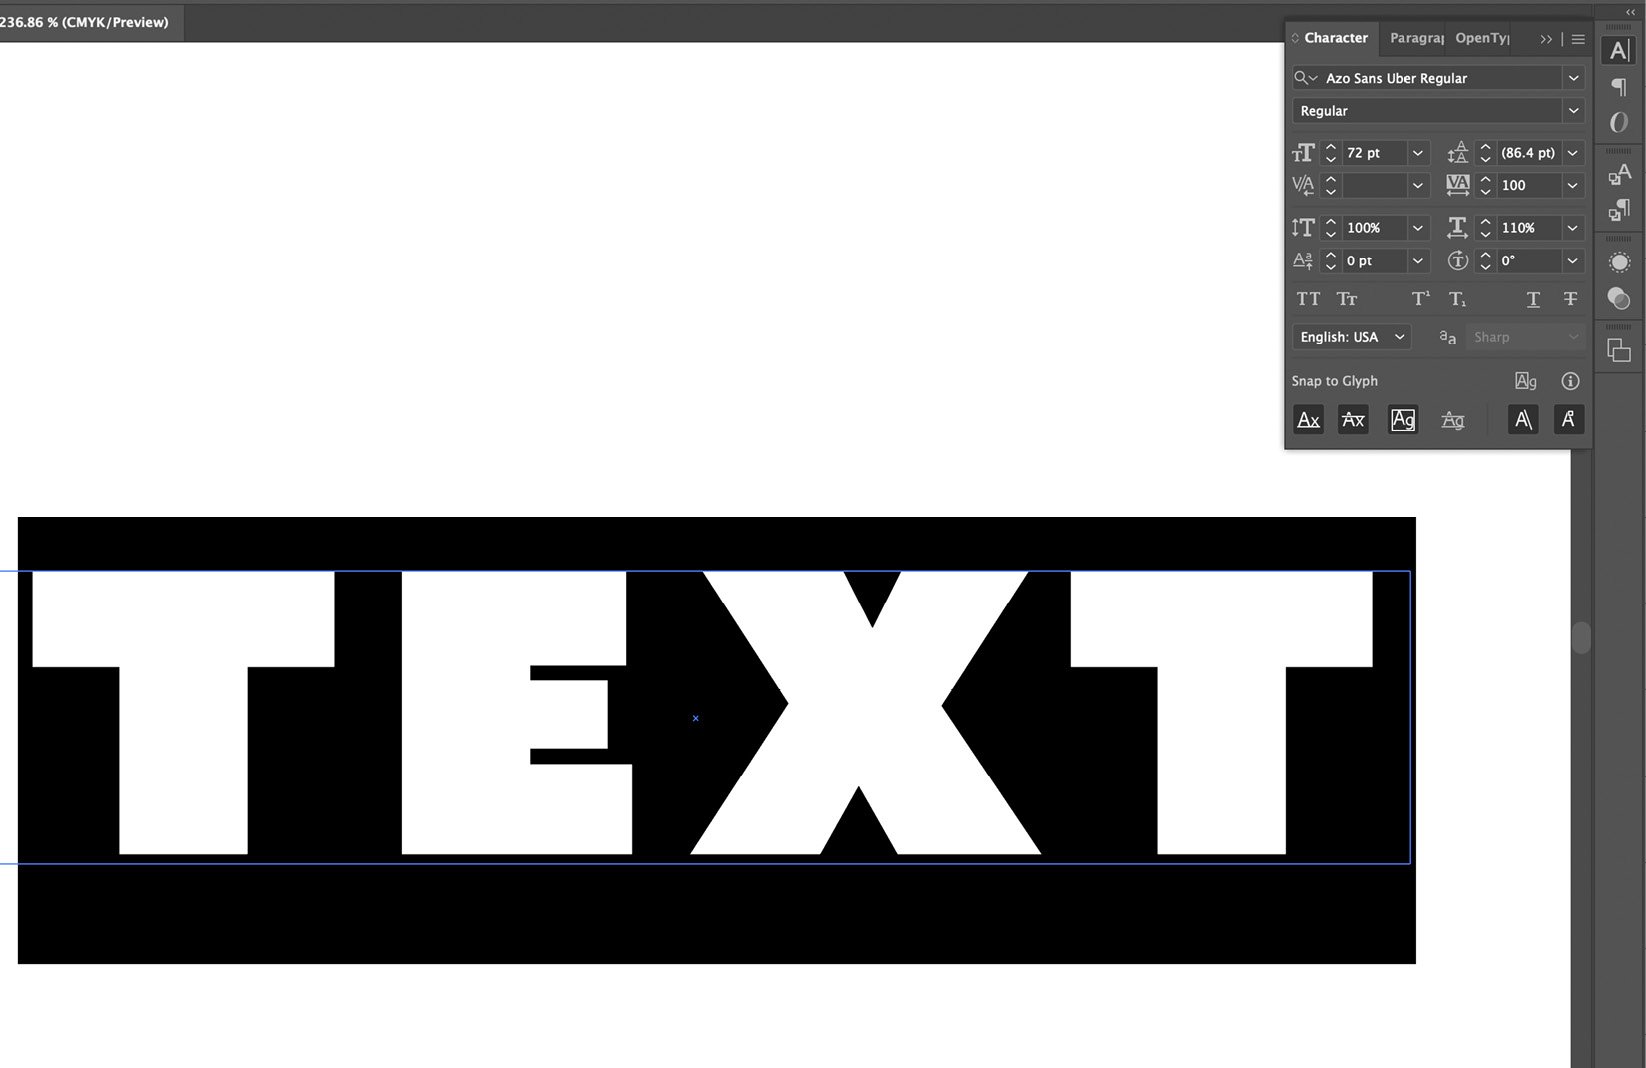
Figure 1.10 – Text editing with the Character panel
The Character panel can be made available by either selecting the Typography workspace or using the Ctrl/Command + T keyboard shortcut. Here, you can choose the font with a What You See Is What You Get (WYSIWYG) view as well as choose the typography Tracking, Kerning, and Leading elements (all elements of spacing).
Pencil tool
As a relative of the Pen tool, the Pencil tool can still be used to create vector paths but allows them to be drawn in a more natural and intuitive way. The best thing about it is that it can be edited in the exact same manner as the Pen tool. Both tools create paths and anchors in their results. It is only their method of creating those paths and anchors that vary.
Shape tools (Rectangle, Ellipse, Polygon, and Star)
Just like the Pen/Pencil tools (and similar), the shape tools make use of the Bezier curve to create their paths. Each shape can then accept the common attributes of Fill and Stroke, as well as the more advanced options and effects.
Shape Builder tool
This tool has grown to be one of my favorite tools in the entire set. After selecting a collection of overlapping shapes, you can quickly combine them by drawing a line across their intersecting paths. In addition, you can also subtract their intersecting shapes by holding down the Alt/Option key while clicking or drawing a line across them.
If you have been using Adobe Illustrator for many years now, you may already know the connection between this tool and the older tool known as Pathfinder. We will also be taking a closer look at Pathfinder and how the combination of these two tools allows for the most options.
Control panel
In the Control panel, you have a multitude of available visuals and choices at your disposal. To investigate just what will be shown in the panel when appropriate, right-click on the contextual menu to the far right of the panel to display the entire list of options:
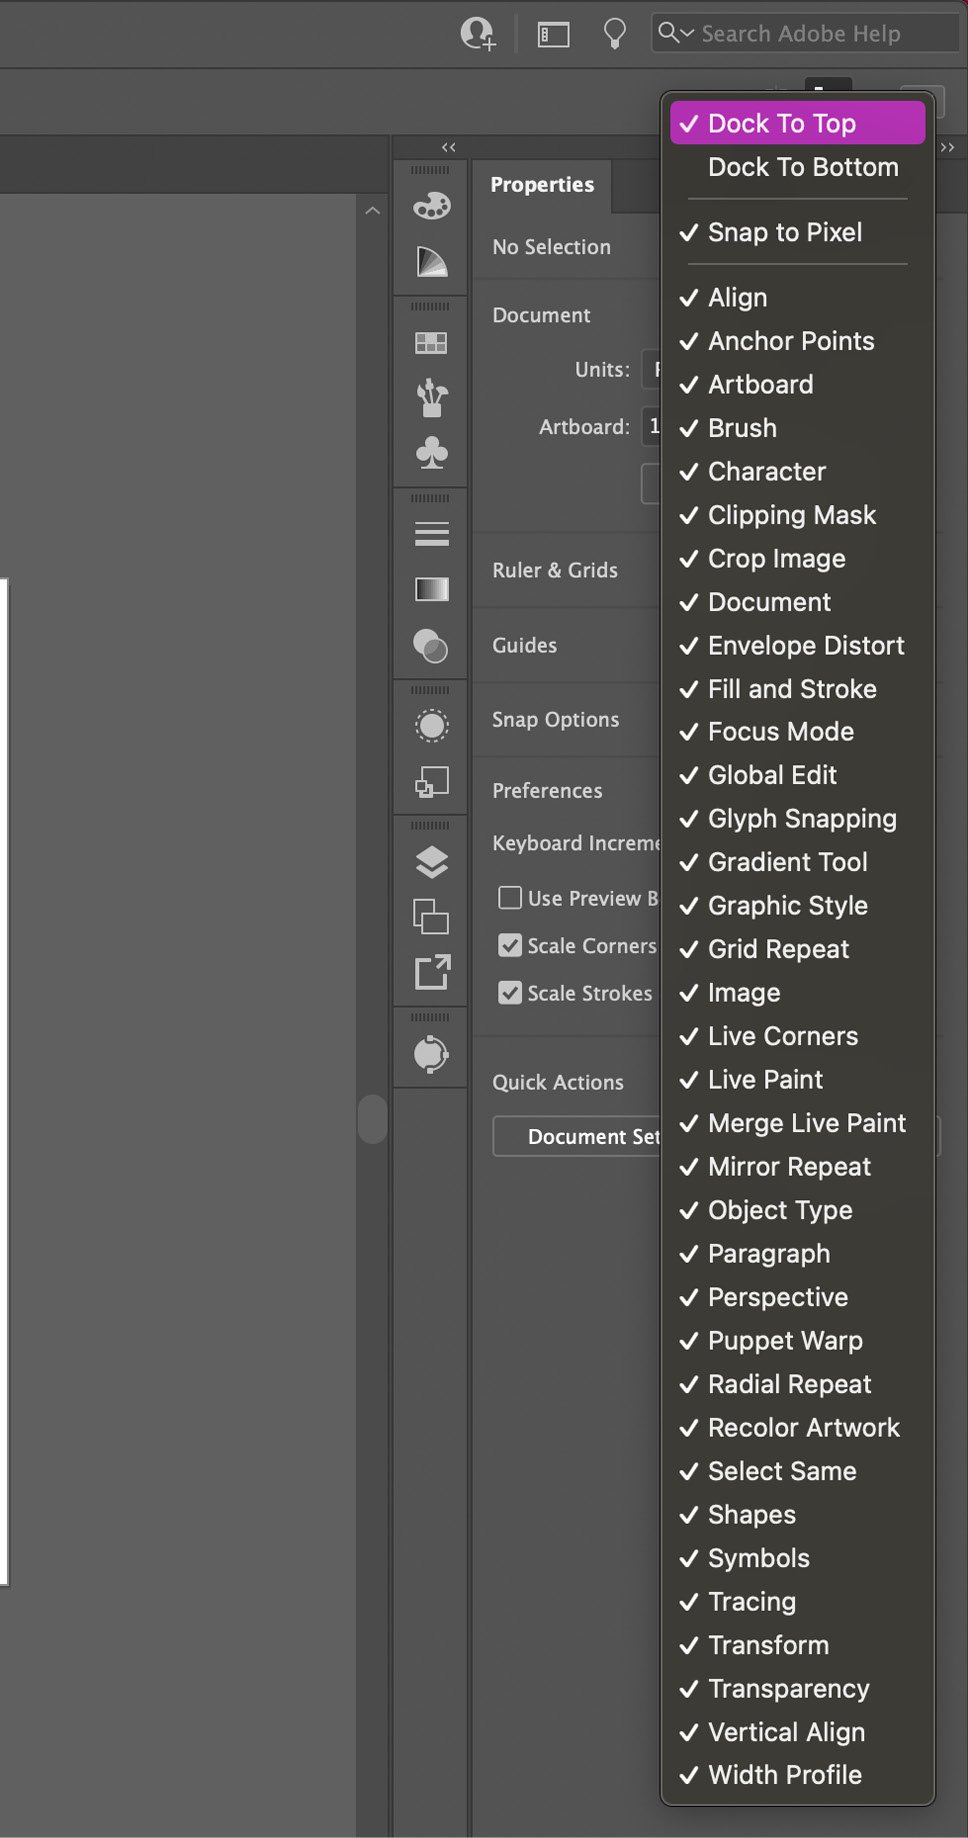
Figure 1.11 – Control panel view options
If any options are unchecked, they will not be displayed inside the Control panel, even when it is appropriate to do so.
As you can see in Figure 1.11, the Control panel allows for a lot of content in one small space on your screen. In addition, you can even choose to dock it to the top or bottom of the GUI.
Important Note
Adobe has elected to remove the Control panel from Essentials, which is their default workspace view. If you want to leverage the benefits of this panel, you can choose any of the other workspaces.
If you have been using Illustrator for quite a while you will understand why I wanted to discuss the Control panel and its usage before moving on to the newer Essentials workspace and the transition to using other panels and methods for finding information and options. If you have only been using Illustrator for a short time, then you may have been keeping within the comfort zone of the Essentials workspace, and this discussion will be helping you to venture into the additional options. Either way, it's important to acknowledge these foundational options before moving forward.
Additional panels and shortcuts
In moving forward, let's address those items that you should all have a common knowledge of. In this section, we will review the key panels for assigning attributes and editing them at any time. We will also look at a few powerful methods to keep designs organized as well as a few keyboard shortcuts you will want to know as you become more efficient while using the software.
Appearance panel
Once an object is selected, you can review and adjust assigned attributes and effects on the object (or similar objects). It will show different information based on what has been selected. If the selected object is a path, then the Fill and Stroke attributes will be displayed. It will also display Opacity and Blending Mode attributes, as well as effects applied to the path. This can also be where you choose to add any or all the aforementioned attributes.
When looking for the Appearance panel, look for an icon that appears to have a circle with a solid white fill and a white dashed line stroke around it, as in Figure 1.12:
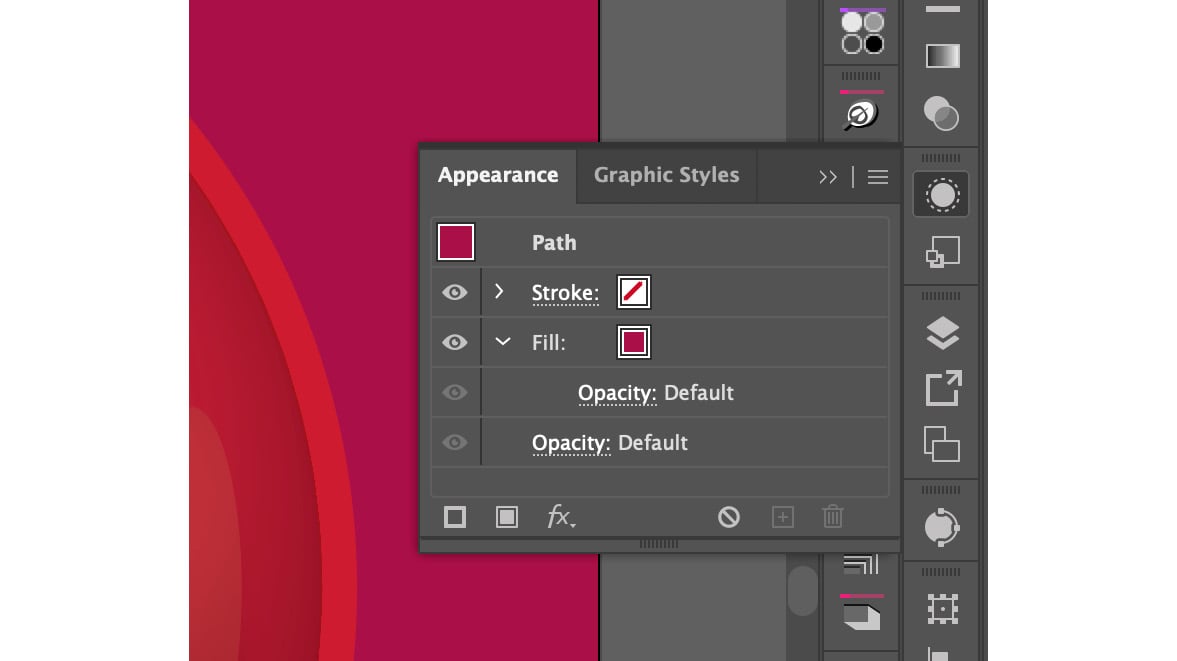
Figure 1.12 – Appearance panel showing the properties of the selected object
You may also summon the panel by going to the menu and choosing Window > Appearance. Note that the information within this panel will change each time you select a different object, multiple objects (selecting while holding the Shift key), or groups.
Properties panel
The Properties panel is a bit of a one-stop shop for viewing attributes of a selected object and quickly adding to or modifying it. This Swiss Army knife of a panel allows for Transform adjustments, Appearance adjustments, Alignments, and additional Quick Actions, such as Arrange and Recolor. If there is currently nothing selected, the panel allows you to set up several document and user interface options, such as Ruler & Grids, Snap Options, and Document and Artboard settings:
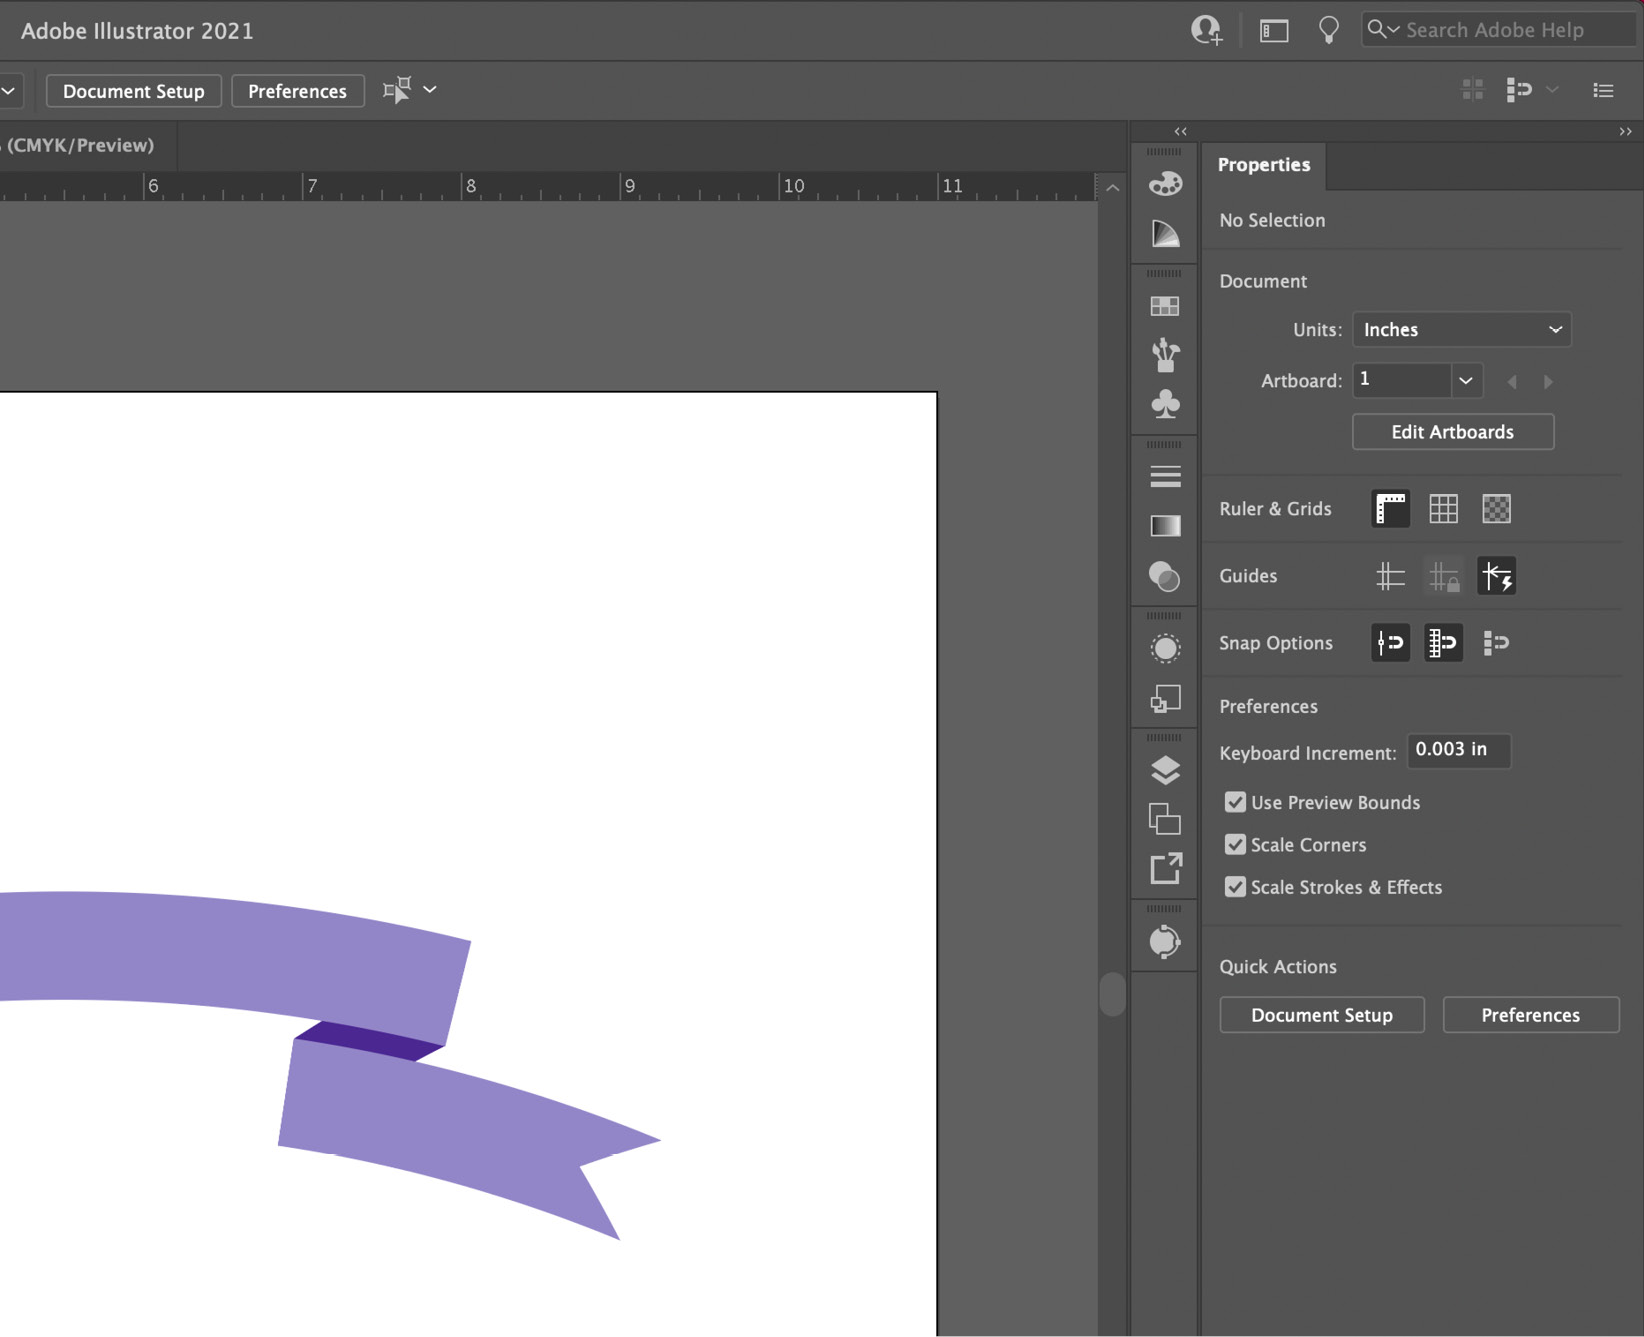
Figure 1.13 – Document properties
While using the Selection tool, you will find the document's properties in the Properties panel when nothing is selected. From this panel, you can change the unit of measurement, add artboards, and many more options. Located at the bottom of this panel will always be Quick Actions. This area showcases several shortcut buttons that may accelerate your efforts. In the scenario shown in Figure 1.13, the two buttons available to you will be Document Setup and Preferences. Once an item or items becomes selected, the panel changes to display the properties available for that specific situation:
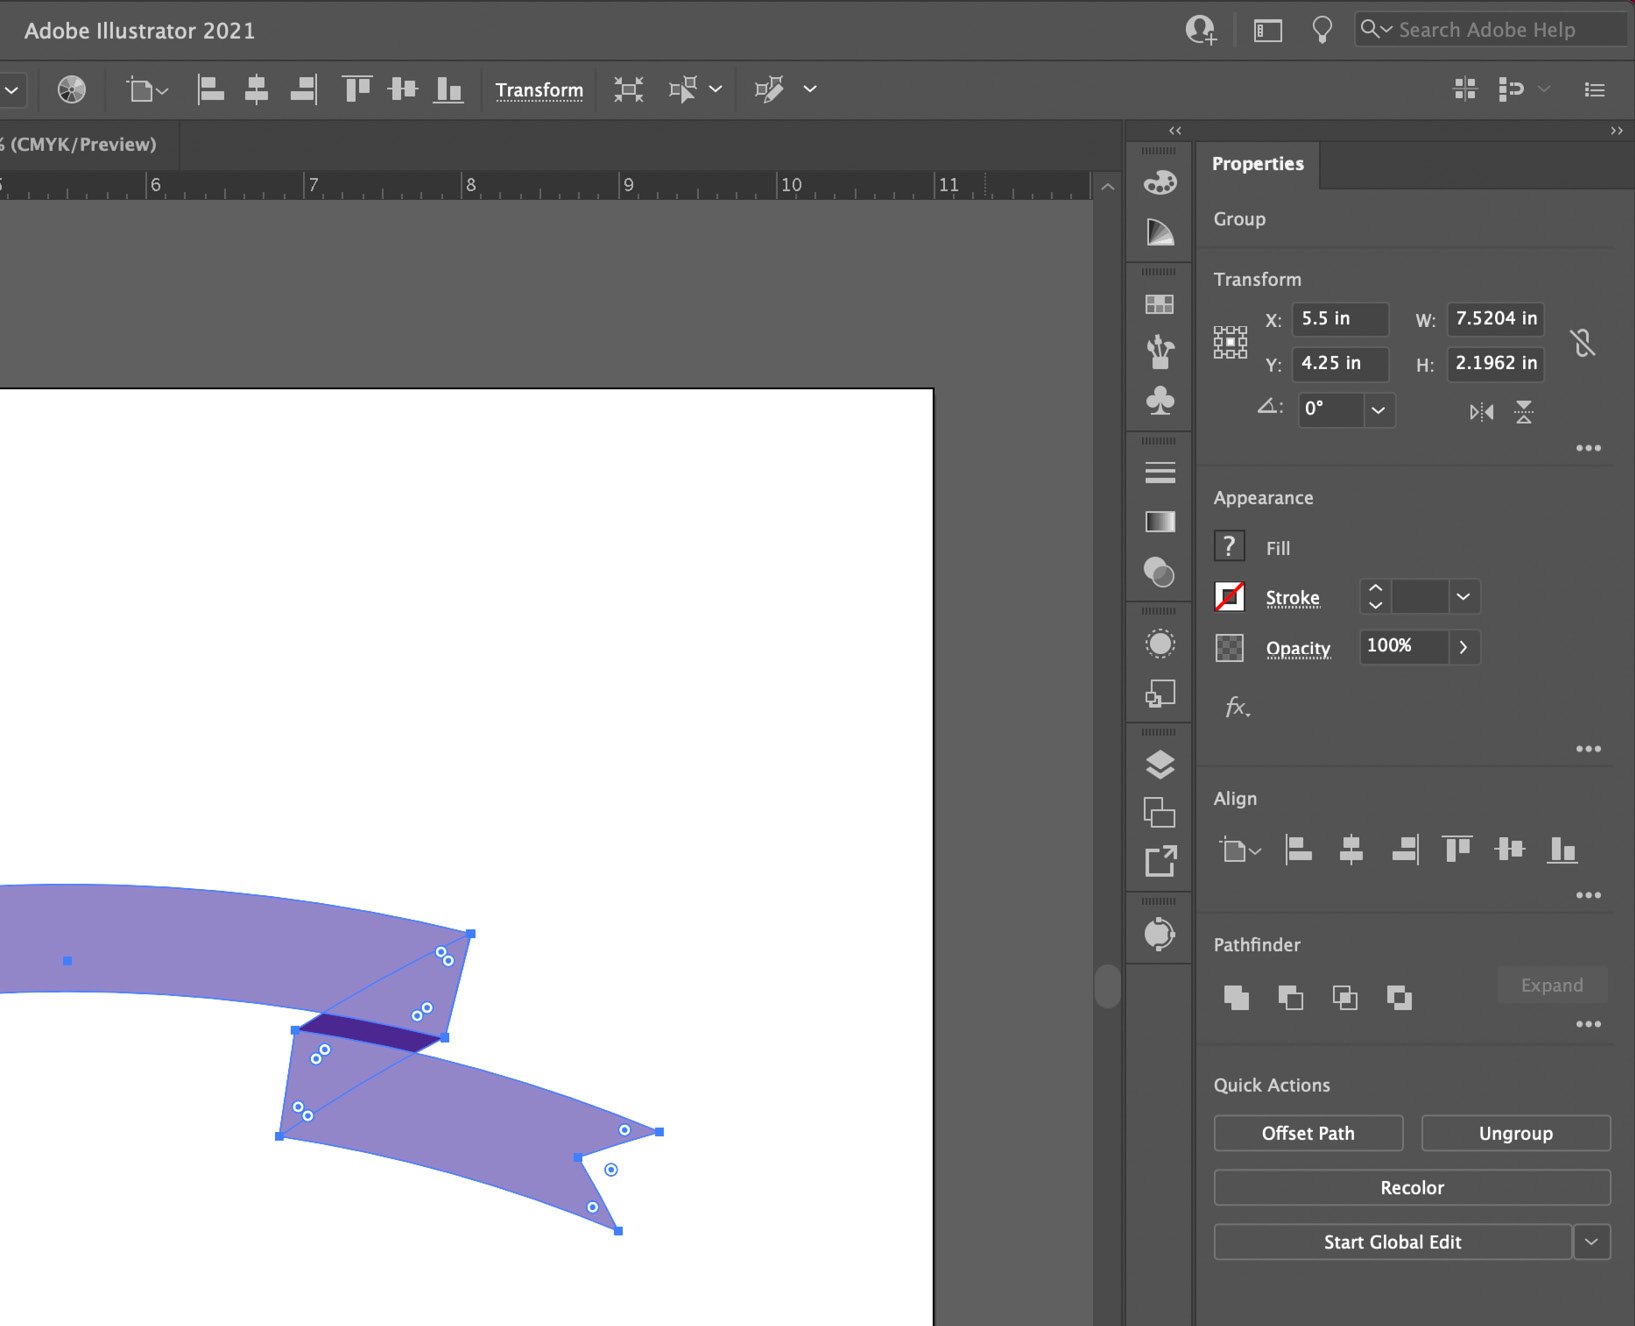
Figure 1.14 – Properties panel showing options based on selection
Several manipulations can be accomplished using this panel, including access to the aforementioned Appearance panel. Many of the options are available there, while any additional options can be accessed using the More Options button located in the lower-right corner of each section.
You should now feel comfortable with setting up and adjusting your workflow for a variety of intended tasks, while continually becoming more efficient with your process of creation. You may find that your current situation still requires a more precise layout, though. In such cases, I would highly recommend the use of the following compositional aides.
The grid and guides
One of the key methods for keeping your designs to a high professional standard is precision. By using the following layout methods in conjunction with a variety of alignment techniques (we will be going over them in future chapters), you will be able to construct with confidence.
Grid
You can quickly view (and hide) your grid layout by using the Ctrl/Command + ' keyboard shortcut. In addition, if you would like to customize the grid, you can summon the Preferences panel with the keyboard shortcut of Ctrl/Command + K. One benefit to turning on the grid's visibility is the ability to snap to it. You can activate Snap to Grid using the keyboard shortcut of Shift + Ctrl/Command + ' as shown here:
Figure 1.15 – Grid view
Be sure to use the Properties panel to customize the grid to your liking. From here, you can choose Snap to Grid or go into the preferences by using the Quick Actions button to change the dimensions, style, and color of the grid.
Rulers
After turning on the Rulers view (Ctrl/Command + R), you can further utilize the tool by adjusting the unit of measurement. Just right-click on either ruler to see a contextual menu for all the available units of measurement, and then select your preferred units:
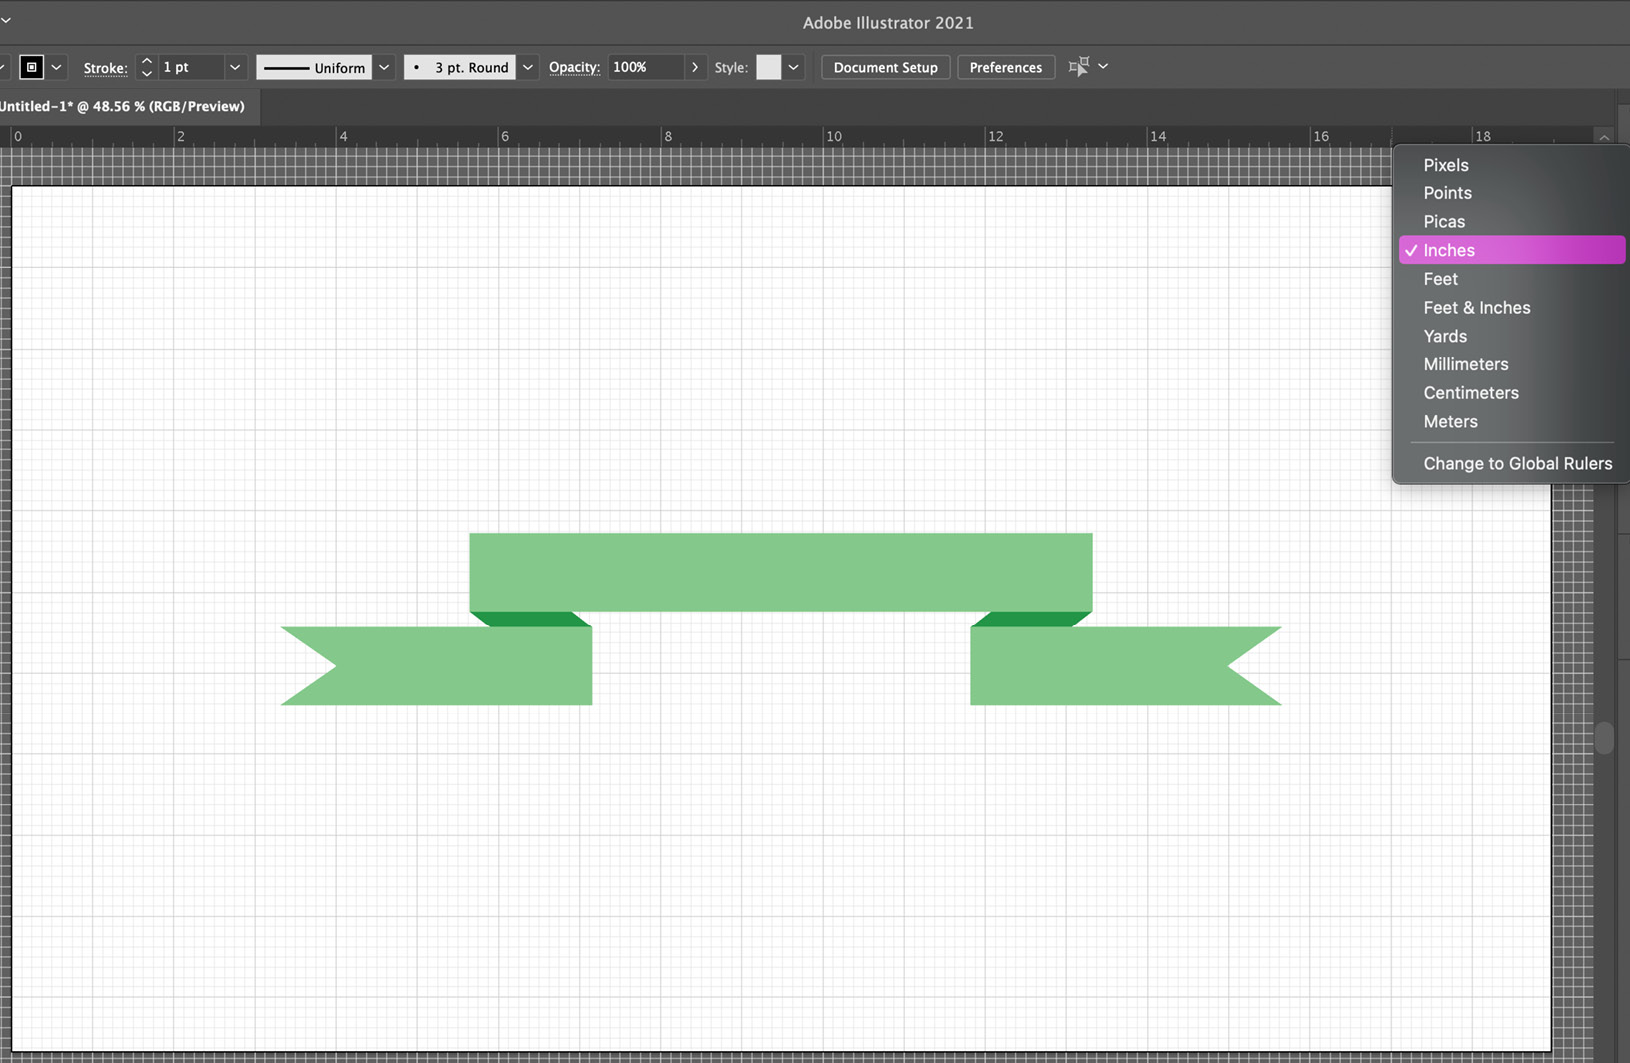
Figure 1.16 – Rulers view
I suggest changing your rulers to the unit of measurement your intended output will use. For example, if you are intending the graphic for the web or screen, then using pixels is likely the best choice. If the end result is to go to print, then the units should relate to that.
Guides
To add guides, just locate your cursor inside the vertical ruler to click and then drag a vertical guide and, similarly, locate your cursor inside a horizontal ruler to click and then drag a horizontal guide.
Guides are non-printable, so use them as needed to create order within your documents. Guides work well for developing templates that you can later share with colleagues or clients to help speed along the design process while ensuring accuracy. You can use the Ctrl/Command + ; keyboard shortcut to quickly view (and hide) your guides:
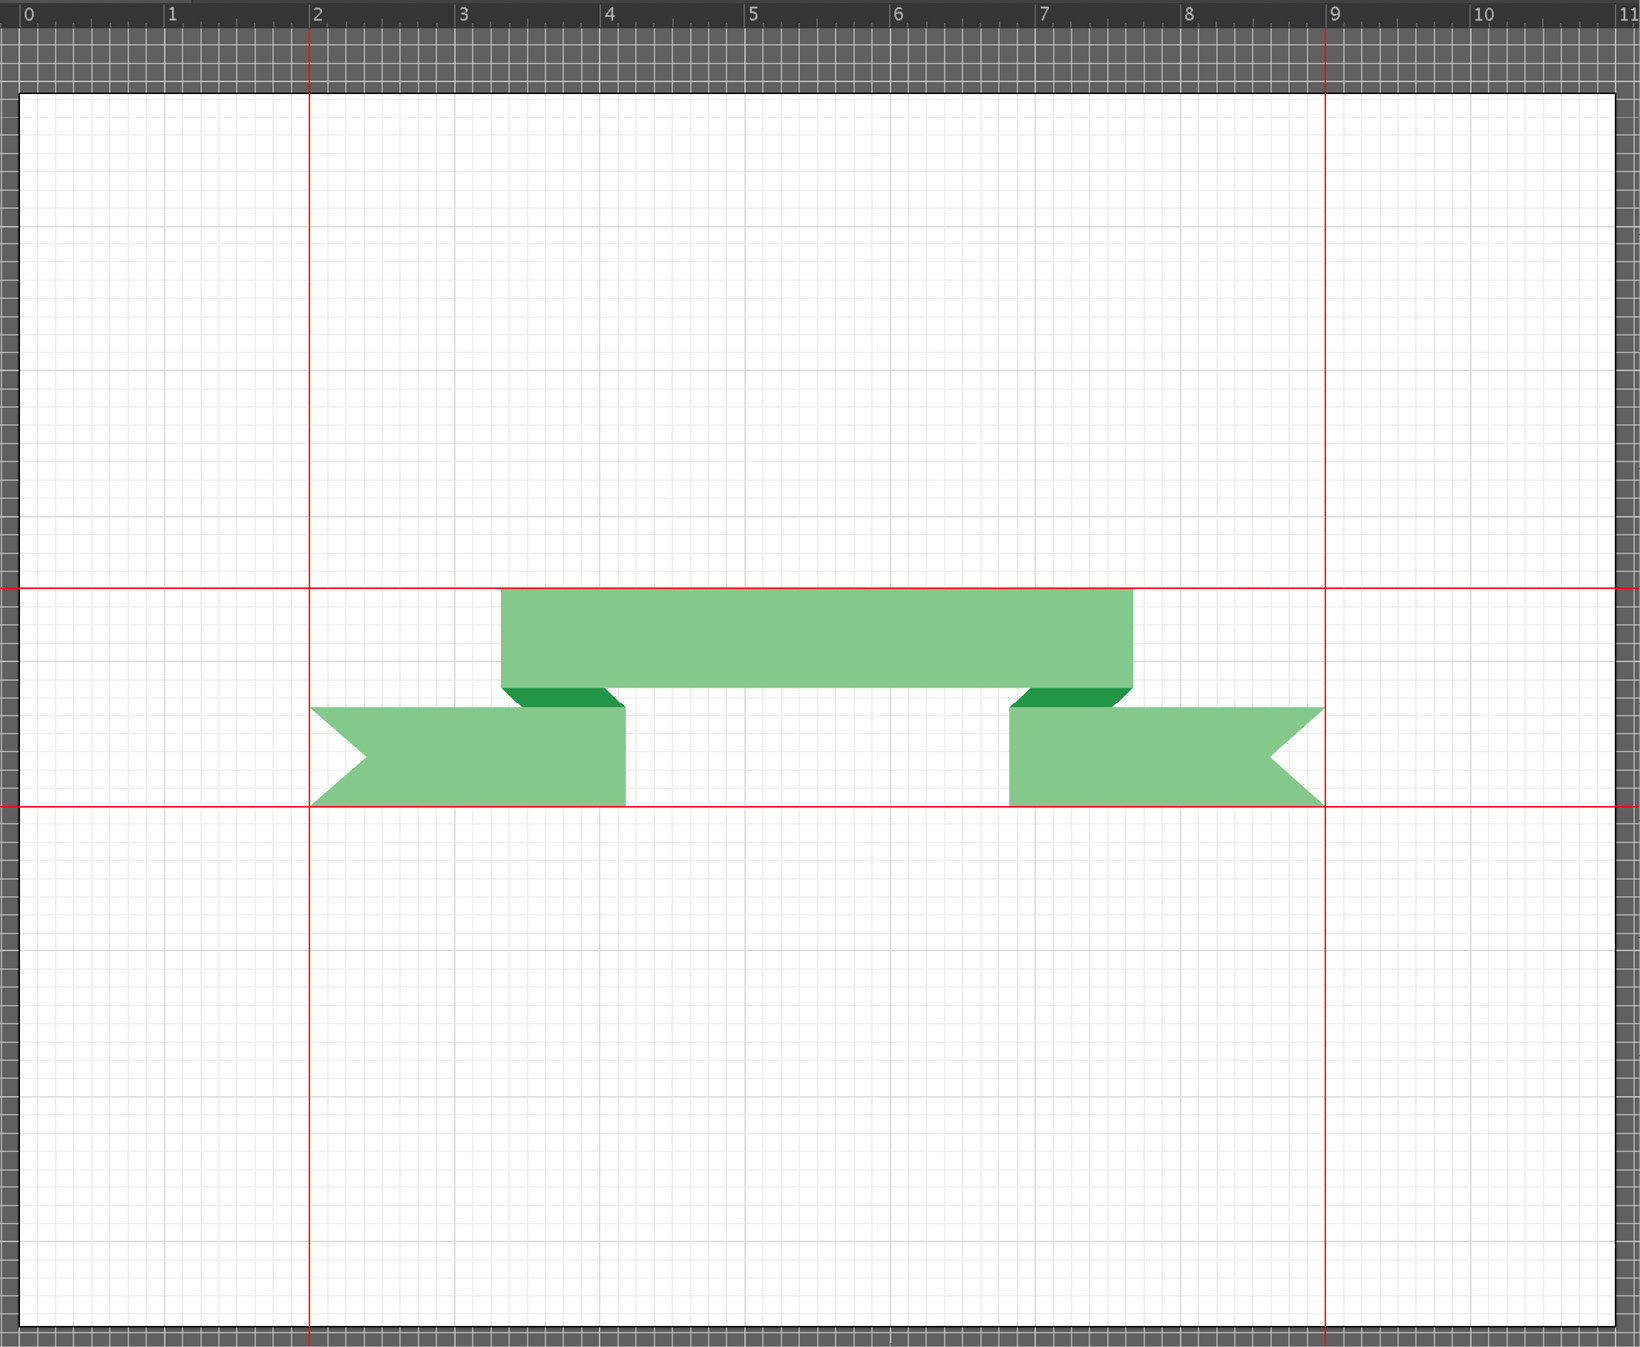
Figure 1.17 – Guides
As mentioned earlier, the guides can be created by pulling them from the rulers. After they have been created, they can be moved by dragging them, or even deleted (just drag them back into the ruler). Go to the menu bar and choose View > Guides > Lock Guides to keep from accidentally moving guides around or protect them as a template before sharing with others. To make your guides more visible, open your system preferences (remember that this was discussed earlier in this chapter) and change the color of your guides to something that offers a greater contrast to your work:
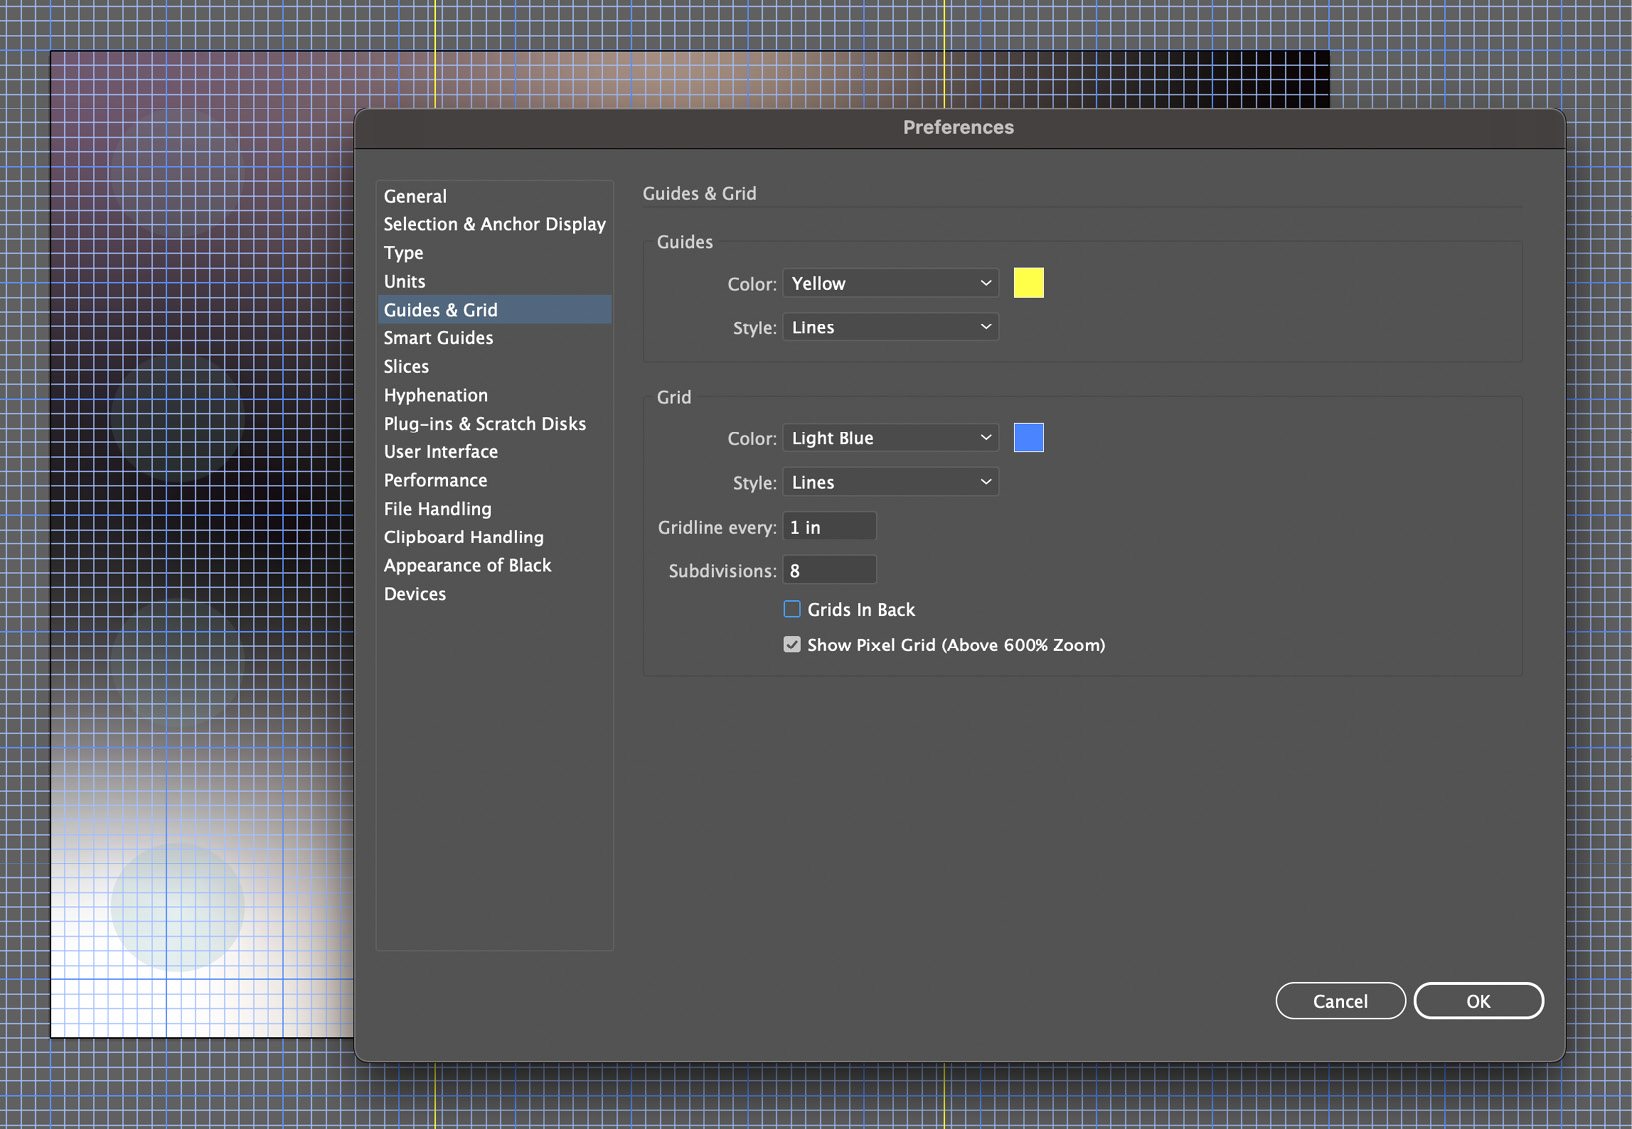
Figure 1.18 – Guides & Grid adjustments within the Preferences panel
In Figure 1.18, you can see that the work is predominately made up of cool colors, so having guides with a color with a warm hue helps to separate it from the artwork and offers greater visibility.
Consistency will be the key to mastering your designs, and using these layout aides should allow you to check for accuracy and deliver work that you are confident in its exactness.
As much as we all try to stay on top of things when it comes to the technology we use, it is inevitable that upgrades and improvements (even setbacks, at times) will continually require us to learn more. Even if you are comfortable with Adobe Illustrator and the topics I have addressed so far, you may find this book helpful in discovering some of the newest tricks this tool can do.
What's new in Adobe Illustrator 26.3.1?
Adobe is continually improving its software and releasing updates, so the following information relates to the May 2022 release of Illustrator on the desktop (version 26.0). We will be going over many of these items later in the book, but for now, I'll just offer a quick highlight of what each is and what it can help you do. In addition, you may want to select the What's new button, which is located at the bottom left of the Home screen, for the very latest additions.
Adobe Sensei
With Adobe's ongoing quest for improvement, they continually advance their software to the cutting edge of technology. Nothing can better illustrate that than their latest efforts in artificial intelligence (AI). Adobe Sensei uses a neural network to make informed decisions. Adobe Sensei will help you create and deliver content with less effort or fewer steps. This is an ongoing process of software engineering, and updates are continually bringing us more opportunities for success. To view their latest offerings, be sure to visit https://www.adobe.com/sensei.html.
Illustrator on desktop
The following list of features are all examples of what Sensei adds to Adobe Illustrator:
- Puppet warp: Creates a warp mesh over your art, which can then have adjustment pins added for controlling the warping effect.
- Global editing: Similar items can now be intuitively selected and batch edited.
- Curvature tool: This uses past usage and experience to make an educated guess about the angle and distance of the curves created by the tool.
- Freeform gradients: This is an advancement from the mesh gradients that you may be used to. I think you will find this much easier and more logical.
- Content-Aware Crop: Illustrator can make crop suggestions based on the image and your intended output.
- Recolor Artwork: The Recolor Artwork panel has just gone through a major update and now allows for more color variations. It is now more compact and scaled down to just show the more popular tasks, but still offers an Advanced Options button to get to the panel as it used to be.
Aside from Sensei, Adobe has also introduced several additional features to Illustrator in this latest update:
- Collaborative editing: Edit with a friend or colleague by utilizing Adobe Cloud sharing.
- Patterns in a click: Repeat is Illustrator's new way to produce complex patterns quickly. Under the Repeat command, you can now develop patterns using either Radial, Grid, or Mirror methods.
- Enhanced Glyph Snapping: Aligning your graphic elements to your text in several ways.
- Cloud documents: Adobe has made major strides in developing a true cloud-based option for file storage and integration. Although they have used the Creative Cloud moniker for many years, it is only recently allowing full-scale storage, offline editing, and collaboration.
In addition to all these latest features that have been brought to the desktop version of Illustrator, Adobe has also been working hard to improve Illustrator on the iPad.
Illustrator on the iPad
Adobe has already had success with adapting several of its desktop applications to mobile devices, and now it is Illustrator's turn. At this time, they have developed the Illustrator iPad version, but have not developed a version for other platforms. If history repeats itself, they may develop something for additional platforms later.
Here are some new features for Illustrator on the iPad:
- Work offline: This is welcome news to anyone that travels and does not always have the good fortune to be connected to the internet.
- Advanced export controls: More options for file types and control for each have been added. You can export your iPad illustration as a JPEG, PNG, SVG, PDF, or PSD. Depending on which file format you choose, several options will be made available to you, such as color model, quality, and the resolution intended for the document. In addition, you will now be able to export the entire document, an artboard or range of artboards, or a selection.
- Enhanced Blob Brush: This tool is now working much like it would in the desktop version.
- Transparency grid viewer: Bringing over this display option from the desktop version, you can now set the view of your artboard to transparent instead of the default white.
- Support for template format: Adobe has taken a major step toward making the app a professional-level tool by adding support for template format. This allows the use of prefabricated templates to accelerate your workflow.
Important Note
Adobe Illustrator on the iPad is getting updates at a feverish pace, but this book will cover the options that are available at the time of publishing.
At the time of this writing, Adobe has updated Illustrator to include native support for the new Apple Silicon M1 chip. This is a perfect example of how the improvements come at a faster and less regulated pace than in the past. Since changing from a single purchase (with upgrades) model to the subscription model, we have been given access to updates as soon as they have been beta-tested and deemed ready for consumers.
Summary
After having completed this chapter, you should now have the base knowledge needed to begin delving deeper into the options, enhancements, and recent additions to Adobe Illustrator so that you can truly master the software and have greater success in bidding it to do what you wish. This level of control falls into five key categories; they are workflow, customization, control, efficiency, and organization. Under the category of workflow, you should now understand how to find an appropriate workspace for your needs and save customized workspaces for more specific situations. Under the categories of customization and control, you should be able to find the Properties panel to customize Illustrator and the Control panel to select attributes and options for a selection. Under the category of efficiency, you should be able to accelerate your work with the use of panels and shortcuts for often-used tools and tasks. And finally, under the category of organization, you should know how you could stay more organized by using rulers, a grid, and/or guides.
In the next chapter, we will be preparing Illustrator for the instruction, activities, and challenges throughout the rest of the book. After prepping the software and discussing some suggested methods of digital asset management, you should feel comfortable and confident that you can move on and grow in both your knowledge and skill.
