


In this chapter, we will cover:
Inventory management setup
Setting up branch/plant constants
Setting up inventory transactions
Defining item information
Defining segmented items and templates
Item classification
Item Unit of Measure (UOM) conversion
Item branch/plant setup
Item costing and pricing
Inventory management is a core module of the Supply Chain Management modules. It is necessary to understand how to set up and manage inventory in order to effectively work with all in order the other programs in JD Edwards EnterpriseOne. The JD Edwards EnterpriseOne Inventory Management system defines inventory items, which enables you to manipulate inventory throughout the supply chain. The Inventory Management application integrates with the following EnterpriseOne applications:
Inventory management is a core module of the Supply Chain Management modules. It is necessary to understand how to set up and manage inventory in order to effectively work with all in order the other programs in JD Edwards EnterpriseOne. The JD Edwards EnterpriseOne Inventory Management system defines inventory items, which enables you to manipulate inventory throughout the supply chain. The Inventory Management application integrates with the following EnterpriseOne applications:
In this recipe, we will see how to set up the inventory management default options. There are several tasks that need to be completed before you can set up the actual inventory management system setup.
Before you start, you should make sure that the general accounting system has been configured, in order to integrate the inventory management module with the general accounting system. The inventory management default setup can be accessed from the G4141 menu.
1. To set up system constants, select Sys. Constants from the form menu on the Work with Branch/Plant Constants form, in order to access the system constants.
2. Select the checkbox for Unit of Measure Conversion by Branch in order for the system to display the item-specific conversion table when you add an item to a specific branch/plant.
3. Select the Update Average Cost On-Line checkbox so that the system calculates a new average cost immediately after any transaction that affects the average cost of an item occurs.
4. Select the Scientific Rounding checkbox to indicate that scientific rounding should be performed.
5. Select the relevant checkbox to indicate whether the system should apply the Ship Ascending Date Rule by customer and by item.
6. Select the appropriate value by clicking on Visual Assist for allowing duplicate lots. You can choose from the following options:
Duplicate Lots Not Allowed (is value "1"): The lot is restricted to one item and one branch/plant
Duplicate Lots Allowed (is value "2"): Allows you to create a lot that contains multiple items and branches/plants
Duplicate Lots Not Allowed (is value "3"): The lot is restricted to one item, but can contain quantities in multiple branches/plants
7. To set up warehouse locations, select Location Def from the row menu on the Work with Branch/Plant Constants (P41001) form.
8. On the Work With Location Master (P4100) form, click Add to enter locations individually.
9. On the Work with Default Location & Printers (P400951) form, click Add and then enter the name of the default printer.
10. To set up standard units of measure on Work With Standard Units of Measure (P41003), click Add to set the unit of measure conversion. You can access the Standard Unit of Measure Revisions (P41003) application from Work With Standard Units.
11. Item cross reference set-up can be accessed through Work With Item Cross Reference (P4104). Click Add to set up item cross referencing.
12. To set up messages, select a record and then select Revisions from the row menu on the Work With Print Message (P40162). You can define a print message, which can be attached to different document types, customers, or suppliers.
13. To set up document type information, click Add on the Work With Document Type (P40040) form. Enter the document type code and description. The document type code should be a two-digit code, and the description should not be greater than 10 characters in length.
14. To set up Automatic Accounting Instructions, enter DMAAI on the fast path, and access the AAI application, Work With AAIs (P40950).
15. Select the AAI that you want to setup, and select AAI details from the row menu on the Work With AAIs (P40950) form for entering the financials AAI object account.
 |
Before you can begin with Inventory Management, it is necessary to perform a number of minor setups. You need to set up System Constants to specify which functions to perform. For example, assume that you have several branches/plants and you use different units of measure for the items in each branch/plant. You can set a system constant to automatically convert units of measure by branch/plant. A system constant is configured at the branch/plant/company level.
In addition, Location Control is required for the EnterpriseOne warehouse management system, but is optional for all other distribution systems. The system stores location information in the F4100 table. The Speed Location Setup Program (P4100A) enables you to set up the warehouse quickly by copying an existing location to create new locations. Using this program is much faster than entering locations individually.
In the Standard Unit of Measure part of the recipe, you can create any number of conversion factors for any number of units of measure, but they must all be able to convert to the primary unit of measure through either a direct path—for example, 1 box equals 2 each, where each is the primary unit of measure—or an indirect path—for example, 1 box equals 4 each. You can also set up conversion factors that associate each unit of measure with the primary unit of measure.
A particularly important aspect of these setups to take note of is Automatic Accounting Instructions. A company code identifies each specific organization. The company code must already exist in the Company Constants table (F0010) and must identify a reporting entity that has a complete balance sheet. The following image shows the Automatic Accounting Instructions (AAI) setup.
 |
The document type identifies the origin and purpose of the transaction. The system reserves several prefixes for document types, such as vouchers, invoices, receipts, and time sheets. Document type information is typically set up in a User-Defined Code (UDC). The Document Type Maintenance Program (P40040) updates the Document Type Master Table (F40039). This program also updates the User Defined Codes Table (F0005) . The General Ledger category identifies the GL offset that the system uses when it searches for the account to which it posts the transaction. If you do not want to specify a class code, you can enter **** (four asterisks) in this field. You can use AAIs to predefine classes of automatic offset accounts for the inventor y management, procurement, and sales order management systems.
Branch/plant constants enable you to configure the processing of daily transactions for each branch/plant in the supply chain management systems. Branch plant setup is critical, and each option is significant.
Before setting up branches/plants, you must set up branches/plants in the business unit | application Work With Business Units (P0006).
Select EnterpriseOne menus: EnterpriseOne menu | Inventory management | Daily processing | Inventory Management Set up | Branch Plant Constants and enter the branch/plant information as shown in the following image:
 |
1. Enter each Branch/Plant in the address book. The search type of the branch/plant should be Branch/Plant. The Branch Country of Origin Code is defined in UDC 40R/CO and specifies where a part was made.
2. Enter a two-digit code indicating parts made outside of the USA, for example, SA refers to Saudi Arabia. The Approval Route Code determines to whom an order is routed for approval.
3. Select the Location Control checkbox to indicate which type of location control the system requires. You should use location control if you want to use only locations that are in the Location Master Table F4100 table.
4. Select the Warehouse Control checkbox to indicate that the system creates warehouse transactions for the branch/plant.
5. The Quality Control checkbox indicates that the JD Edwards quality management system is enabled for the branch/plant. In addition to activating quality control for each branch/plant that you want to include in quality tests, you need to activate quality management on the Quality Management setup menu (G3741).
6. Use the Product Cost detail checkbox to indicate that the distribution programs use the total cost method or the detailed product cost method.
7. Select the Foreign Depot checkbox to indicate that another company owns the branch/plant. The Bulk And Packed Load Confirmation programs use this code to determine whether the depot from which the product is being loaded is a foreign depot. If it is a foreign depot, you must enter a valid borrow agreement during load confirmation.
8. The Location Segment Control checkbox enables the location segment specifications in the Location Definition Program (P41001) . The segment specifications determine how the system segments locations within a branch using UDC 41/ER.
9. Enter User Defined Code 40/CM to indicate the cost method that the system uses to calculate the cost of goods that are sold for the item.
10. Enter the Inventory Carrying Cost (%) percentage of inventory investment that you want the JD Edwards EnterpriseOne procurement system to use to calculate EOQ. Enter the percentage as a decimal value.
A Short item number is an eight-character number that you use when you do not want to use it as the primary item number. The short number is a system-generated number that is generated automatically through the next number application. Leave this field blank to indicate that you want to use this item number as the primary number. That is, you use it most often to enter or review information. If this is not the primary number, you must enter a special symbol to identify it. Use a symbol that is not significant for any other purposes of entry, such as /, *, or&.
Note
Make sure that you do not use a period or a comma as a symbol. The JDE system allows only the characters already described.
In the Branch Plant Constants setup, if you leave the second item number field blank then this indicates that you want to use this item number as the primary number. If the second item number is not the primary number, a special symbol should be used to identify it.
The Third item number is a number of up to 25 characters in length for when you do not want to use it as the primary number. A blank field indicates that you want to use this item number as the primary number. If this is not the primary number, you must enter a special symbol to identify it. Use a symbol that is not significant for any other purposes of entry such as /, *, or &.
When you enter a number preceded by this character, the system recognizes the number as the customer's or supplier's number. The system then uses the cross-reference table to match the number to the item number. You must complete this field if you want the system to perform cross-referencing.
Setting up Cross Reference UDC 41/DT identifies the type of cross-reference setup for this customer. Examples of cross-reference types include substitutes, replacements, and customer and supplier item numbers.
The character or symbol will be used to separate segments within an item number based on the template that is associated with the item number. If this field is left blank, the system displays the segments as one string of characters.
Numbers from 1 — 14 identify the current accounting period. The system uses this number to generate error messages, such as PBCO (Posted Before Cut Off) and PACO (Posted After Cut Off).
Inventory commitment involves committing the inventory through sales orders, based on the Branch Plant constants setup. This value in days is added to the current date and compared with the promised ship date for the order line. If the promised date is greater than the calculated date, the order line is future-committed in the Item Location Table F41021 table.
It is suggested that you define how the system should calculate item availability for each branch/plant. Item availability affects how the system calculates back orders, cancellations, and customer delivery time. The following image shows the item availability definition setup.
 |
To help you manage the complex recording and accounting functions that are involved in maintaining an up-to-date inventory, you might need to record inventory movements between branches/plants and between locations in a branch/plant.
Following are the inventory transactions types that need to be set up:
For issuing inventory, access the menu from EnterpriseOne menu | Inventory management | daily processing | Inventory master transaction | Issues.
1. On the Work With Inventory Issues (P4112) form, click on Add.
2. Enter the branch/plant, issue date, general ledger date, item number, and item quantity.
3. The document will appear in the application automatically, based on the document type next number application setup.
4. General ledger batches are created automatically once you have saved the transaction. You should review and post general ledger batches from the application Batches P0011.

5. For inventory adjustment, access the menu from EnterpriseOne menu | Inventory Management | Daily Processing | Inventory Master Transaction | Adjustment.
6. On the Work With Inventory Adjustment (P4114) form, click on add.
7. Enter branch plant, issue date, GL date, item number, and item quantity.
8. The document will come automatically from the document type next number application.
9. Post the general ledger batches.

10. For setting up inventory transfers, access the menu from EnterpriseOne menu | Inventory Management | Daily Processing | Inventory Master Transaction | Transfer.
11. On the Work With Inventory Transfer (P4113) form, click on Add.
12. Enter the branch/plant FROM; branch/plant TO, issue date, general ledger date, item number, and item quantity.
13. The document will come automatically through the document type next number application.
14. Post the general ledger batches.
 |
Inventory issue setup UDC 00/DT specifies the document type. The default document type is typically II (Inventory Issues). If you leave this processing option blank, the system does not provide a default value. The issue type specifies whether or not the equipment and subledger information appears in the detail area of the Inventory Issues form. The system requires the entry of account numbers in the detail area of the Inventory Issues form. This field is available only when you enter 2 or 3 as the issue type processing option. Allow an issue quantity that is greater than the available quantity, which could result in a negative on-hand quantity. The system enables the issue of lots that are on hold. If the lot status code field on the item/branch/plant form is blank, the lot is not on hold. Use this processing option to update the Item H istory Table (F4115) if you use the Inventory Management system and do not use the Sales Order Management system.
For Inventory Adjustment Setup, the default inventory adjustment document type is IA. You can use the primary location as the default only if all secondary locations have a physical location (for example, aisle, and bin). If any of the secondary locations have a blank location or lot, you cannot set the primary location as the default. The extended amount field will be calculated automatically based on the item unit cost and the item quantity. The journal entries specify whether detailed or summarized journal entries are created for the general ledger. For summarized journal entries, the system creates a summarized debit total and a summarized credit total by account number for each line in an adjustment. The Lot and Layering fields determine whether to display the lot information fields on the forms and whether they can be updated. Adjustment quantities specify the way in which the system validates a transaction that results in a negative quantity.
For Inventory Transfer, the default document type is typically IT (inventory transfers). The journal inventory management system integrates with general accounting through the document type. From location is used to issue the quantity from whichever location you want. Once you select the location, the system subtracts the quantity from that location. To location is used for receiving the quantity into stock. Once you select the To Location, the system adds the quantity upon completion of the transaction.
Journal entries specify the version of the journal entries program to use when you access it from the row menu on the Work With Inventory Transfer (P4113) form or from the form menu on the Inventory Transfers form. For summarized journal entries, the system creates a summarized debit total and credit total per account number for all lines in a transfer.
Item Ledger specifies the version of the Item Ledger Inquiry (CARDEX) program to use when you access it from the row menu on the Work with Inventory Transfers form or from the form menu on the Inventory Transfers form.
Issuing inventory typically involves removing items from a branch/plant or location, adjusting the inventory balance, and recording the transaction in the GL. Setting up inventory issues is done through the Inventory Issue application (P4112) processing option.
Inventory adjustments are used to increase or decrease the on-hand quantity and the cost of inventory items in a branch/plant without conducting a complete physical inventory. The main setup for inventory adjustment is to set up the processing option of Inventory Adjustment P4114.
Transfer transactions are used to record two types of inventory movement: movement between different locations in the same branches/plant, and movement between different branch/plants. An inventory transfer creates two journal entries in the GL. The first journal entry decreases inventory at the original location. The second entry increases inventory at the destination location. Inventory application is done by using the application P4113. The main setup of inventory transaction is the P4113 processing option.
Before you can work with inventory, you must provide the system with information about the items that you stock. You must enter master information for all stock and non-stock items.
To begin to define an item master, select EnterpriseOne Menus| Logistics Management | Inventory Management | Daily Processing | Inventory/Master Transactions | Item Master.
1. On the Work With Item Master (P4101) browse form, click on add.
2. Enter the Basic Data Item, such as the item code, description, GL class, supplier, stocking type, planner number, and buyer number.
3. Enter the item category codes information from Item Master Revisions row menu category codes, and enter the item category based on your item master setup.
4. Enter the weights and Unit of Measure information, such as EA for Each, and so on.
5. Enter Item/Branch.
 |
The item number is identified based on company business needs.
When you enter the item into the system, the short item number is assigned automatically. The second item number will be entered manually, as per business needs. The system stores the item master in the Item Master table (F4101). The catalog number can be entered as a vendor item number for reference. The catalog number is also stored in the Sales Order Detail table (F4211), along with the second item number.
You can define multiple stocking types, such as S for Stock and N for Non Stock Item. The stocking type is a base of all the transactions. The system reads the stocking type of the item from the item master. If the item is stocking type S, then you will receive the physical quantity into your stock.
GL/Class controls the general ledger accounts that will receive the monetary amount of inventory transactions for this item.
You can enable back-orders per item using the Item Master (P4101) program or the Item Branch (P41026) program, per customer by using the Customer Master (P03013) program, or per branch/plant by using the Branch/Plant Constants (P41001) program. You might want to enable availability checking for certain items. For other items, if you assume that an adequate supply is available, leave availability checking disabled.
Advanced serial number processing enables you to use a serial number to track an item through purchasing and sales. The code that specifies whether you must attach a serial number to this item at receipt or sale for basic serial number processing, or whether memo lot information is required for advanced serial number processing.
The lot status code indicates the status of the lot. Leaving this field blank indicates that the lot is approved. All other codes indicate that the lot is on hold. You can assign a different status code to each location in which a lot resides, in the item/location information or location lot status change application.
The commitment date method specifies which date the system uses to commit inventory when an item is committed by date. The default value is 01 (lot expiration date).
Shelf life days are the days for which an item can remain in inventory before it expires. The system adds this number to the date on which the item is received, in order to determine the expiration date for the item. If you do not enter a value here, you must enter an expiration date each time you receive the lot item.
The default number of days is the number of days for which an item can remain in inventory before it should be consumed. The system uses the number that you enter to calculate the Best Before Date by using one of two different methods, depending on whether the number that you enter in this field is positive or negative. If the value is positive, the system adds the days to the based-on date to determine the best before date for the lot. If the value is negative, the system subtracts the days from the lot expiration date to determine the best before date.
The number of days refers to the number of days for which an item must remain in inventory before the system considers the item to be available for sales and manufacturing commitments. To calculate the lot effective date, the system adds the number that you enter in this field to the based-on date that appears in the Lot Master F4108 table. The system uses this number when calculating and displaying the effective date field in the Purchase Orders program (P4310) and the PO Receipts program (P4312).
 |
The system uses EA (each) as the primary unit of measure.
Category Codes store additional information for item grouping that is used for reporting and inquiry purposes.
Additional System Information indicates whether the system displays the additional system information form when you add or change information on the Item Master Revisions (P4101) form.
Many industries have base products that differ from another base product because of packaging components, packaging processes, other attributes, or other differences that can cause costing structures to differ. You are going to create one or more templates for entering segmented items.
1. From the fast path, enter P410014 and access the Template Master application, and then enter the template name.
2. Give a description of the template.
3. Enter the length of a segment.
4. Define the segments.
5. After defining the segments, access Item Master Processing 11 on the Process tab to enable the use of the template.
6. Enter a segmented item.
7. Attach messages to an item, for example any precaution messages or handling notes, and so on.
8. Enter notes for an item.
9. Enter attachments for an item.
10. Assign item responsibility.
11. Enter classification codes.
12. Enter default units of measure for items.
13. Define item unit of measure conversions.
14. Specify a dual unit of measure for an item.
15. Set up the search sequence to use price units of measure.
16. Set up manufacturing information.
 |
You have just created templates for entering segmented items. If the same template is not applicable for all of the segmented items, create a template for each type and name each template appropriately. After you have created a template, you can attach it to the Item Master Revisions form if the use templates processing option has been activated.
You can use template names when entering items on the Item Master Revisions Form. This name is case-sensitive. If you use any capital letters in the template name when you add it, you must enter those letters in capitals whenever you search for the template or attach it to the Item Master Revisions Form.
You should specify whether characters will be used to separate the segments. If you select this control, separators are not used in this template and all 25 character spaces can be allotted to the segmented item number. The length field is used to keep a running total of the number of spaces, including separators, that are used in all of the segments.
Items can be classified into groups. The inventory management system provides for numerous purchasing, sales, and distribution classifications. By using these classifications, you can report on purchasing or sales activity using many different facets of item characteristics. These classifications are also used to determine how products move through or reside within the warehouse.
Before defining an item classification, the user-defined codes that are related to the item classification need to be defined in the user-defined codes constants. Define the item category in the User Defined Codes P0004A application.
1. Select EnterpriseOne Menus | Logistics Management | Inventory Management | Daily Processing | Inventory/Master Transactions | Item Master.
2. On the Work With Item Master (P4101) browse form, click Find.
3. Select the item, and then from the Row menu, click on Category Codes.
4. Enter the item category codes information.
 |
The sales catalog and user-defined category code need to be set up for the item property and classification, such as color, material content, brand, and many different classifications. The User Defined Codes from 41/S1 to 49/S0 need to be set up. The system uses this code to sort and process like items. This field is one of ten classification categories that are available, primarily for sales purposes. When item classification has been set up you can inquire on a sales order or purchase order based on these category codes. You can make a customized report and also set up standard reports based on the selection of a specific category. These category codes will be stored, including sales order, in the Sales Order Detail table F4211, and the Purchase Order Detail table F4311, respectively.
It is suggested that you enter the default unit of measure information; it is also required to provide the system with unit of measure conversion information if the item has various units of measure (for example, an item that you stock in both boxes and in crates). You can update conversion information only for items that already exist in the system. For new items, you must select OK to save the item, and then select the item on the Work With Item Master browse form to return to the item master revisions form.
1. Select EnterpriseOne Menus | Logistics Management | Inventory Management | Daily Processing | Inventory/Master Transactions | Item Master.
2. On the Work With Item Master browse form, and then search for and select the item number.
3. On the Item Master Revisions (P4101) form, select Conversions from the form menu.
4. On the Work With Item Unit of Measure Conversions (P41002) form, click on Add.
5. On the Item Unit of Measure Conversions form, click on Add and enter the unit of measure From (UoM), Quantity, and Unit of measure To (UoM) in the Item Unit of Measurement Conversion. For example, if you enter EA in the From unit of measure and Box in the To unit of measure then the unit of measure conversion will be Box = 6. (Each is the unit of measurement available in the system, by default.)
 |
After defining a unit of measure conversion, whenever you will create a sales/purchase order. the system will, search the unit of conversion table for the conversion factor. The system stores unit of conversion information in the Item Unit of Measure Conversion Factors F41002 table. You can search the item quantity by dual unit of measure on item availability. If you change the UOM (Unit of Measure) field in the heading area of the Work With Item Availability (P41202) form from EA (each) to BX (boxes), you might expect to see the quantity on hand to be displayed. However, with no display decimals specified, the system does not display decimal quantities. You can also select the price unit of measure during sales order creation. The dual picking process specifies whether the system uses the pr imary or secondary unit of measure for a dual unit of measure item for picking, sales order availability checking, and splitting purchase order lines. To use the primary unit of measure, do not select this option. To use the secondary unit of measure, select this option.
Dual unit of measure Item use specifies whether the system must maintain inventory balances and record transactions for an item in a secondary unit of measure that does not have a fixed conversion to the primary unit of measure. Typically, you select this option when the item is ordered or sold by a packaged quantity and priced by weight or volume.
Item branch/plant set-up is required for Item Branch Plant Setup application in the item master. Non stock items do not require branch/plant set-up. You can also specify the locations within the branch/plant where the item is stored. The JD Edwards EnterpriseOne system retrieves item information from the item Branch/Plant Information before searching the item master information.
Before you complete the tasks in this recipe, you must:
Set up the origin of imported items in UDC 41/L9
Set up customs codes in UDC 41/L0
Enter a value in the country of origin field on the item branch/plant Info form
1. Select EnterpriseOne Menus | Logistics Management | Inventory Management | Daily Processing | Inventory/Master Transactions | Item Branch/Plant.
2. On the Work with Item Branch (P41026) form, enter the item number and item branch.
3. On the Cost Revisions (P4105) form, add Sales/Inventory Price, Purchasing Price, Cost Method, Description, and Unit Cost.
4. Enter the Lot/ Serial Number.
 |
We might have item information that applies to items in multiple branches/plants. We can enter item information for one branch/plant and then duplicate the information for as many as ten other branches/plants either by using the Item Branch Duplication program (P41015) to select individual items for duplication, or by using the batch program Item Branch Duplication - Batch Selection (R41826) to define criteria for items that you want to duplicate.
For both actions, we use processing options to specify the branches/plants for which you are duplicating information. We can also specify which information to duplicate, such as costs, prices, units of measure, and so on. For either procedure, the system sends a message to the employee work center when the duplication process is completed.
When you duplicate item information, the system does not duplicate the primary location for an item. The system uses the blank location that you have set up for the branch/plant to which you are duplicating the information.
If you use item branch duplication to select individual items for duplication, you can set processing options to display up to four search fields to enable you to locate items for a particular branch/plant.
1. Category codes specify whether to display the category codes form when you add or change information.
2. Quantities specify whether to display the quantities form when you add or change information.
3. Additional system information specifies whether to display the additional system information form when you add or change information.
4. Item profile revisions specify whether to display the item profile revisions form when you add or change information.
5. Cost revisions specify whether to display the cost revisions form when you add or change information.
6. Price revisions specify whether to display the price revisions form when you add or change information.
7. After you assign an item to a branch/plant, you can specify multiple locations in which the item resides. For each branch/plant, it is required to assign the primary location. You can also assign a secondary location for each item.
Whether the system maintains one overall cost for the item or a different cost for each branch/plant
The cost method that system uses to track inventory costs
The cost method that system uses for purchase orders
This recipe will provide you with an overview of item cost setup and how to do it.
You should get ready to provide cost information for items in order to track inventory costs.
1. Assign a cost level to an item. From the Item/Branch (P41026), select the item and select the Cost Revision (P4105) form row menu.
2. Assign a cost method to an item. Select Last In, Standard cost, and Weighted Average cost on the item's Cost Revision application, and enter the item cost.
3. Enter manufacturing setup Cost Information (09) for manufacturing items.
4. Set up the costing method for Sales/Inventory as 02 and for Purchasing as 01 on the Cost Revisions (P4105) form.
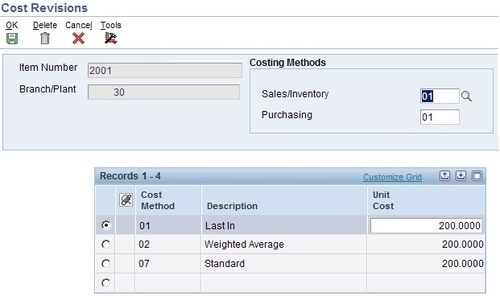 |
For each cost method that you assign to an item, you must also specify a cost. For example, to use the last-in cost method for an item, you must enter an initial cost for that cost method. The system updates the last-in cost based on the cost of the item as of the last receipt date. The system stores inventory cost records in the F4105 table.
You can also define a different cost for each location and lot within a branch/plant. The level at which you assign a cost to an item determines whether the system maintains costs at the lot, location, branch/plant, or master level. The cost level also determines how you locate the item to which to assign cost methods and enter item costs. For example, you can locate the item based on the item level or based on the item and branch/plant level, or based on the item, branch, and location level.
You can also indicate from which table the system is to retrieve a cost for an item when you enter a purchase order. The purchase price level that you specify for an item indicates which of these costs to use for inventory costs for the item, which are stored in the Item Cost F4105 table, and supplier's cost for the item, which are stored in the Supplier Price/Catalog F41061 table.
Cost methods for items should specify the cost method that the system uses to determine an item's cost for sales and cost of goods sold for purchase orders.
The system provides eight predefined cost methods. You can define your own cost methods by using User-Defined Codes, although cost methods 01 through 19 are reserved.
If you do not enter an item cost for the cost methods that you assign to sales, inventory, and purchasing, the system displays a warning message. If you ignore the warning, the system assigns a zero cost for the cost method. When you review costs for an item, the system displays only those methods for which you entered an amount.
If you change the amount for the cost method that you use to track costs of goods sold, the system applies the new amount to the on-hand quantity of the item. It also creates journal entries to record the difference between the old and the new amounts. Certain programs update the amount for cost methods 01 through 08. For last-in, or cost method 01, the system interactively updates this amount based on the last cost of the item at the time of receipt. For weighted average, or cost method 02, the system calculates and updates this amount by adding transaction quantities together, adding transaction costs together, and dividing the total cost by the total quantity. You cannot use the weighted average cost method (02) for the sales/inventory cost method with stocking types C or R.
For actual cost, or cost method 09, the system calculates the cost of the product built on a work order or rate schedule based on the actual hours used and the actual quantity of parts issued. The system updates the cost based on the most current information. You cannot use the actual cost method (09) for the sales/inventory cost method with stocking types C or R.
The system also updates last-in, purchasing, and lot costs via the PO Receipts program. Purchasing cost is updated by the Voucher Match Program (P4314).
The additional cost methods must be updated manually. You can delete a cost method for an item if it is no longer applicable. If you try to delete the sales, inventory, or purchasing cost method, the system displays a warning message. The system does not delete the cost method, but assigns a zero cost for the cost method.


