In this chapter, we will cover the following recipes:
Importing your own 3D models
Importing animations from 3ds Max
Navigating in Lumion
Relocating your imported 3D models
Reverting your last action
Locking your 3D model's position
Organizing your 3D world with layers
Updating your imported 3D models
Replacing an imported 3D model
Welcome to the first chapter of Lumion 3D Cookbook, which will assist you in developing and improving your workflow in Lumion. The main focus of this opening chapter will be in getting your 3D model properly imported in Lumion and your 3D scene organized. The nine recipes mentioned in the beginning of this chapter will cover some basic concepts that will help you to get an excellent and strong foundation for building the entire 3D world on top of it. As you will find throughout this Cookbook, Lumion is a powerful application, but the most significant aspect that you need to keep in mind is not to be afraid to experiment and have fun. Be curious and when reading one of these recipes, ask yourself what if, and this will help you to master Lumion.
Lumion supports a direct import of SketchUp files, which means that we don't need to use any special format to have our 3D model in Lumion. But if you are working with modeling packages, such as 3ds Max, Maya, and Blender, you need to use a different approach by exporting a COLLADA or FBX file as these two are the best formats to work with Lumion.
COLLADA is an XML namespace and database schema that allows you to move 3D files between 3ds Max, Maya, Revit, and Lumion. Each application is different, but in most cases, we just need to export or save our scene as a COLLADA file or an FBX file.
Let's start by launching Lumion with the following steps:
Launch
Lumion.exelocated in theLumionfolder, or use the shortcut on the desktop. You will be presented with an interface, as shown in the following screenshot:
From the New tab, select one of the nine different presets to begin your new project, or just use the Grass scene to start with a basic scene. Each scene only differs in the type of weather, time of day, and terrain; nothing you couldn't get with a few minutes of work.
From the left-hand side of the screen, select the Import menu and click on the Add a new model button, as you can see in the following screenshot:

In the new window, navigate to where your 3D model it is, select it, and click the Open button. You may need to select the proper object file extension if you are not seeing the file.
Give a specific name for your imported model, or you can just leave the default name and click on the Add to library button.
Use your mouse and the keyboard shortcuts to navigate around your scene, and left-click to place the 3D model inside Lumion.
This recipe is a really straightforward task as you can see, but is one of the most important tasks once you start working with Lumion. It is at this stage that you can be sure that everything is OK with your 3D model and make sure that you don't have any missing faces or other geometry problems. This step also assists you in checking if you have worked with the correct scale, so if your model is either extremely large or very small, you need to go back to your 3D modeling package and correct the scale. With all these things in mind, we now have a good base to start working with Lumion.
Another tip; we sometimes overlook the reality that even though Lumion is a very powerful application and can handle millions of polygons, it still has limits. So, if initially you just want to organize and populate your scene without paying too much consideration to the 3D model itself, it is good to create a proxy or a simple representation of your 3D model and import that proxy, and then later with a special feature in Lumion, reimport your high-poly model.
In particular situations, we may need to use our own animations. You may be aware that we can import basic animations in Lumion from 3D modeling packages such as 3ds Max. This recipe is going to help us to understand how we can import such animations and the limitations associated with these external animations.
Prior to importing an animation into Lumion, we need to check a few things first. Lumion doesn't support vertex, morph, and bone animations, and we can only bring in basic animations on the move, rotate, and scale values. The frames per second (FPS) rate needs to be set to 25, and you can export your animation as an FBX file or DAE file, although with the last option, the interpolation between key frames will be linear, so bear that in mind.
With Lumion launched, perform the following steps:
On the left-hand side of the screen, select the Import menu and click on the Add a new model button.
In the new window, navigate to where you have your 3D model, select it, and click on the Open button.
Give a specific name to your imported model, or you can just leave the default name, and select the Import animations checkbox, as you can see in the following screenshot:

Use your mouse and the keyboard shortcuts to navigate around your scene, and left-click to place the 3D model inside Lumion.
After placing the 3D model, you can see the animation going in a loop, which means that you will need to use some Layers effects in order to control these external animations.
It's true that Lumion allows you to import simple animations, but most of the time, this is not the best solution. Why? First, once the animation is in Lumion, you have little control over it, and second, only basic animations with the move, rotate, and scale values are possible in Lumion. It's true that we can use a specific layer to switch the animation on and off when required or use the Objects effect to control the position of the animation, but we still have limited control.
However, there is one particular situation when we may import an animation from Maya or 3ds Max. It's when we have a walk cycle of a person that we want to use in Lumion, and in this circumstance, we import this object along with the walk cycle and use the Advance move effect or the Move effect to control it.
Lumion uses the flexibility of shortcuts to improve the control we have in the 3D world. This recipe will focus on how to use some of these shortcuts to improve the workflow and the way we control Lumion's camera.
With Lumion launched and with a scene open, perform the following steps:
To look around, right-click and move the mouse to look inside your 3D world, and if you want to reset the camera to the horizontal viewpoint, use the combination Ctrl + H. In the Settings menu, you can invert this action by activating the Enable Inverted Up\Down Camera Pan option.
The arrow keys along with the combination WSAD are used to move the camera, and the keys Q and E are used to move the camera up and down.
Use the middle mouse button to pan the camera; this gives you very accurate control.
Press the Space bar key along with the arrow keys or with the combination WSAD to slowly move the camera.
Lumion has a sort of zoom on to the object option that we can use by double-clicking with the right mouse button on a model or even on the ground.
The reason why we bring up these shortcuts is that when working with the Photo and Video modes, we need a more precise and accurate way to move the camera to create the perfect composition. However, there is an additional option that will be very handy in the final stages when we want to produce a movie or a still image.
That's the option to save and load the specific camera viewpoints. Use the Ctrl + 0, 1, 2, 3, 4, 5, 6, 7, 8, or 9 to save up to 10 camera positions and the combination Shift + 0, 1, 2, 3, 4, 5, 6, 7, 8, or 9 to load the saved camera viewpoints. Then we can use these saved viewpoints in the Photo mode, as shown in the following screenshot where each thumbnail represents the camera viewpoint saved previously:

Once we import a 3D model or even if we use a model from the Lumion library, we need to adjust the position, the orientation, and the scale of the 3D model. But keep in mind the importance of organizing your 3D world using layers as well. They are free and they will become very useful when we need to hide some objects to focus our attention on a specific detail or when we use the Hide layer and Show layer effect.
If we want to rearrange a 3D model that is imported, choose the Import menu, but if we need to move a model in the Lumion library, select the Objects menu. In both situations, we are going to use the same steps, so I will just use the expression "3D model" to refer to both the models.
With our scene opened, perform the following steps:
Select the 3D model, and if you need to select multiple objects, use the combination Ctrl+ the left mouse button to draw a rectangular selection.
Press the M key to move the 3D model.
To place the 3D model on the ground, press the G key.
If you are moving the 3D model in a terrain with variations, press the Shift key to turn off the horizontal snapping.
If you want to copy the selected objects and paste them in a different location, press the Alt key while moving your objects.
Don't forget that we can use the L key to scale the 3D model, the R key to rotate the object, and the H key to move the 3D model vertically, as you can see in the following screenshot:

Another option that is more accurate is as follows:
In the Import or Objects menu, select the Edit properties submenu.
Select the 3D model.
In the 3D model properties window, type in the new coordinates, as you can see in the following screenshot:

If our 3D model is not moving and we didn't lock it, this is because we have the wrong category selected. This means, for example, that in order to move a tree we need to select the Nature category.
Here is a tip to help us improve the workflow while placing and moving the 3D models. We may know where we want the trees or other 3D models to be placed, and sometimes we have the freedom to choose this, but in most cases, we will get a landscape project with this information. While working in the 3D package (3ds Max, Maya, or SketchUp), create small cubes (100 mm x 100 mm) with different colors that correspond to different elements. They can represent a specific type of tree, bushes, hedges, flowers, and lamps, and we import these small cubes with the 3D model in Lumion.
In Lumion, create a top view with the camera (don't forget to save it using the combination Ctrl + 0, 1 to 9) and with the aid of this viewpoint, we can start composing a 3D world and place the trees and other objects where the small cubes are. Then, if necessary, assign the invisible material to these cubes to hide them. With this workflow, we can be sure that everything is in the correct place and we don't need to lose time arranging the entire scene. Oh and don't forget to use layers; we will cover some recipes later that will help you with this.
At a certain point in our project, we will need to go back and undo a mistake or something that doesn't look as expected. Lumion offers you a very limited undo option. Let's see how it works.
This option depends on which menu you have selected, because in some menus, such as the Weather menu, you can't find it at all.
With our scene opened, perform the following steps:
Right-click on the model to place a model or to change the terrain.
To revert this last action, click on the Undo button that you will find at the bottom of the menu, as shown in the following screenshot:

As you can see, in the previous recipe, we used the Move object tool to move the 3D model and the Undo button appears, giving us the opportunity to undo the movement.
That's it? Yes, and as you can see, this undo feature is very limited. I trust that in the future versions of Lumion, we will get a little more than just one single undo. However, the rationale for introducing this easy recipe is to show you the two ways to overcome this restriction.
The first option is using the F5 key to do a quick save before importing a model or changing an object's position, but unfortunately, there is no option to do a quick load. The second option saves various versions of your work, particularly when doing a big change, such as replacing all the trees for another type, changing the environment or the landscape. By saving various versions, we can always go back to a specific point and start over.
So, this undo option is very limited, and the only time I really wish to have more flexibility is when I am modeling a terrain, but have a look at the following recipe to help you with modeling a terrain.
To have more control over the terrain, have a look at the Working with heightmaps recipe in Chapter 4, Constructing Your World
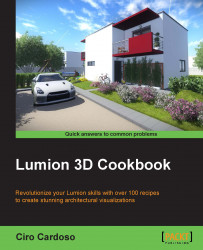
When working with Lumion, and in particular, when organizing our 3D world, and arranging and adjusting the 3D models, we might find the possibility of locking the 3D model's position to be useful. This helps us to avoid selecting and unintentionally moving other, already placed 3D models.
To get prepared, you need to select your 3D model or multiple models, and for that don't forget to use the Context menu that we can find inside the Import and Objects menu.
With the 3D model or models selected, perform the following steps:
Select the Context menu.
Chose the Transformation submenu.
Select the Lock position... option.
Click on the On option to lock, or the Off option to unlock, as you can see in the following screenshot:
From the beginning of our project with Lumion, it is very important for us to organize and categorize our 3D world. Sometimes we may not do this straightaway, and only after importing some 3D models and adding some content from the Lumion library we realize the need to organize our project in a better way. So, we are going to see how to use layers and how to assign the existing 3D models to a new layer.
Remember that the Layer menu will only appear when we have the Import or Objects menu selected.
With our scene opened, perform the following steps:
On the top-left corner of the screen, you can locate the Layer menu, as shown in the following screenshot:

Select the Layer 1 option and rename it for something more precise, such as
Trees.With this layer selected, go to the Objects menu.
Add a tree to your scene.
At this moment, the tree you added is inside the layer
Trees, and you can hide or show this layer by clicking on the icon that represents an eye.
If you want to add a 3D model to a layer, perform the following steps:
Select the 3D model.
Go to the Layer menu and select the correct layer.
Use the Move selection to layer button to move your 3D model to the layer you want, as you can see in the following screenshot:

We can create up to 20 layers, which gives plenty of room to make full use of the layers feature. Don't forget that in order to use these layers, we need to select the correct layer before placing or importing a 3D model of our scene; otherwise, the 3D models will be placed in the first layer or the layer you have selected. Having our scene arranged with layers will also help us to know if our workstation is starting to struggle with the amount of 3D models we have in Lumion, and switching off a few layers will give us a little room to breathe and improve the speed.
To control the layers, check the Animating the layers recipe in Chapter 10, Bringing Your World to Life
Over the course of a project, it is very common to have certain 3D models updated, and we need to update those 3D models into our Lumion project. This can be a rather daunting task, taking into account that most of the time these updates in the 3D models happen after we have already assigned materials to the imported 3D model.
Before we update the 3D model into Lumion, it is vital that we save or export the 3D model with the same name that we used to import into Lumion. This means that we need to overwrite the old file (we can always create a backup) so that we can update the 3D model in Lumion successfully.
With the Import menu selected, perform the following steps:

As a safety practice, we might want to save our old files in case something goes wrong. Typically, I rename the file to something like House_OLD_01-13.dae (.dae is the extension for the COLLADA files and is just for reference purposes). The OLD tag is self-explanatory, showing that this is an old file and the 01-13 tag represents the month and the year it was created. If the project is complex and there are a few modifications, just create a text file where the 3D models are stored, and in this text file write something like the following:
House_OLD_01-13.dae -> Fence replacedHouse_OLD_02-13.dae-> Window ground floor replaced
Why should we go this extra mile and do this? Well, the reason is that when we are working on large projects, they can take weeks and even months to be completed, and a complex project always goes forward and back with changes, which means that something you changed last month may be back after a few weeks because the client changed their mind. With this text file we don't need to open every single file to check where we did the change.
Sometimes during the project we may face a radical change in a 3D model we have already imported into the Lumion project. The worst scenario is reassigning all the materials to the new 3D model and perhaps relocating to the correct place. However, Lumion has an option to help us with this and to avoid reassigning all the materials or at least not all of them, and the 3D model will stay in exactly the same place.
Before we begin replacing the 3D model, we may want to save another version just in case something goes wrong, and another safety measure is saving a material set as a backup.
With the Import menu selected, perform the following steps:
Select the Edit materials menu.
Click on the small white dot on our 3D model to select the model.
On the bottom-right corner of the screen, we can see the Reload model and re apply materials button.
Press the Ctrl key to activate the Reload model and re apply materials new file button, as you can see in the following screenshot:
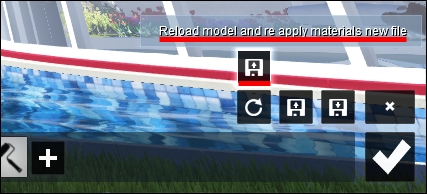
Click on the Reload model and re apply materials new file button to open a new window.
Select the file and click on the Open button.
Click on the OK button to accept the changes.
In most situations, this will work as long we don't modify the names of the objects inside the 3D file. What that means is, for example, we can change the size, rotation, and even the position of the wall_01 object, and when we reload the model, the material that was assigned to the wall_01 object will be the same. However, if you change the name of the object for something like Wall_01, just the fact that you used a capital letter will be enough to confuse Lumion, and the material will not be assigned.
To save the materials assigned to the model, check the Saving materials recipe found in Chapter 6, Working With Lumion Materials