


In this chapter we will cover:
Creating shadows within the Reach profile
Creating shadows within the HiDef profile
Implementing lens flare within the Reach profile
Implementing lens flare within the HiDef profile
Implementing smoke within the Reach profile
Creating explosions within the Reach profile
Creating explosions within the HiDef profile
In this chapter, we will be creating some of the common special effects used in 3D games to help increase the level of realism, and thereby help the player to immerse themselves in the virtual world.
The examples in this chapter assume that at least the bare bones of a 3D scene are already present, with one or more 3D objects being rendered successfully to the screen. If inspiration for how to achieve this is in short supply, Chapter 2, Building 2D and 3D Terrain and Chapter 3, Procedural Modeling, provide some examples on possible ways to get started.
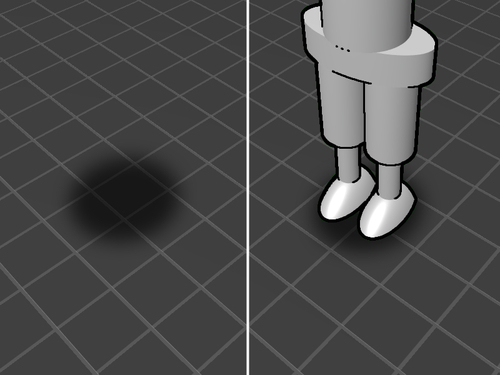
Shadows are one of the most common ways to make something appear like it is part of the surrounding environment, and for a lot of games written within the Reach profile, a simple static image of a dark patch beneath the character's feet is sufficient, as seen in the following illustration:
There are, however, times where a non-descript blur isn't going to cut it, and a more realistic looking shadow is required.
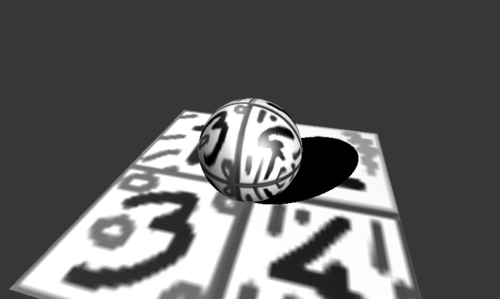
This recipe will teach you how to create a detailed shadow of an in-game element, as seen in the following illustration, using one of the matrix transformation helper methods supplied in the XNA framework.
We will be using the BasicEffect class in this example, but any effect that implements the IEffectMatrices interface and has some way to darken the rendered model should be adequate.
Prior to adding the code presented in this example, ensure that a model is being loaded and rendered onto the screen.
To create a disc programmatically:
1. Define an instance-level variable to hold the direction of the virtual light source, another to hold the effect that's going to render the shadow, and a third to hold the transformation to give the shadow its shape:
Vector3 lightDirection;
BasicEffect reachShadowEffect;
Matrix flattenShadow;
2. In the
LoadContent()method, define the direction of the light source:lightDirection = Vector3.Normalize((Vector3.Backward * 2) + (Vector3.Up * 2) + (Vector3.Left * 2));
3. Next, define the matrix that will be used to transform objects into their flattened shadow form:
var flattenShadow = Matrix.CreateShadow(
lightDirection,
new Plane(Vector3.Up, 0.95f));
4. Now use a calculation that takes the
worldmatrix used to transform the regular object, and alters it into a transformation to project a shadow onto a flat surface:var shadowWorld = world * flattenShadow;
5. Next, implement the effect that will be used to render the shadow:
reachShadowEffect = new BasicEffect(GraphicsDevice)
{
View = view,
Projection = projection,
World = shadowWorld,
AmbientLightColor = Vector3.Zero,
DiffuseColor = Vector3.Zero,
SpecularColor = Vector3.Zero,
Alpha = 0.5f
};
6. After drawing the game scene's floor, but prior to drawing the object to be shadowed, insert the following code to give the shadow transparency:
graphicsDevice.BlendState = BlendState.AlphaBlend;
graphicsDevice.DepthStencilState = DepthStencilState.DepthRead;
7. Drawing the object with the shadow effect will then render a shadow:
gameObject.Draw(reachShadowEffect);
8. Setting the
BlendStateandDepthStencilStateback to their defaults will allow you to draw the object normally. For example:
Note
Downloading the example code
You can download the example code files for all Packt books you have purchased from your account at http://www.packtpub.com. If you purchased this book elsewhere, you can visit http://www.packtpub.com/support and register to have the files e-mailed directly to you.
Utilizing one of the built-in transformations of the XNA framework, we are squashing a blackened copy of the mesh onto a given plane.
It's a simple technique, but it does come at the cost of having to render your shadow casting meshes at least one more time than normal. These particular shadows are as stiff as a board too and won't bend if they happen to fall upon a wall or other vertical surface.
If you're after a shadow with a softer edge within the Reach profile, you may want to render the shadow to a separate render target and blur in a similar fashion to the technique demonstrated in the Implementing lens flare within the Reach profile section of this chapter.
In the example, a simplified call to a game object's Draw() method was made, passing in the effect to be used in rendering.
If you're interested in how such a method might be constructed, sneak a peek at the Draw() method of the GeometricBuffer class covered in the Modeling triangles recipe in Chapter 3, Procedural Modeling .
Creating realistic-looking shadows without sacrificing a huge amount of memory or processing power remains one of the great challenges in computer graphics. While I may not be able to offer a perfect solution for every shadow-related problem you have in your games, I can at least get you started in the world of shadow creation through the demonstration of one of the more well-known techniques, shadow mapping, seen in the following illustration.
For this recipe, it's best to start with a simple existing scene containing a floor and at least one mesh floating or standing above it, as shown in the previous illustration.
To create a disc programmatically:
1. Add a new effect file to your game content project named
Shadows.fx.2. Define the input parameters of the new shader:
float4x4 World;
float4x4 View;
float4x4 Projection;
float4x4 LightViewProj;
float3 LightDirection;
float4 AmbientColor = float4(0.15, 0.15, 0.15, 0);
float DepthBias = 0.001f;
texture Texture;
sampler TextureSampler = sampler_state
{
Texture = (Texture);
};
texture ShadowMap;
sampler ShadowMapSampler = sampler_state
{
Texture = <ShadowMap>;
};
3. Define the structures used to pass data between the pixel and vertex shaders:
struct DrawWithShadowMap_VSIn
{
float4 Position : POSITION0;
float3 Normal : NORMAL0;
float2 TexCoord : TEXCOORD0;
};
struct DrawWithShadowMap_VSOut
{
float4 Position : POSITION0;
float3 Normal : TEXCOORD0;
float2 TexCoord : TEXCOORD1;
float4 WorldPos : TEXCOORD2;
};
struct CreateShadowMap_VSOut
{
float4 Position : POSITION;
float Depth : TEXCOORD0;
};
4. Next, create a vertex shader for rendering a depth map:
CreateShadowMap_VSOut CreateShadowMap_VertexShader(
float4 Position: POSITION)
{
CreateShadowMap_VSOut Out;
Out.Position = mul(Position, mul(World, LightViewProj));
Out.Depth = Out.Position.z / Out.Position.w;
return Out;
}
5. Create the vertex shader's partner-in-crime, the pixel shader, to render a depth map:
float4 CreateShadowMap_PixelShader(
CreateShadowMap_VSOut input) : COLOR
{
return float4(input.Depth, 0, 0, 0);
}
6. Next, make the vertex shader render the shadows:
DrawWithShadowMap_VSOut DrawWithShadowMap_VertexShader(DrawWithShadowMap_VSIn input)
{
float4x4 WorldViewProj = mul(mul(World, View), Projection);
DrawWithShadowMap_VSOut Output;
Output.Position = mul(input.Position, WorldViewProj);
Output.Normal = normalize(mul(input.Normal, World));
Output.TexCoord = input.TexCoord;
Output.WorldPos = mul(input.Position, World);
return Output;
}
7. Create the matching pixel shader, which will, for every pixel, compare the depth of the scene from the player's perspective to that of the previously captured shadow depth map:
float4 DrawWithShadowMap_PixelShader(
DrawWithShadowMap_VSOut input) : COLOR
{
float4 diffuseColor = tex2D(
TextureSampler, input.TexCoord);
float diffuseIntensity = saturate(
dot(LightDirection, input.Normal));
float4 diffuse = diffuseIntensity *
diffuseColor + AmbientColor;
float4 lightingPosition = mul(
input.WorldPos, LightViewProj);
float2 ShadowTexCoord = 0.5 * lightingPosition.xy /
lightingPosition.w +
float2( 0.5, 0.5 );
ShadowTexCoord.y = 1.0f - ShadowTexCoord.y;
float shadowdepth = tex2D(ShadowMapSampler,
ShadowTexCoord).r;
float ourdepth = (lightingPosition.z / lightingPosition.w) - DepthBias;
if (shadowdepth < ourdepth)
{
diffuse *= float4(0.5,0.5,0.5,0);
};
return diffuse;
}
8. Add some technique definitions to specify which shader to use in which circumstance:
technique CreateShadowMap
{
pass Pass1
{
VertexShader = compile vs_2_0
CreateShadowMap_VertexShader();
PixelShader = compile ps_2_0
CreateShadowMap_PixelShader();
}
}
technique DrawWithShadowMap
{
pass Pass1
{
VertexShader = compile vs_2_0
DrawWithShadowMap_VertexShader();
PixelShader = compile ps_2_0
DrawWithShadowMap_PixelShader();
}
}
9. In your game class, add some instance variables to hold details about the virtual camera:
Matrix view;
Matrix projection;
Matrix world;
BoundingFrustum cameraFrustum = new BoundingFrustum(Matrix.Identity);
10. Then, add some details about the lighting:
Vector3 lightDirection;
Matrix lightViewProjection = Matrix.Identity;
11. Now, add some variables to hold the various effects that are going to be used to render the scene:
BasicEffect basicEffect;
Effect hiDefShadowEffect;
RenderTarget2D shadowRenderTarget;
12. In the
LoadContent()method, start by setting up the lighting and camera positions:lightDirection = Vector3.Normalize( (Vector3.Backward * 2) + (Vector3.Up * 2) + (Vector3.Left * 2)); view = Matrix.CreateLookAt( (Vector3.Backward * 4) + (Vector3.Up * 3) + (Vector3.Right), Vector3.Zero, Vector3.Up); projection = Matrix.CreatePerspectiveFieldOfView( MathHelper.ToRadians(60f), GraphicsDevice.Viewport.AspectRatio, 0.002f, 100f); world = Matrix.CreateTranslation(Vector3.Zero); cameraFrustum.Matrix = view * projection;
13. Continue by creating a render target to hold the shadow map:
var shadowMapWidthHeight = 2048;
var pp = GraphicsDevice.PresentationParameters;
shadowRenderTarget = new
RenderTarget2D(graphics.GraphicsDevice,
shadowMapWidthHeight,
shadowMapWidthHeight,
false,
pp.BackBufferFormat,
DepthFormat.Depth24);
14. Then, set up the effects used to render the objects within the scene, and the shadows cast by them:
basicEffect = new BasicEffect(GraphicsDevice)
{
View = view,
Projection = projection,
World = world,
};
basicEffect.EnableDefaultLighting();
hiDefShadowEffect = Content.Load<Effect>("Shadows");
15. Add a new method to calculate the position and size of the virtual camera used to record a depth map from the point of view of the light source:
Matrix CreateLightViewProjectionMatrix()
{
16. Insert a matrix into the new method to rotate things towards the direction of the light:
Matrix lightRotation = Matrix.CreateLookAt(
Vector3.Zero,
-lightDirection,
Vector3.Up);
17. Calculate the corners of the visible area for the "light" camera:
Vector3[] frustumCorners = cameraFrustum.GetCorners();
for (int i = 0; i < frustumCorners.Length; i++)
{
frustumCorners[i] = Vector3.Transform(frustumCorners[i], lightRotation);
}
18. Work out the smallest box that could fit the corners of the visible area:
BoundingBox lightBox = BoundingBox.CreateFromPoints(frustumCorners);
Vector3 boxSize = lightBox.Max - lightBox.Min;
Vector3 halfBoxSize = boxSize * 0.5f;
19. From the previously calculated box dimensions, derive the position of the light camera:
Vector3 lightPosition = lightBox.Min + halfBoxSize;
lightPosition.Z = lightBox.Min.Z;
lightPosition = Vector3.Transform(
lightPosition, Matrix.Invert(lightRotation));
20. Calculate the associated view projection matrix:
Matrix lightView = Matrix.CreateLookAt(
lightPosition,
lightPosition - lightDirection,
Vector3.Up);
Matrix lightProjection = Matrix.CreateOrthographic(
boxSize.X, boxSize.Y,
-boxSize.Z, boxSize.Z);
return lightView * lightProjection;
21. Create a new method to set up the shadow effect:
private void PopulateShadowEffect(bool createShadowMap)
{
string techniqueName = createShadowMap ?
"CreateShadowMap" : "DrawWithShadowMap";
hiDefShadowEffect.CurrentTechnique = hiDefShadowEffect.Techniques[techniqueName];
hiDefShadowEffect.Parameters["World"].SetValue(world);
hiDefShadowEffect.Parameters["View"].SetValue(view);
hiDefShadowEffect.Parameters["Projection"].SetValue(
projection);
hiDefShadowEffect.Parameters["LightDirection"].SetValue(
lightDirection);
hiDefShadowEffect.Parameters["LightViewProj"].SetValue(
CreateLightViewProjectionMatrix());
if (!createShadowMap)
hiDefShadowEffect.Parameters["ShadowMap"].SetValue(
shadowRenderTarget);
}
22. In your game's
Draw()method, start by setting theGraphicsDeviceto render to theshadowRenderTarget:GraphicsDevice.SetRenderTarget(shadowRenderTarget); GraphicsDevice.Clear(Color.White); PopulateShadowEffect(true);
23. Next, render any shadow casting objects using the
hiDefShadowEffect:sphere.Draw(hiDefShadowEffect);
24. Switch the rendering from the
shadowRenderTarget, back to the screen:GraphicsDevice.SetRenderTarget(null); GraphicsDevice.BlendState = BlendState.Opaque; GraphicsDevice.DepthStencilState = DepthStencilState.Default; PopulateShadowEffect(false);
25. Set the texture of the
hiDefShadowEffectto the corresponding scene object, and render it in a similar fashion to this (wherefloorTexturehas already been loaded with the texture for the floor):hiDefShadowEffect.Parameters["Texture"].SetValue(floorTexture); floor.Draw(hiDefShadowEffect);
26. For any scene objects you don't want shadows to be cast upon, use a shader such as the
BasicEffectshader you created earlier which will do the job nicely:basicEffect.Texture = texture; basicEffect.TextureEnabled = true; sphere.Draw(basicEffect);
Shadow mapping, for all the code and math involved, really comes down to the relatively simple idea of identifying all the spots in a scene where a player can see something but a light cannot, due to an obstruction blocking the light's view.
A depth map is generated from the light's view of the scene, and another from the player's perspective. The shader darkens any pixels that correspond to the player's view being "deeper" than the light's.
In the example given in this recipe, we've set up a 2048 x 2048 24-bit texture to hold our shadow map. Depending on the scene, you may find this is either a waste, or not nearly enough.
In the cases where it's an overkill, don't be afraid to drop the resolution to reclaim some memory for better use elsewhere.
On the other hand, if you find yourself unable to create a large enough shadow map to produce a sufficiently detailed shadow, the addition of blur to a shadow can be a useful tool to diminish or completely eliminate such issues.
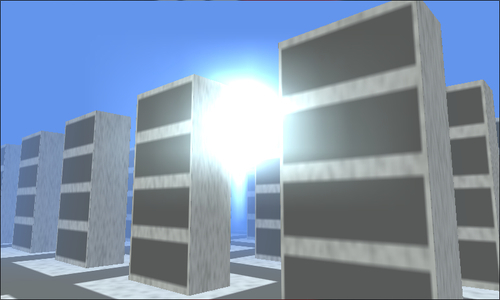
A realistic lens flare can be achieved within the Reach profile by being "physically correct" and performing a check of each frame to confirm that the source of light is, at least partially, visible from the camera's point of view. (Tests involving whether something is in line of sight from something else are commonly referred to as occlusion tests.)
The bad news is, that without the benefit of hardware accelerated occlusion testing like the HiDef profile's OcclusionQuery class can offer, this test can be beyond the processing resources available to a game (especially one running on either mobile or older hardware).
The good news is that we do have a relatively cheap alternative that may just provide enough approximation for a game, and no one need be the wiser that the "proper" technique wasn't used, as the following illustration of the approximation in use demonstrates:
For this special effect, we're going to need an image that will form the basis of our glow. The image can be a simple white circle that fades out to complete transparency, as shown in the following illustration, but don't be afraid to make things even more visually interesting and swap it out for a more complex image later.

To create a lens flare within the Reach profile:
1. Start by creating a new class to hold the lens flare behavior:
class ReachLensFlare
{
2. Inside the new class, define some instance variables to hold details concerning the appearance of the glow:
Texture2D glow;
Vector2 glowOrigin;
float glowScale = 0.25f;
Vector2 lightPosition;
public Vector3 LightDirection = Vector3.Normalize(new Vector3(0.5f, -0.1f, 0.5f));
3. Next, define some instance variables to hold details concerning the rendering of the glow:
SpriteBatch spriteBatch;
GraphicsDevice graphicsDevice;
RenderTarget2D flareTarget;
List<RenderTarget2D> blurTargets;
Viewport flareViewport;
public BasicEffect ShadowCaptureEffect;
4. Then, add a constructor:
public ReachLensFlare(GraphicsDevice graphicsDevice, ContentManager content)
{
5. Next, load the glow image details:
glow = content.Load<Texture2D>(@"lensflare/glow");
glowOrigin = new Vector2(glow.Width, glow.Height) / 2;
6. We now need to pre-calculate the size of the screen onto which the glow is going to be displayed:
flareViewport = new Viewport(0,0,
graphicsDevice.Viewport.Bounds.Width / 8,
graphicsDevice.Viewport.Height /8);
7. Define the render targets, which will aid in the final composition of the overall effect:
this.graphicsDevice = graphicsDevice;
spriteBatch = new SpriteBatch(graphicsDevice);
var pp = graphicsDevice.PresentationParameters;
flareTarget = new RenderTarget2D(graphicsDevice,
flareViewport.Width,
flareViewport.Height,
false,
pp.BackBufferFormat,
pp.DepthStencilFormat);
blurTargets = new List<RenderTarget2D>()
{
new RenderTarget2D(graphicsDevice,
3, 5,
false,
pp.BackBufferFormat,
pp.DepthStencilFormat),
new RenderTarget2D(graphicsDevice,
7 ,4,
false,
pp.BackBufferFormat,
pp.DepthStencilFormat),
new RenderTarget2D(graphicsDevice,
5, 9,
false,
pp.BackBufferFormat,
pp.DepthStencilFormat),
new RenderTarget2D(graphicsDevice,
15, 10,
false,
pp.BackBufferFormat,
pp.DepthStencilFormat),
new RenderTarget2D(graphicsDevice,
33, 43,
false,
pp.BackBufferFormat,
pp.DepthStencilFormat),
new RenderTarget2D(graphicsDevice,
90, 90,
false,
pp.BackBufferFormat,
pp.DepthStencilFormat)
};
8. Complete the constructor with the effect that will be used to mask out any portions of the lens flare that are blocked by scenery:
ShadowCaptureEffect = new BasicEffect(graphicsDevice)
{
DiffuseColor = Vector3.Zero,
};
9. Next, add an
Update()method to the class:public void Update(GameTime gameTime, Matrix view, Matrix projection) {10. Add in a check to determine if the lens flare is visible at all where the player is currently looking:
view.Translation = Vector3.Zero;
var projectedPosition = flareViewport.Project(
-LightDirection, projection,
view, Matrix.Identity);
if ((projectedPosition.Z < 0) || (projectedPosition.Z > 1))
{
return;
}
11. If the lens flare is visible from the player's point of view, complete the
Update()method by storing the light's screen space position:lightPosition = new Vector2(projectedPosition.X, projectedPosition.Y);
12. Create a method to begin the process of capturing the silhouette of the scene:
public void BeginShadowCapture()
{
13. Set the render target, clear the silhouette to black, and place the glow image in the background; ready to be possibly covered by scene elements:
graphicsDevice.SetRenderTarget(flareTarget);
graphicsDevice.Clear(Color.Black);
spriteBatch.Begin();
spriteBatch.Draw(
glow, lightPosition, null, Color.White, 0,
glowOrigin, glowScale, SpriteEffects.None, 0);
spriteBatch.End();
14. Create the method to complete the silhouette capture and apply some blur:
public void EndShadowCapture()
{
15. Paint the captured silhouette scene onto each of the blur targets:
foreach (var blurTarget in blurTargets)
{
graphicsDevice.SetRenderTarget(blurTarget);
spriteBatch.Begin(
SpriteSortMode.Deferred,
BlendState.Opaque,
SamplerState.AnisotropicClamp, null, null);
spriteBatch.Draw(
flareTarget,
blurTarget.Bounds,
Color.LightBlue);
spriteBatch.End();
}
16. Paint the blur targets onto the final target:
graphicsDevice.SetRenderTarget(flareTarget);
graphicsDevice.Clear(Color.Black);
spriteBatch.Begin(
SpriteSortMode.Deferred,
BlendState.Additive,
SamplerState.AnisotropicClamp,
null, null);
foreach (var blurTarget in blurTargets)
{
spriteBatch.Draw(
blurTarget,
flareTarget.Bounds,
Color.White);
}
spriteBatch.End();
graphicsDevice.SetRenderTarget(null);
17. Add a
Draw()method to render the final target on screen:public void Draw() { spriteBatch.Begin( SpriteSortMode.Deferred, BlendState.Additive, SamplerState.AnisotropicClamp, null, null); spriteBatch.Draw( flareTarget, graphicsDevice.Viewport.Bounds, Color.White); spriteBatch.End(); }18. Next in our game code, we add an instance variable for the new lens flare:
ReachLensFlare reachLensFlare;
19. Initialize an instance of the lens flare in the
LoadContent()method:reachLensFlare = new ReachLensFlare(GraphicsDevice, Content);
20. Inside the
Draw()method, there are two parts. The first part is where we draw the elements of the game scene which are likely to block out the lens flare as the player moves through the scene. Here's an example of the required call to the lens flare, followed by a rendering of the scene with the silhouette effect:reachLensFlare.BeginShadowCapture(); // draw scene here. // e.g. here's some building and ground objects // being rendered via their own custom Draw methods foreach (var building in buildings) { building.Draw(camera, reachLensFlare.ShadowCaptureEffect); } ground.Draw(camera, reachLensFlare.ShadowCaptureEffect); reachLensFlare.EndShadowCapture();21. The second part of the rendering process is drawing the scene normally, followed by a call to render the now fully formed lens flare:
GraphicsDevice.Clear(Color.CornflowerBlue);
foreach (var building in buildings)
{
building.Draw(camera);
}
ground.Draw(camera);
reachLensFlare.Draw();
The lens flare class works by drawing a silhouette of the scene in front of the light source, our glow image, and then applying various levels of blurring until we achieve a "flare" appearance.
In the constructor of the lens flare class, we can see the elements of this strategy being set up with the loading of the glow image and the creation of some render targets, which will be used later to facilitate blurring.
Also note the creation of the shadow effect, which when used in the drawing of game objects, will make them appear as solid black shapes, perfect for our silhouette needs.
Moving down to the Update() method, the calculation of the glow position in screen space can be spotted. In this case, we're taking advantage of the Project() method on the ViewPort class, which is conveniently designed to do that very calculation for us.
Note
To simulate the sun's distance and size, the view has been altered so that the glow is always just in front of the camera. This step is not required if the lens flare being displayed is in place of something a lot closer, such as a lamp or headlight.
Finally, we have the three methods that form the working heart of the lens flare.
The
BeginShadowCapture()method sets the render target, so that any rendering performed from this point onwards will be diverted into theflareTarget. It clears the contents of the render target to black, and draws the glow image.Next is the
EndShadowCapture()method, which is called by the game after the scene has finished being drawn onto the render target. This is where the blurring process takes place.The captured image in the render target is drawn onto each of the blur render targets, and then all of the blur render targets are combined back into one image.
A combination of the low resolution of each one of the blur render targets, along with the smoothed sampling method used in their combination, gives us our desired blurred effect.
The
Draw()method performs the important act of actually drawing the newly created blurred glow on the screen.
Note
SpriteBatch alters a few GraphicsDevice settings when it renders to the screen, and this can cause strange side effects in the appearance of any 3D graphics rendered afterwards. If your 3D world stops rendering correctly, be sure to reset the GraphicsDevice.BlendState and GraphicsDevice.DepthStencilState properties upon completing any SpriteBatch operations.
This technique for producing lens flares will probably need to be fine-tuned in your game on a case-by-case basis, to achieve the best result and avoid any distracting artifacts produced during its construction.
Altering the resolutions and tints of the blur render targets can make a significant difference to how convincing the effect is.
Modern GPUs are very good at determining whether one set of polygons is obscured by another set. We can use this to our advantage when creating lens flares within a HiDef profile.
This recipe assumes that you've already got a scene, rendering correctly, albeit without a lens flare.
To create a lens flare within the HiDef profile:
1. Create a new class to hold the lens flare behavior:
class HiDefLensFlare
{
2. Add some instance-level variables to hold the details of the occlusion test, the lighting, and the glow image:
SpriteBatch spriteBatch;
GraphicsDevice graphicsDevice;
public BasicEffect ShadowCaptureEffect;
OcclusionQuery occlusionQuery;
bool occlusionQueryActive;
float occlusionAlpha;
const float querySize = 50;
VertexPositionColor[] queryVertices;
public Vector3 LightDirection = Vector3.Normalize(new Vector3(0.5f, -0.1f, 0.5f));
Vector2 lightPosition;
bool lightBehindCamera;
Texture2D glow;
Vector2 glowOrigin;
float glowScale = 400f;
3. Next, add a constructor to set up the occlusion test prerequisites and load the glow texture:
public HiDefLensFlare(GraphicsDevice graphicsDevice, ContentManager content)
{
this.graphicsDevice = graphicsDevice;
spriteBatch = new SpriteBatch(graphicsDevice);
ShadowCaptureEffect = new BasicEffect(graphicsDevice)
{
View = Matrix.Identity,
VertexColorEnabled = true
};
occlusionQuery = new OcclusionQuery(graphicsDevice);
queryVertices = new VertexPositionColor[4];
queryVertices[0].Position = new Vector3(-querySize / 2, -querySize / 2, -1);
queryVertices[1].Position = new Vector3(querySize / 2, -querySize / 2, -1);
queryVertices[2].Position = new Vector3(-querySize / 2, querySize / 2, -1);
queryVertices[3].Position = new Vector3(querySize / 2, querySize / 2, -1);
glow = content.Load<Texture2D>(@"lensflare/glow");
glowOrigin = new Vector2(glow.Width, glow.Height) / 2;
}
4. Create a new
BlendStateinstance-level variable so the ocular test can proceed without changing the visible image:static readonly BlendState ColorWriteDisable = new BlendState { ColorWriteChannels = ColorWriteChannels.None };5. Add a new method to perform the ocular test:
public void Measure(Matrix view, Matrix projection)
{
6. Calculate the position of the lens flare on screen, and exit early if it's behind the player's viewpoint:
var infiniteView = view;
infiniteView.Translation = Vector3.Zero;
var viewport = graphicsDevice.Viewport;
var projectedPosition = viewport.Project(
-LightDirection, projection,
infiniteView, Matrix.Identity);
if ((projectedPosition.Z < 0) ||
(projectedPosition.Z > 1))
{
lightBehindCamera = true;
return;
}
lightPosition = new Vector2(projectedPosition.X, projectedPosition.Y);
lightBehindCamera = false;
7. Add the calculation for how much of the lens flare test area is occluded by the scene once the previous occlusion test has completed:
if (occlusionQueryActive)
{
if (!occlusionQuery.IsComplete)
{
return;
}
const float queryArea = querySize * querySize;
occlusionAlpha = Math.Min(
occlusionQuery.PixelCount / queryArea, 1);
}
8. Set up for the next occlusion query:
graphicsDevice.BlendState = ColorWriteDisable;
graphicsDevice.DepthStencilState = DepthStencilState.DepthRead;
ShadowCaptureEffect.World = Matrix.CreateTranslation(
lightPosition.X,
lightPosition.Y, 0);
ShadowCaptureEffect.Projection = Matrix.CreateOrthographicOffCenter(0,
viewport.Width,
viewport.Height,
0, 0, 1);
ShadowCaptureEffect.CurrentTechnique.Passes[0].Apply();
9. Render the lens flare test vertices inside the occlusion test to determine how many pixels were rendered:
occlusionQuery.Begin();
graphicsDevice.DrawUserPrimitives(PrimitiveType.TriangleStrip, queryVertices, 0, 2);
occlusionQuery.End();
occlusionQueryActive = true;
10. Complete the class by adding a
Draw()method to render the glow:public void Draw() { if (lightBehindCamera || occlusionAlpha <= 0) return; Color color = Color.White * occlusionAlpha; Vector2 origin = new Vector2(glow.Width, glow.Height) / 2; float scale = glowScale * 2 / glow.Width; spriteBatch.Begin(); spriteBatch.Draw(glow, lightPosition, null, color, 0, origin, scale, SpriteEffects.None, 0); spriteBatch.End(); }
XNA and the underlying DirectX infrastructure contain a rather handy little diagnostic tool in the form of the occlusion test. With this test, you can count how many pixels were filled when trying to render a particular portion of a scene.
We utilize this in the lens flare example by attempting to render a small rectangle across the opposite side of the scene from the player's viewpoint, and measuring how much of it is obscured by the scene's meshes. With this number, we adjust the opacity of the lens flare's glow texture up or down to simulate the sun disappearing either partially or completely behind an object.
If implemented in a naive fashion, rendering smoke could place a significant burden on the hardware of a device running a game under the Reach profile.
In this recipe, you'll learn a method for improving the distribution of work and data between the CPU and GPU, to hopefully get as close as possible to the unachievable goal of hardware instancing in an environment that doesn't allow for custom shaders.
In the following illustration, you can see this recipe in use within a stylized city scene:
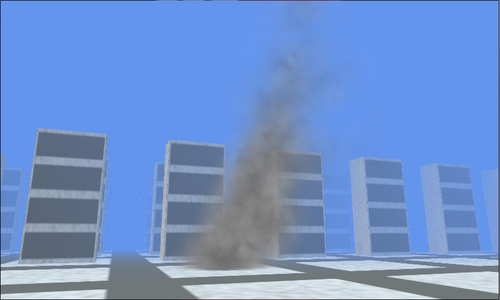
An image of a smoke "particle" is required for this special effect, but don't feel pressured to spend too much time or effort creating anything too elaborate. Although it forms the heart of the display, the technique's repetition and distortion of even the most basic smoke pattern can result in some quite intricate and realistic results.
To create smoke within the Reach Profile:
1. Start by creating a new smoke particle class:
class ReachSmokeParticle
{
2. Insert instance variables for the position and age of the particle:
public Vector3 Position;
public float PositionDelta;
public float Scale;
public float Rotation;
public float RotationDelta;
public float Age;
public float AgeDelta;
public bool Visible;
public Texture2D Texture;
public Vector2 TextureOrigin;
3. Add an
Update()method to calculate a particle's details:public void Update( GameTime gameTime, Vector3 wind, Vector3 spawnPoint, float spawnRadius, Random random) { var timeScale = (float)gameTime.ElapsedGameTime.TotalSeconds; Position += ((Vector3.Up * PositionDelta) + wind) * timeScale; Rotation += RotationDelta * timeScale; Age += AgeDelta * timeScale; if (Age > 1) { var offset = ((.5f - (float)random.NextDouble()) * (Vector3.Right * spawnRadius)) + ((.5f - (float)random.NextDouble()) * (Vector3.Forward * spawnRadius)); Position = spawnPoint + offset; Age = 0; Visible = true; } }4. Continue by adding a
Draw()method:public void Draw( SpriteBatch spriteBatch, Viewport viewport, Matrix view, Matrix projection, float projectedScale) { if (!Visible) { return; } var projectedPosition = viewport.Project( Position, projection, view, Matrix.Identity); var screenPosition = new Vector2( projectedPosition.X, projectedPosition.Y); var tint = Color.FromNonPremultiplied( 255, 255, 255, 255 - (int)(255f * Age)); var displayScale = Scale * projectedScale; spriteBatch.Draw( Texture, screenPosition, null, tint, Rotation, TextureOrigin, displayScale, SpriteEffects.None, projectedPosition.Z); }5. Now, add the class that will be emitting the freshly defined particles:
class ReachSmoke
{
6. Insert some instance variables to the new class to hold the details of the particles:
SpriteBatch spriteBatch;
Texture2D smoke;
Vector2 halfSmokeSize;
List<ReachSmokeParticle> particles;
Vector3 spawnPoint = Vector3.Zero;
float spawnRadius = 0.2f;
Random random = new Random();
Vector3 wind = Vector3.Right * 0.3f;
7. Add a constructor to create instances of all the particles:
public ReachSmoke(
GraphicsDevice graphicsDevice,
ContentManager content)
{
spriteBatch = new SpriteBatch(graphicsDevice);
smoke = content.Load<Texture2D>("smoke/smoke");
halfSmokeSize = new Vector2(
smoke.Width / 2, smoke.Height / 2);
var particleCount = 300;
particles = new List<ReachSmokeParticle>();
for (var index = 0; index < particleCount; index++)
{
var particle = new ReachSmokeParticle()
{
Texture = smoke,
TextureOrigin = halfSmokeSize,
Position = spawnPoint,
PositionDelta =
(0.8f * (float)random.NextDouble()) + .2f,
Scale =
(0.8f * (float)random.NextDouble()) + .2f,
Rotation = (float)random.NextDouble(),
RotationDelta = 0.5f - (float)random.NextDouble(),
Age = (float)random.NextDouble(),
AgeDelta =
(0.8f * (float)random.NextDouble()) + .2f,
Visible = false
};
particles.Add(particle);
}
}
8. Add an
Update()method to update all the particles to their latest positions:public void Update(GameTime gameTime) { foreach (var particle in particles) { particle.Update( gameTime, wind, spawnPoint, spawnRadius, random); } }9. Finish the class with the addition of the
Draw()method to render the particles onto the screen:public void Draw( Matrix view, Matrix projection, Matrix world, Viewport viewport) { var scaleTestPositionOne = viewport.Project( Vector3.Zero, projection, view, Matrix.Identity); if (scaleTestPositionOne.Z < 0) { return; } var scaleTestPositionTwo = viewport.Project( Vector3.Up + Vector3.Right, projection, view, Matrix.Identity); var projectedScale = Vector3.Distance( scaleTestPositionOne, scaleTestPositionTwo) / (smoke.Height * 2); if (projectedScale > 5f) { return; } spriteBatch.Begin( SpriteSortMode.Deferred, BlendState.AlphaBlend, null, DepthStencilState.DepthRead, null); foreach (var particle in particles) { particle.Draw(spriteBatch, viewport, view, projection, projectedScale); } spriteBatch.End(); }
Inspecting the constructor of the ReachSmoke class, we can see the creation of the smoke particles.
A diverse selection of random sizes, speeds, and states throughout the particles lessens the chance of players being able to spot any obvious signs of repetition, despite the use of only one texture across all of the particles.
In order to lessen the chance of unwanted pressure on the garbage collector, we create a set number of particles at the beginning and recycle them as required.
Within the Update() method of the ReachSmokeParticle class, the code to move and rotate each particle can be seen along the recycling process that re-spawns a particle once it has reached the end of its life.
Eagle-eyed readers may notice that a given particle's visibility isn't enabled until it has re-spawned at least once. This delay in visibility is done to give the particles the best chance of appearing in a reasonably even manner, and avoid one large, unrealistic clump at the beginning.
To enjoy the best chance of maximum performance, the Draw() methods of both the ReachSmoke and ReachSmokeParticle classes are designed with the idea of harnessing the optimizations present in the SpriteBatch class.
With this in mind, the transformation from 3D world space into 2D screen space is performed on the CPU via .NET code. This allows the GPU to receive and display the particles in one unified update, without the need to recalculate or reload.
Handling the 3D calculations ourselves presents two issues:
The first is that of perspective and the need to scale, which is dependent on how far away the viewer is from the smoke.
A measurement of the distance between screen positions of two known points in 3D space is made at the start of the
Draw()method ofReachSmoke, to help approximate the scaling of perspective.The second problem is of depth, where the
SpriteBatchclass is more commonly called upon to draw images over the top of a 3D scene rather than within it.Thankfully, the
Draw()method of theSpriteBatchclass has an override that allows us to specify the depth of a given texture, and use this to ensure that particles appear correctly in front of, and behind other elements in a 3D scene.
With some tweaking of the numbers and the texture, a variety of effects from flame, to steam, and even bubbles, can be achieved with a similar approach.
One addition that can really improve the realism of particle-based effects such as smoke, is animating the texture of each particle as it moves through the scene.
Examples of this can be found in games such as Naughty Dog's Uncharted 3, where they utilized an additional texture as a "movement map", where the color of each pixel in the movement map dictated the direction and intensity of the translation/distortion applied to the corresponding pixel in the texture map.
If there's one thing I really appreciate, it's explosions that have a visceral and almost palpable presence in a game.
Much of the presence of an explosion tends to come from the more subtle in-game artifacts, such as a deep, complex, sound design and shaking of the camera, and for a lot of games this is more than enough. But sometimes, something that is a little more satisfying is required visually, such as the rolling fireball covered in this recipe and pictured in the following illustration:
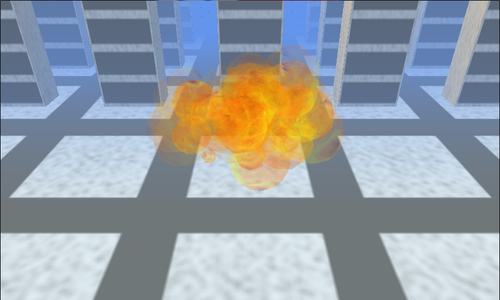
In this special effect, you'll need a textured sphere with a flame or lava appearance.
In the following code, there are references to a GeometricBuffer class that can be substituted with any other sort of mesh container. You can find the details of how to construct this kind of mesh programmatically in Chapter 3, Procedural Modeling.
A textured sphere mesh from a modeling package would work equally well.
To create an explosion within the Reach profile:
1. As with other particle-based effects, we begin with a new particle class:
class ReachExplosionParticle
{
2. Start the new class by adding some instance variables to hold its position, age, and other details:
public Microsoft.Xna.Framework.Matrix World;
public float Size;
public float HorizontalAngle;
public float HorizontalOffset;
public float VerticleOffset;
public float Roll;
public float Age;
public float AgeDelta;
3. Next, define the class that will render each particle:
class ReachExplosionParticleDisplay
{
4. Add some instance-level variables to hold the mesh, effect, and lifetime details of the particle displayed:
GeometricBuffer<VertexPositionNormalTexture> sphereBuffer;
BasicEffect sphereEffect;
Curve alphaCurve;
Curve lightCurve;
5. Create a constructor to initialize everything:
public ReachExplosionParticleDisplay(
GeometricBuffer<VertexPositionNormalTexture> sphereBuffer,
BasicEffect sphereEffect)
{
this.sphereBuffer = sphereBuffer;
this.sphereEffect = sphereEffect;
alphaCurve = new Curve();
alphaCurve.Keys.Add(new CurveKey(0, 0.75f));
alphaCurve.Keys.Add(new CurveKey(0.125f, 0.5f));
alphaCurve.Keys.Add(new CurveKey(0.35f, 0.125f));
alphaCurve.Keys.Add(new CurveKey(1f, 0f));
lightCurve = new Curve();
lightCurve.Keys.Add(new CurveKey(0, 1f));
lightCurve.Keys.Add(new CurveKey(0.2f, 1f));
lightCurve.Keys.Add(new CurveKey(1f, 0.25f));
}
6. Add the
Draw()method to render the particles and finish the class:internal void Draw( Matrix view, Matrix projection, Matrix world, float age) { sphereEffect.View = view; sphereEffect.Projection = projection; sphereEffect.World = world; sphereEffect.Alpha = alphaCurve.Evaluate(age); sphereEffect.DiffuseColor = Vector3.One * lightCurve.Evaluate(age); sphereBuffer.Draw(sphereEffect); }7. Create a new class to orchestrate all the particles and their displays:
class ReachExplosion
{
8. Add the instance-level variables to hold the display renderer, the particles, and some animation settings:
ReachExplosionParticleDisplay particleDisplay;
List<ReachExplosionParticle> particles;
Random random = new Random();
Curve horizontalRateCurve;
Curve verticleRateCurve;
private bool exploding;
9. Initialize everything in a constructor:
public ReachExplosion(
GraphicsDevice graphicsDevice,
ContentManager content)
{
particleDisplay = ReachExplosionParticleDisplayFactory.Create(
graphicsDevice, content);
particles = new List<ReachExplosionParticle>();
for (var index = 0; index < 100; index++)
{
particles.Add(new ReachExplosionParticle());
}
horizontalRateCurve = new Curve();
horizontalRateCurve.Keys.Add(new CurveKey(0, 0f));
horizontalRateCurve.Keys.Add(new CurveKey(0.025f, 0.8f));
horizontalRateCurve.Keys.Add(new CurveKey(0.25f, 1f));
verticleRateCurve = new Curve();
verticleRateCurve.Keys.Add(new CurveKey(0.2f, 0.1f));
verticleRateCurve.Keys.Add(new CurveKey(0.3f, 0.25f));
}
10. Create a variable and a method to indicate when things should start exploding:
public void Explode()
{
foreach (var particle in particles)
{
Reset(particle);
}
exploding = true;
}
11. Add the ability to reset particles back to an initial position ready to explode:
private void Reset(ReachExplosionParticle particle)
{
particle.Size = (float)random.NextDouble() * 0.2f;
particle.HorizontalAngle = (float)random.NextDouble() *
MathHelper.TwoPi;
particle.HorizontalOffset = (float)random.NextDouble() *
0.5f;
particle.Roll = ((0.4f *
(float)random.NextDouble()) +
0.6f) * 2f * MathHelper.TwoPi;
particle.VerticleOffset = (0.2f *
(float)random.NextDouble());
particle.Age = 0f;
particle.AgeDelta = ((0.6f *
(float)random.NextDouble()) + 0.4f);
}
12. Update the state of all the particles through the addition of an
Update()method:public void Update(GameTime gameTime) { if (!exploding) { return; } var liveParticleCount = 0; foreach (var particle in particles) { if (particle.Age > 1) { continue; } particle.Age += particle.AgeDelta * (float)gameTime.ElapsedGameTime.TotalSeconds; particle.VerticleOffset += verticleRateCurve.Evaluate(particle.Age) * (float)gameTime.ElapsedGameTime.TotalSeconds * 5f; particle.Roll += (float)gameTime.ElapsedGameTime.TotalSeconds; var horizontalOffset = horizontalRateCurve.Evaluate(particle.Age) * particle.HorizontalOffset * Vector3.Backward; var verticleOffset = Vector3.Up * particle.VerticleOffset; particle.World = Matrix.CreateScale(particle.Size) * Matrix.CreateRotationX(particle.Roll) * Matrix.CreateTranslation(horizontalOffset) * Matrix.CreateRotationY(particle.HorizontalAngle) * Matrix.CreateTranslation(verticleOffset); liveParticleCount++; } exploding = liveParticleCount > 0; }13. And completing the class, we come to rendering the particles onscreen:
public void Draw(
Matrix view,
Matrix projection,
GameTime gameTime)
{
if (!exploding)
{
return;
}
foreach (var particle in particles)
{
if (particle.Age > 1)
{
continue;
}
particleDisplay.Draw(
view,
projection,
particle.World,
particle.Age);
}
}
14. To complete the example, add a factory class to create a new instance of the particle mesh. Here's an example using the
GeometricBufferclasses from Chapter 3, Procedural Modeling:class ReachExplosionParticleDisplayFactory { public static ReachExplosionParticleDisplay Create(GraphicsDevice graphicsDevice, ContentManager content) { var sphereEffect = new BasicEffect(graphicsDevice) { SpecularColor = Color.Black.ToVector3(), DiffuseColor = Color.White.ToVector3(), Texture = content.Load<Texture2D>("lava"), TextureEnabled = true }; var factory = new VertexPositionNormalTextureGeometricBufferFactory(); var radius = 1f; var vStep = -MathHelper.Pi / 8f; var uStep = -MathHelper.TwoPi / 8f; for (var v = MathHelper.PiOver2; v > -MathHelper.PiOver2; v += vStep) { var nextV = v + vStep; var vY = radius * (float)Math.Sin(v); var nextVY = (float)Math.Sin(nextV); var bandRadius = radius * (float)Math.Cos(v); var nextBandRadius = radius * (float)Math.Cos(nextV); var top = new Vector3( bandRadius, vY, bandRadius); var bottom = new Vector3( nextBandRadius, nextVY, nextBandRadius); for (var u = MathHelper.Pi; u > -MathHelper.Pi; u += uStep) { var nextU = u + uStep; var uX = (float)Math.Sin(u); var nextUX = (float)Math.Sin(nextU); var uZ = (float)Math.Cos(u); var nextUZ = (float)Math.Cos(nextU); var right = new Vector3(uX, 1f, uZ); var left = new Vector3(nextUX, 1f, nextUZ); var topLeft = top * left; var topRight = top * right; var bottomRight = bottom * right; var bottomLeft = bottom * left; var textureLeft = (float)( (nextU + MathHelper.Pi) / MathHelper.TwoPi); var textureRight = (float)( (u + MathHelper.Pi) / MathHelper.TwoPi); var textureTop = 1f - (float)( (v + MathHelper.PiOver2) / Math.PI); var textureBottom = 1f - (float)( (nextV + MathHelper.PiOver2) / Math.PI); var topLeftNormal = Vector3.Normalize(topLeft); var topRightNormal = Vector3.Normalize(topRight); var bottomRightNormal = Vector3.Normalize(bottomRight); var bottomLeftNormal = Vector3.Normalize(bottomLeft); factory.AddPane( topLeft, new Vector2(textureLeft, textureTop), topLeftNormal, topRight, new Vector2(textureRight, textureTop), topRightNormal, bottomRight, new Vector2(textureRight, textureBottom), bottomRightNormal, bottomLeft, new Vector2(textureLeft, textureBottom), bottomLeftNormal); } } var sphereBuffer = factory.Create(graphicsDevice); sphereBuffer.IsTextureTransparent = true; return new ReachExplosionParticleDisplay( sphereBuffer, sphereEffect); } }
The heart of the ReachExplosion class lies with the use of the XNA Curve class.
Via the Curve class, we can take the relatively random nature of the particle stream and mold it into the visually satisfying shape of a gaseous explosion.
Two instances of the Curve class are created within the constructor of the ReachExplosion class.
The first curve determines the shape of the explosion by expanding or contracting the distance between each particle and the center of the explosion. The second curve determines how quickly the particles rise.
Another two instances of the Curve class can be observed in the ReachExplosionParticleDisplay class controlling the luminescence and transparency of each particle, thereby simulating the particle's transition from flame, to smoke, to thin air.
Just like in film, the difference between a convincing explosion and one less so can usually be found not in the explosion itself, but in the impact it has on the world around it.
A deep bass explosion sound along with a small shake of the virtual camera, possibly also achieved via the Curve class, would go a long way towards enhancing the realism of this effect.
One of the more visceral elements of a good explosion is the shockwave that races ahead of the flames. Extracting and modifying one of the standard Microsoft examples of distortion mapping can let us enjoy the rather gratifying joy of shockwave-laden explosions in our own games.
This recipe assumes you have access to a spherical mesh and some sort of flame texture. It was originally written with the sphere generator presented in the Modeling spheres recipe of Chapter 3, Procedural Modeling, but should work equally well with any other method of creating spheres. Where you find the call to a CreateSphere() method in the following example code, feel free to replace that with your own.
Likewise, any references to GeometricBuffer classes of Chapter 3, Procedural Modeling can be substituted for any other mesh container style classes.
To create an explosion within the HiDef profile:
1. Add a new effect file to your game's content project, named
DistortionGenerator.fx.2. Inside the new file, clear any existing content and add the input parameters:
float4x4 WorldViewProjection;
float4x4 WorldView;
float DistortionScale;
3. Define the structure of the data that passes between the vertex and pixel shaders:
struct PositionNormal
{
float4 Position : POSITION;
float3 Normal : NORMAL;
};
struct PositionDisplacement
{
float4 Position : POSITION;
float2 Displacement : TEXCOORD;
};
4. Add a vertex shader that calculates the distortion on behalf of the pixel shader based upon a vertex's normal:
PositionDisplacement PullIn_VertexShader(PositionNormal input)
{
PositionDisplacement output;
output.Position = mul(input.Position, WorldViewProjection);
float3 normalWV = mul(input.Normal, WorldView);
normalWV.y = -normalWV.y;
float amount = dot(normalWV, float3(0,0,1)) * DistortionScale;
output.Displacement = float2(.5,.5) + float2(amount * normalWV.xy);
return output;
}
5. Next, add the corresponding pixel shader that emits the distorted normal as a color:
float4 DisplacementPassthrough_PixelShader(float2 displacement : TEXCOORD) : COLOR
{
return float4(displacement, 0, 1);
}
6. Complete the file by tying the vertex and pixel shader together into a technique:
technique PullIn
{
pass
{
VertexShader = compile vs_2_0 PullIn_VertexShader();
PixelShader = compile ps_2_0 DisplacementPassthrough_PixelShader();
}
}
7. Create a new effect file named
DistortionApplicator.fxand add it to your content project.8. Specify the effect's inputs to receive two textures and the weighting arrays for a Gaussian blur:
sampler SceneTexture : register(s0);
sampler DistortionMap : register(s1);
#define SAMPLE_COUNT 15
float2 SampleOffsets[SAMPLE_COUNT];
float SampleWeights[SAMPLE_COUNT];
9. Add a constant to help in the translation of a zero amount when moving between 0-1 and 0-255 ranges:
const float ZeroOffset = 0.5f / 255.0f;
10. Include a pixel shader that renders a distorted and possibly blurred version of the scene texture if the distortion map texture is any color other than black:
float4 Distort_PixelShader(float2 TexCoord : TEXCOORD0,
uniform bool distortionBlur) : COLOR0
{
float2 displacement = tex2D(DistortionMap, TexCoord).rg;
float4 finalColor = 0;
if ((displacement.x == 0) && (displacement.y == 0))
{
finalColor = tex2D(SceneTexture, TexCoord);
}
else
{
displacement -= .5 + ZeroOffset;
if (distortionBlur)
{
for (int i = 0; i < SAMPLE_COUNT; i++)
{
finalColor += tex2D(
SceneTexture,
TexCoord.xy +
displacement +
SampleOffsets[i]) *
SampleWeights[i];
}
}
else
{
finalColor = tex2D(SceneTexture, TexCoord.xy + displacement);
}
}
return finalColor;
}
11. Add two techniques to allow the pixel shader to be used with or without blurring:
technique Distort
{
pass
{
PixelShader = compile ps_2_0 Distort_PixelShader(false);
}
}
technique DistortBlur
{
pass
{
PixelShader = compile ps_2_0 Distort_PixelShader(true);
}
}
12. In your game project, create a new factory class to produce explosions:
class HiDefExplosionFactory
{
13. Add a static method to create new explosions:
public static HiDefExplosion Create(
GraphicsDevice graphicsDevice,
ContentManager content)
{
var buffer = CreateSphere(graphicsDevice);
var occlusionEffect = new BasicEffect(graphicsDevice)
{
DiffuseColor = Color.Black.ToVector3()
};
var flameEffect = new BasicEffect(graphicsDevice)
{
DiffuseColor = Color.White.ToVector3(),
Texture = content.Load<Texture2D>("explosion/lava"),
TextureEnabled = true,
Alpha = 0.5f
};
var distortionGeneratorEffect = content.Load<Effect>("explosion/DistortionGenerator");
var distortionApplicatorEffect = content.Load<Effect>("explosion/DistortionApplicator");
return new HiDefExplosion(
graphicsDevice,
buffer,
occlusionEffect ,
flameEffect,
distortionGeneratorEffect,
distortionApplicatorEffect);
}
14. Create a new Explosion class:
class HiDefExplosion
{
15. Add the instance-level variables that will be used to render the flames:
GeometricBuffer<VertexPositionNormalTexture> buffer;
BasicEffect flameEffect;
RenderTarget2D sceneRenderTarget;
16. Declare the instance-level variables that will be used to render the shockwave:
RenderTarget2D distortionRenderTarget;
public BasicEffect OcclusionEffect;
Effect distortionGeneratorEffect;
Effect distortApplicatorEffect;
17. Append the instance-level variables used to display the completed animation:
18. Add a constructor:
public HiDefExplosion(
GraphicsDevice graphicsDevice,
GeometricBuffer<VertexPositionNormalTexture> buffer,
BasicEffect occlusionEffect,
BasicEffect flameEffect,
Effect distortersEffect,
Effect distortEffect)
{
19. Inside the constructor, populate the instance- level variables:
this.buffer = buffer;
OcclusionEffect = occlusionEffect;
this.flameEffect = flameEffect;
this.distortionGeneratorEffect = distortersEffect;
this.distortApplicatorEffect = distortEffect;
20. Set up the pieces required to capture and display the various elements of the explosion:
spriteBatch = new SpriteBatch(graphicsDevice);
var pp = graphicsDevice.PresentationParameters;
sceneRenderTarget = new RenderTarget2D(graphicsDevice,
pp.BackBufferWidth, pp.BackBufferHeight,
false, pp.BackBufferFormat, pp.DepthStencilFormat);
distortionRenderTarget = new RenderTarget2D(graphicsDevice,
pp.BackBufferWidth, pp.BackBufferHeight,
false, pp.BackBufferFormat, pp.DepthStencilFormat);
21. Populate the Gaussian blur weight arrays of the distortion effect:
SetBlurEffectParameters(
1f / (float)pp.BackBufferWidth,
1f / (float)pp.BackBufferHeight);
22. Create the timings for the explosion animation:
explosionLifeSpanSeconds = 5f;
sizeCurve = new Curve();
sizeCurve.Keys.Add(new CurveKey(0, 0.1f));
sizeCurve.Keys.Add(new CurveKey(0.75f, 5f));
flameAlphaCurve = new Curve();
flameAlphaCurve.Keys.Add(new CurveKey(0, 0f));
flameAlphaCurve.Keys.Add(new CurveKey(0.05f, 1f));
flameAlphaCurve.Keys.Add(new CurveKey(0.15f, 0f));
23. Add a method to begin capturing a scene into the
sceneRenderTarget:public void BeginSceneCapture(GraphicsDevice graphicsDevice) { graphicsDevice.SetRenderTarget(sceneRenderTarget); }24. Create a method to render the flame as a final element onto the scene, before switching the rendering from the
sceneRenderTargetback to the screen:public void EndSceneCapture( GraphicsDevice graphicsDevice, Matrix view, Matrix projection) { if (exploding) { flameEffect.View = view; flameEffect.Projection = projection; flameEffect.World = World; flameEffect.Alpha = flameAlpha; // draw explosion particle. // e.g. here's how it would be done using // Chapter 3's GeometricBuffer classes buffer.IsTextureTransparent = true; buffer.Draw(flameEffect); } graphicsDevice.SetRenderTarget(null); }25. Next up is the method to begin capturing any objects within a scene that may be occluding the explosion from the player:
public void BeginOcclusionCapture(
GraphicsDevice graphicsDevice)
{
if (!exploding)
{
return;
}
graphicsDevice.SetRenderTarget(distortionRenderTarget);
graphicsDevice.Clear(Color.Black);
}
26. Add the method to render the distortion effect into a render target, and shift the rendering to the screen once more:
public void EndOcclusionCapture(
GraphicsDevice graphicsDevice,
Matrix view,
Matrix projection)
{
if (!exploding)
{
return;
}
Matrix meshWorldView = Matrix.CreateScale(1.5f) * World * view;
distortionGeneratorEffect.CurrentTechnique =
distortionGeneratorEffect.Techniques["PullIn"];
distortionGeneratorEffect.Parameters["WorldView"].SetValue(meshWorldView);
distortionGeneratorEffect.Parameters["WorldViewProjection"].SetValue(
meshWorldView * projection);
distortionGeneratorEffect.Parameters["DistortionScale"].SetValue(
0.0125f);
buffer.Draw(distortionGeneratorEffect);
graphicsDevice.SetRenderTarget(null);
}
27. Specify the method and the associated variables to start the animation:
public void Explode(GameTime gameTime)
{
exploding = true;
explosionStartTime = gameTime.TotalGameTime.TotalSeconds;
explosionEndTime = explosionStartTime +
explosionLifeSpanSeconds;
}
28. Insert an
Update()method to play the animation once it has begun:public void Update(GameTime gameTime) { if (!exploding) { return; } if (gameTime.TotalGameTime.TotalSeconds >= explosionEndTime) { exploding = false; return; } var explosionTimeOffset = gameTime.TotalGameTime.TotalSeconds - explosionStartTime; World = Matrix.CreateScale(sizeCurve.Evaluate((float)explosionTimeOffset)) * Matrix.CreateTranslation(Vector3.Zero); flameAlpha = flameAlphaCurve.Evaluate((float)explosionTimeOffset); }29. Add the
Draw()method to render the scene along with any explosion that may be in progress:public void Draw(GraphicsDevice graphicsDevice) { if (exploding) { spriteBatch.Begin(0, BlendState.Opaque, null, null, null, distortApplicatorEffect); distortApplicatorEffect.CurrentTechnique = distortApplicatorEffect.Techniques["DistortBlur"]; graphicsDevice.Textures[1] = distortionRenderTarget; graphicsDevice.SamplerStates[1] = SamplerState.PointClamp; } else { spriteBatch.Begin(); } var viewport = graphicsDevice.Viewport; spriteBatch.Draw( sceneRenderTarget, new Rectangle(0, 0, viewport.Width, viewport.Height), Color.White); spriteBatch.End(); }30. Finish the class with methods to calculate Gaussian blur weightings:
void SetBlurEffectParameters(float dx, float dy)
{
EffectParameter weightsParameter, offsetsParameter;
weightsParameter = distortApplicatorEffect.
Parameters["SampleWeights"];
offsetsParameter = distortApplicatorEffect.
Parameters["SampleOffsets"];
int sampleCount = weightsParameter.Elements.Count;
float[] sampleWeights = new float[sampleCount];
Vector2[] sampleOffsets = new
Vector2[sampleCount];
sampleWeights[0] = ComputeGaussian(0);
sampleOffsets[0] = new Vector2(0);
float totalWeights = sampleWeights[0];
for (int i = 0; i < sampleCount / 2; i++)
{
float weight = ComputeGaussian(i + 1);
sampleWeights[i * 2 + 1] = weight;
sampleWeights[i * 2 + 2] = weight;
totalWeights += weight * 2;
float sampleOffset = i * 2 + 1.5f;
var delta = new Vector2(dx, dy) *
sampleOffset;
sampleOffsets[i * 2 + 1] = delta;
sampleOffsets[i * 2 + 2] = -delta;
}
HiDef profileexplosions, creatingfor (int i = 0; i < sampleWeights.Length; i++)
{
sampleWeights[i] /= totalWeights;
}
weightsParameter.SetValue(sampleWeights);
offsetsParameter.SetValue(sampleOffsets);
}
static float ComputeGaussian(float n)
{
return (float)((1.0 /
Math.Sqrt(2 * Math.PI * blurAmount)) *
Math.Exp(-(n * n) /
(2 * blurAmount * blurAmount)));
}
I find it easiest to imagine how this recipe works in terms of how I might try to achieve a similar effect using more traditional real-world artistic techniques.
For example, if this was an airbrushed artwork, I might paint the surrounding scene first, apply masking tape to any area where I didn't want the explosion to appear, spray a fiery design over the top, remove the tape, and voila! A scene with an explosion is produced.
Between the BeginSceneCapture() and EndSceneCapture() methods is where we draw the surrounding scene.
Next, we create a mask by painting the shape of the explosion amongst a completely blackened version of our scene, through calling the BeginOcclusionCapture() and EndOcclusionCapture() methods, and the DistortionGenerator effect.
Rendering this "heat map" amongst a blackened version of the scene means that any elements of the scene that would normally obscure the explosion are rendered as black, over the top of the explosion shape, thereby masking those portions out.
The color we fill the explosion shape in with is not the final color of the rendered explosion though. Instead, it is a sort of a "heat map", indicating the direction and amount of distorted explosive effect that will be applied to each pixel in the final image.
Inside the Draw() method is where we bring all the elements together with the help of the DistortionApplicator effect.
Taking note of which pixels are black and which are not within the masked image, the DistortionApplicator effect renders the original scene image with the appropriate amount of distortion in each area, thereby achieving the final result: a scene with an explosive bubble of distortion flooding across the landscape.
The draw, mask, and combine technique demonstrated in this recipe is the foundation of a vast array of effects found in games.
Apply the distortions to a flattened pane and you're half way towards producing a patch of water. Change the intensity of the distortion based upon the depth of the original scene, and you're very close to a passable focal blur effect.
Rendering water within the HiDef profile recipe in Chapter 4, Creating Water and Sky.