Download code from GitHub
You may remember building a diorama project from a shoebox for school as a child. We're going to make one today, using Unity. Let's assemble our first scene, which is composed of simple geometric objects. Along the way, we'll talk about using Unity, world scale, and rendering. We'll also explore various sources for 3D content, where you can find them, and how to use them in your Unity VR scenes. In this chapter, we will get you started in creating VR projects with Unity and work through some core concepts, including the following:
- Installing Unity
- Getting started with Unity
- Creating a simple diorama
- Using prefabs
- Creating and importing content
Technical requirements
To implement the projects and exercises in this chapter, you will need the following:
- A PC or Mac with Unity 2019.4 LTS or later, the XR Plugin for your device, and the XR Interaction Toolkit installed
You can access or clone the GitHub repository for this book (https://github.com/PacktPublishing/Unity-2020-Virtual-Reality-Projects-3rd-Edition-) to optionally use the assets and completed projects for this chapter as follows:
- The asset files for you to use in this chapter are located in UVRP3Files/Chapter-02-Files.zip.
- All completed projects in this book are in a single Unity project atUVRP3Projects.
- The completed assets and scenes for this chapter are in the UVRP3Projects/Assets/_UVRP3Assets/Chapter02/folder.
Installing Unity
To get started, you first need to install Unity on your development machine. All the projects in this book will be built using the Unity 3D game engine. Unity is a powerful, cross-platform 3D development environment with a user-friendly editor.
If you don't have Unity installed on your computer yet, we'll do that now! The full-featured Personal Edition is free and runs on both Windows and Mac (for details, see https://store.unity.com/#plans-individual). This book is written with Unity 2019.4 LTS and Unity 2020.x in mind.
Development system requirements
There are a few prerequisites that we need before we get started. You should have a Mac or Windows PC to develop on with enough resources to install and run Unity (a Linux version of Unity is also in the works). Details of the current system requirements for Unity can be found on its website (https://unity3d.com/unity/system-requirements), including the supported operating system...
Getting started with Unity
For you beginners out there, we're going to take this chapter nice and slow, with more hand-holding than you'll get later in this book. Even if you already know Unity and have developed your own games, it may be worthwhile to revisit the fundamental concepts, since the rules are sometimes different when designing for virtual reality.
Exploring the Unity Editor
The Unity Editor consists of multiple nonoverlapping windows, or panels, that may be subdivided into panes. The following is a screenshot of a project with the default window layout, annotated to identify some of the panels: (1) Hierarchy, (2) Scene, (3) Inspector, and (4) Project:
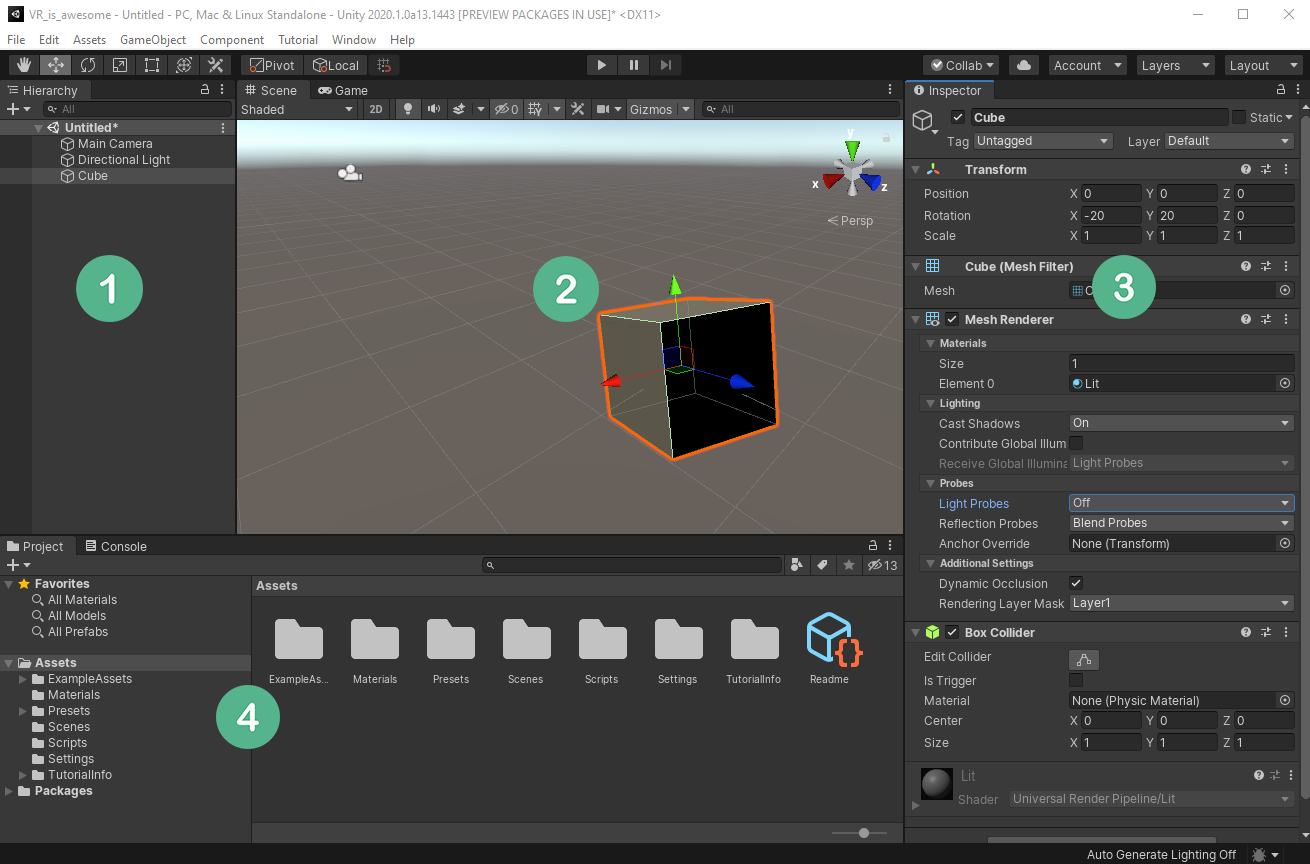
A Unity project consists of one or more scenes, containing a hierarchy of game objects. In the preceding screenshot, I have just created a new default empty scene (File | New Scene) and added a 3D cube (GameObject | 3D Object | Cube). The Hierarchywindow...
Creating a simple diorama
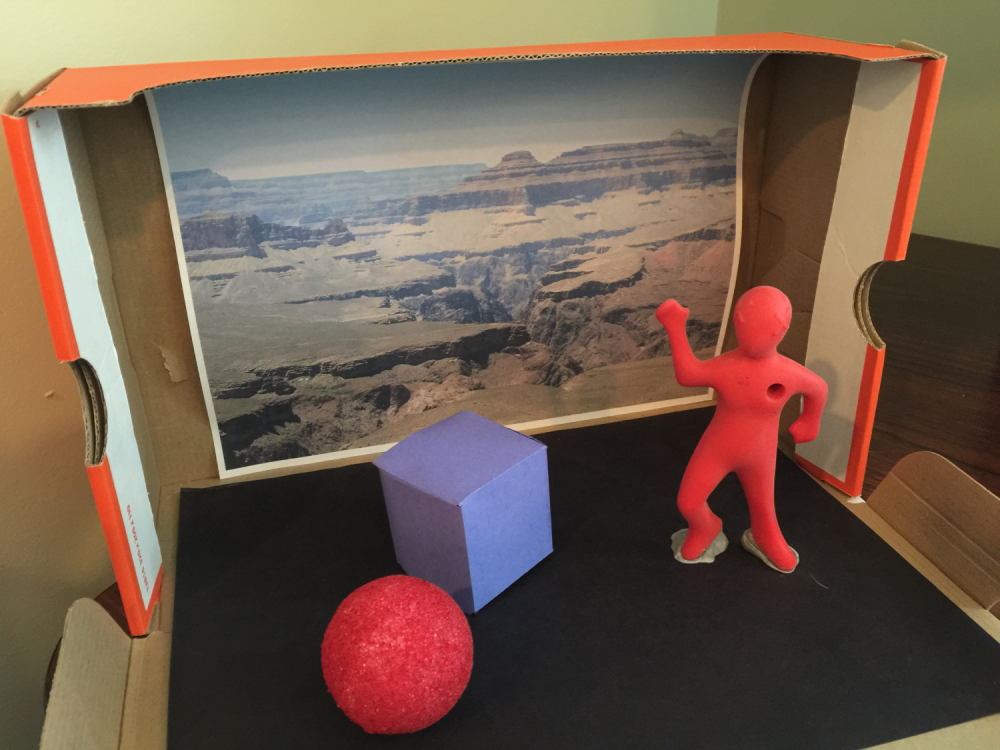
We will add a few objects to the scene, including a unit cube, a flat plane, a red ball, and a photographic backdrop. Here is a photograph of a physical mock-up of the diorama we will build in VR:
To begin, let's create a new scene and name it Diorama:
- If you haven't already, start a new scene in your opened project by selecting File | New Scene.
- Then select File | Save As....
- Open the Assets/Scenes/ folder.
- Set the file name to Diorama.
- Press Save.
Ok, now we'll add stuff.
Adding a cube and a plane
Let's add the first object to the scene, a unit-sized cube:
- Within theHierarchywindow,click on the+ (create) menu in the upper-left corner.
- Click on 3D Object | Cube. The same selection can also be found in the main menu bar's GameObject menu.
A default cube...
Using prefabs
Unity prefabs (short for prefabricated object) allow you to create, store, and modify GameObjects as reusable assets together with all its components, property values, and child GameObjects. Prefabs are easily created by dragging an object from the scene Hierarchy window into the Project window, or they may be imported as part of a Unity asset package. You can read more about prefabs in the Unity Manual at https://docs.unity3d.com/Manual/Prefabs.html.
Let's see how this works by creating a simple reusable model built from simple geometric elements.
Creating and instantiating a prefab
We're going to create a reusable character prefab named BobHead. First, let's build the little guy from a few primitive 3D objects, as follows:
- In the Hierarchy, create an empty GameObject named BobHead (by clicking on +| Create Empty; name it BobHead).
- Set its position to something like Position (3, 0.75, 1.25). ...
Importing content
So far, we have shown you how to use Unity and be productive in creating a scene, but with pretty simple content. Normally, Unity is not a 3D-modeling or asset-creation tool. Rather (as the name Unity suggests), it's a unified platform for pulling together content from a variety of sources to assemble and program a game or experience involving animation, physics, rendering effects, and so on. If you are a 3D artist, then you may know how to create content in other programs, or you can find a plethora of models on the web.
Creating 3D content for VR
Unity offers some basic geometric shapes, but when it comes to more complex models, you'll need to go beyond Unity. The Unity Asset Store and many other sites have tons of amazing models. Where do they come from? Will you run into problems while importing them into Unity?
For example, Blender is a free and open source 3D animation suite (http://www.blender.org/) that you can use to...
Summary
In this chapter, you built a simple diorama, became more acquainted with the Unity editor, and learned about importing content into your project. We started by installing Unity via Unity Hub, creating a new VR project with the Universal Render Pipeline, and installing additional packages using Package Manager.
Then you learned some basics of the Unity editor, such as how to navigate between its many windows and how to use the Scene editing gizmos, including grid and snap. We built a simple diorama scene with a ground plane, a crate (cube), a red ball, and a photo backdrop. You then created a BobHead prefab and learned about prefab editing, overrides, variants, and nesting, which we'll be seeing more of in upcoming chapters.
You also looked at the value of, and potential problems with, importing assets and Unity asset packages, including ones from the Asset Store. We learned about the issues with importing legacy assets that are not necessarily compatible...